So Friday night I was lucky enough to go to dinner with the girls where we shared an awesome chicken, cranberry, bacon and brie pizza and I had a fabulous mushroom risotto and then we went late night shopping at Kmart where I picked up some bargain underwear :) All in all a great Friday night!
Then yesterday OH and I took a road trip up to Burnie which is 3.5 hours drive away to look at a bike for me! It was a little 250 Virago and it was just perfect, when I sat on it, it just felt right, everything was comfortable and easy to reach so hopefully it is going to be a great learner bike for me :) My uncle is doing some negotiating and all things going to plan, it will be here waiting for me when we get back from Melbourne next Saturday! To be honest I'm terrified about riding on the road, but you never know if you don't give these things a go! Whilst we were up north we also went to the Imaginarium (like a science works) where they had a display on all things spy related which was pretty cool, to Penguin where we saw the small, medium and large Penguin statues scattered through the town, to Anvers Chocolate Factory which was very impressive, just a shame the factory wasn't operating because it's all glass windows so you can see everything being made, and for a scenic drive through the Great Lakes which was just beautiful and we even saw wild deer - when we got home we were exhausted but it was a great day :)
Today I went shopping, OH brought me a gorgeous winter coat a few weeks ago, but since then I have worn it like every single day so today I went in search of another one in an effort to preserve the first one, I was thinking red, I was thinking thick, I was thinking warm...but in my wildest dreams I could not have imagined this - OH says I remind him of Paddington Bear in it, but I just love the look of it and it's so cosy!
And then tonight we had a big bowl of potatoes, spring onion and chorizo topped with cheese and sour cream...oh it was soooooo good!! Just boil the some halved spuds while you cook the spring onion and chorizo in the fry pan. Add the boiled spuds to the fry pan and cook for a few mins or until they start to get that golden look about them and serve :)
Hope you all had a fantastic weekend :)
Em x
Sunday, May 29, 2011
Friday, May 27, 2011
Australia's Biggest Morning Tea
At work yesterday we hosted an Australia's Biggest Morning Tea event to raise money for the cancer council. The ladies at work did an amazing job, so good in fact we had enough food left over to do it all again today! We had a fantastic vartiety too, from fresh fruit and vegies, bruschetta, biscuits, cheese and dip, lemon cakes, ice cream cakes, coffee streudels and my contribution - Mini Sponge Cakes with Lemon Cream Filling and Strawberry Jam Blondies
For the Mini Sponge Cakes with Lemon Cream Filling, I used the Lemon Cream Filled Sponge from the Women's Weekly Card File. I thought the indivual cakes would be easier to serve up then the large cake and I loved the look of it on the card.
This was the finished product :)
And these were the Strawberry Jam Blondies - so soft and chewy and the jam sort of caramelizes on the top making them to die for!!
For these delicious creations you will need:
2 cups plain flour
2 tsp baking powder
250g butter
1 1/2 cups caster sugar
2 eggs
2 tsp vanilla extract
1/2 cup strawberry jam (or jam of your choice)
50g chocolate chips
Preheat oven to 180C and line a slice pan.
Melt butter and sugar together, either in the microwave or on the stove top. Quickly whisk eggs and vanilla into butter/sugar mixture.
Stir in flour, baking powder and chocolate chips.
Spread batter into prepared pan. Spoon jam over batter and then swirl into batter with a butter knife or skewer to create a marbled effect.
Bake for 25-30 minutes or until toothpick comes out clean from the center of pan. Cool before cutting into squares and serving.
So easy yet so very very good!!
Ohhh and at the hairdressers on Tuesday they straightened my hair....my thick, painful, frizzy mop is dead flat straight....I nearly proposed to my hairdresser on the spot...every day it amazes me even more, I even walked in the wind today and it remained straight and flawless....and it's so versatile, no longer am I confined to up and back or well up and back, I can wear it up or out or however the hell I want! So that confirms it, I'm investing in a good quality hair straightener! Here let me show you a picture :)
Happy Friday!!
Em x
Wednesday, May 25, 2011
Go Team Julie!!
Last night was Tuesday night dinner at Mum and Dads....when we got there as usual there was a flurry of activity in the kitchen and we were quickly ushered out before we could see what was going on.
It wasn't long however before we were greeted with delicious bubbling plates of tomato and cheesey goodness
Woohoooooooooo it was cannelloni! And not just ordinary cannelloni, but Cannelloni Stuffed with Ricotta, Carrot and Zucchini - see I even got you an inside shot it was that good!
And because I am always thinking of you, I got the recipe so you can make it for yourselves :)
6 fresh lasagne sheets (cut in half to make two smaller rectangles)
15g butter
2 zucchini grated
2 carrot grated
2 chicken stock cubes
250g grated cheese
250g light ricotta
1 red onion diced
2 x 400g tins of diced tomatoes with herbs
Melt the butter in a fry pan over medium heat. Add zucchini, carrot, onion and stock cubes and saute until soft. Remove from heat and stir through 1/2 cup grated cheese and all of the ricotta. Season with salt and pepper.
Pre-heat oven to 180C and grease a baking dish. On one of your lasagne sheet halves, place a good tablespoon of the mixture down one edge lenghtways and roll up to make a tube. Place in a baking tray and repeat with remaining mixture and sheets. It's ok if they sit snug in the tray.
Top with diced tomatoes and remaining cheese.
Bake for 15-20 mins or until cheese is melted and golden.
Everyone loved this, it was such a gorgeous filling, we thought we might try it in lasagne form next time!
So after dinner we all sat in the lounge room with our happy, content bellies...but there was something else brewing - we weren't allowed in the fridge, we weren't even allowed in the kitchen which could only mean one thing....dessert was coming!
Now I feel this is a good time to point out that Dad did ask me last night if we could call a truce at some stage because Mum and I use these Tuesday night dinners to whip out some impressive recipe we have been dying to try and it has ended up being a bit of a joke to see if we can out do each other each week....
This is when dessert came out....
Individual trifles...raspberries topped with jam roll topped with more raspberries, some raspberry jelly, double thick vanilla custard and a generous dollop of whipped cream...The jam rolls soaked up the juice from the raspberries and it sort of had that summer pudding look to it...and the taste...it was decadent, it was devine, it was delicious...and OH (who normally is a very slow eater) had inhaled his before everyone else had taken their second spoonful!
So this is me....waving my little white flag...I surrender Mum!!!
Happy Wednesday everyone!
Em x
Monday, May 23, 2011
The Weekend That Was.........
So what did I do this weekend?
I went for a walk in the sunshine on Saturday morning...
I gave money to a homeless man....
I browsed through some new stores and brought Pilsbury Dough Boy Lip Balm in Cinnamon Roll flavour...
I ate some of the most gorgeous fresh dates I have ever tasted...
I had a delicious bowl of apple and yoghurt for lunch...
Then I weeded the vegie patch :(
That was Saturday....but yesterday I did some groceries...
Went to the movies with OH to see Pirates of the Caribbean 4 in 3D (it was pretty good!)...
Then I went home to imerse myself in my kitchen :)
First things first, OH required a beverage so I used these ingredients to make him a Caramel and Whiskey Thickshake
I melted some cream (about 2 tbspns), brown sugar (about 3 tbspns) and whiskey (a good dash) together in the microwave to make a whiskey caramel sauce, then I combined that with about a litre of milk and a good scoop of vanilla ice cream in the blender. I couldn't get any photos of the finished product because OH demolished it before I had the chance! The sauce would also be spectacular just poured over vanilla ice cream or you could use it to make rice pudding or hell, eat it on it's own, it was that good!
So now that OH was content, I got on with my baking.
I made a Tuna, Vegie and Rice Bake for one of the ladies at work who has injured her elbow and can't cook much right now.
I also made her my Mum's Zucchini and Carrot Pancakes.
These are delicious and so easy.
In a bowl combine 1 grated zucchini, 1 grated carrot, 1 cup of grated cheese, 1 diced onion (cooked), 3 beaten eggs, 3/4 cup of water, 1 crumbled stock cube, 2 cups of plain flour and 1 cup of milk. Season with salt and pepper. Let the mix rest in the fridge for an hour or so. Using a buttered fry pan over medium heat or a pancake maker if you have one, cook the mix 1/4 cup at a time. These are delicious hot or cold, my Mum and Dad make them all the time and this is one of my favourite dishes from when I was younger :)
Then I made myself some Roasted Tomato and Lentil Soup for lunch at work this week
This is also our favourite winter dishes, it's so easy and so tasty!
To start with you will need roughly 1kg of tomatoes, halved lengthways. Place the tomatoes on a lined baking tray cut side up and season with salt and pepper. Bake at 200C (fan forced) for about 40-50 mins or until they are starting to look roasted. When the tomatoes are done, chuck them in the blender with 2 tspns crushed garlic and blend until smooth. Meanwhile place a cup of dried red lentils in a saucepan or microwave safe bowl and pour in about 3 cups of water. Cook for 10-15 mins until water is absorbed and lentils have pretty much turned to mush. Pour the tomato mixture into the lentil mixture and stir well to combine. This gave me 5 good size bowls for lunch, or normally if OH and I have it for dinner we add a cooked onion as well and it all disappears in a night! One thing I will say about this soup though is that if you do have the willpower to leave it overnight the flavours really develop so try and make it the day before serving :)
And once all that was done, I finally got started on our dinner! Pizza Pull Apart Bread
We did not intend to eat all of this last night....but we did, it was just too good...soft pillows of herbed dough filled with tomato paste, ham, tomatoes, capsicum, cheese and pineapple...oh it was good...it was so good....
This recipe was slightly more complicated then the others though so I better write it out in steps!
You need:
2 cups of self raising flour
30g butter
3/4 cup of milk
Fillings of your choice.
In a bowl use your fingers to rub the butter into the flour until the mixture resembles fine breadcrumbs. Make a well in the centre of the bowl and add the milk. Stir with a flat bladed knife until the mixture resembles a soft dough. You may need to add more milk.
Turn the mixture out onto a lightly floured surface and if you are making a savoury dough you can knead in 2 tspns crushed wet italian herbs.
Roll the dough out into a rectangle. Now here you can go for your life. You can spread it with vegemite and sprinkle with cheese then roll it up or you could do what I did and spread it with tomato paste then layer fresh cut tomatoes, ham, cheese, pineapple and capsicum in a strip down the middle. I did this so that all I had to do was bring the two lengthways edges together, fold up the ends, and I had a nice little parcel where my layers would show up nicely. Before you put it in the oven (@ 200C fan forced for 35 mins or until golden) cut deep slits every 3-4 cms but be careful not to cut all the way through, this makes it look pretty and makes it easier to pull apart!
Did I mention it was freakin' awesome?? Think dessert, think apples, brown sugar, cinnamon, think lunch boxes with chutney and cheese or vegemite and cheese...get creative people!!
So what did you do this weekend??
Em x
Friday, May 20, 2011
Caramel Mud Cupcakes
Last night I was getting ready to make a carrot cake for work today when I realised it's been some time since I've made cupcakes...far too long in fact.
So I ditched the carrot cake (sorry old faithful...maybe next week we will meet again) and I started looking through my favourite cupcake book for a recipe, I knew exactly what I wanted to make...Caramel Mud Cupcakes.
You need:
100g white chocolate
125g butter
2/3 cup brown sugar
1/4 cup golden syrup (due to the lack of golden syrup I used 1/4 cup of maple syrup and 2 tbspn honey instead)
2/3 cup milk
1 egg
1 cup plain flour
1/3 cup self raising flour
Combine the chocolate, butter, brown sugar, maple syrup, honey and milk in a bowl and microwave for 50 seconds. Give it a good stir and then microwave for a further 50 seconds or until melted. Stir the mixture until well combined and sit to cool for 15 mins.
Meanwhile pre-heat the oven to 150C (fan forced) and line a 12 hole muffin pan with cases (although I actually got 16 cupcakes out of this recipe).
Once the wet mix has had time to cool, sift in plain flour, self raising flour and egg. Beat well.
Fill cases about 3/4 full with mixture and bake for around 20-25 mins or until they bounce back when touched.
You could top these with a maple or vanilla flavoured frosting, but I think they will be delicious just the way they are.
Oh my god they were good! The maple syrup was the perfect addition but be warned they are more-ish....I ended up having two...OH claimed the rest for his lunches so I had to make the carrot cake for work after all!! The tops had a crunchy caramelised taste, the cakes themselves were dense but still soft and delicious...these are a definetly a keeper!!
Lol and here is a photo of OH's 'snack pack' for work today...two caramel mud cupcakes, a whiskey ball (I had no rum for rum balls!) and some jelly cheesecake slice :)
Happy Friday everyone!!
Em x
Thursday, May 19, 2011
Fruit Platter and Shoes!
I was looking for a nice dessert to cook for Mum and Dad when they came up last Tuesday night, I trawled through my new 'Puddings' cookbook for ages drooling over self saucing puddings, upside down cakes, mini cakes, tortes, mousses, souffles....but you know what, they just weren't doing it for me. I wanted something fresh, something relatively light, something delicious...and then I remembered I had a recipe for a dip to serve with fruit!
It is so easy :)
You just need:
100g philly
1/4 cup lemon juice
The juice from one orange
225g tin of pineapple pieces in juice
2 tbspns caster sugar
1/4 cup thickened cream
Combine all the ingredients in a blender and blend well. Pour into a bowl.
Refigerate overnight to set and serve with fresh fruit.
We served ours with fresh dates, apple, pineapple, banana and of course, some marshmallows! It would make a lovely summer breakfast / brunch or would be beautiful to serve up at a morning or afternoon tea.
OH also thought this dip might be nice with some mini marshmallows stirred through and then some gelatine added so it set like a mousse. The boy does have some good ideas sometimes!!
It's been awhile since I've had some shoes to show you! Well the other day I picked up a lay by...got these lil babies just in time for Fri the 13th! And I also picked up my wedding shoes too, but OH was lightning fast at hiding them so I don't wear them out before the big day...Damn him! Hasn't he heard of wearing them in!?
Em x
Wednesday, May 18, 2011
WW Card File Challenge #4 Corned Beef
Love can make you do things you normally wouldn't do.
When your loved one turns to you and asks you to cook them Corned Beef...what do you do? Do you deny them their favourite dish? Do you buck up and give it a shot? Do you look for the silver lining? Do you start plotting the long long long list of things they are going to have to do to make it up to you??
Well I think I began by saying something to the effect of Hell No and made my refusal very very clear. I used to be totally vegetarian, but due to iron issues, I try and eat a bit of meat, but I still have issues with big chunks of the stuff, it has to be in something or covered in something and it has to be in small pieces...roasts are not yet on my list of conquered meals.
But when I thought about it, I thought well he eats lentils and fake meat for me, the least I could do is cook him some Corned Beef and it was a good opportunity to knock off another one of my WW Card File Challenges (silver lining!).
It was actually pretty easy!
All I did was put a 1kg piece of corned beef into a pot with 1/4 cup brown sugar, 2 bay leaves, a tbspn of peppercorns and an onion cut in half. Bring it to the boil, turn the heat down to simmer and let it bubble away for around an hour (30-35 mins for every 500g of meat). And there you have it! No nasty fat and drippings and horrible roasty things to deal with, just one very happy OH!
He had it with some mustard (sounds odd to me, but he says it's the done thing....) and a whole heap of steamed vegies and I have got brownie points coming out of my ears!! Hmmm foot rub anyone???
Em x
Tuesday, May 17, 2011
The Great Choc Chip Cookie Debate
I am not perfect.
I am aware of this.
I have some small quirks...some might even say I'm slightly odd...
For example...
I like the top halves of muffins, not the bottom half....
But I prefer the bottom half of hot cross buns, not the tops....
I have my heater on even in summer and I will guarantee that when you're sweating and stripping off, I'm adding layers and complaining about the cold...
I have savoury food like brown rice and vegetables for breakfast...
After years and years of swimming lessons when I was younger, I still can't swim...
And if I bake something and it fails or doens't come out how I wanted, I have to make it again as soon as humanly possible until I get it right, I literally find it hard to sleep until this is done.
So yesterday when I wanted to make some chewy chocolate chip cookies to use up our leftover easter eggs (I know, I told you I was odd) I found a recipe on the net and went for it. The result was not the thin chewy cookies I was after, don't get me wrong, they are still delicious, but they are kinda cakey...chewy, but cakey.
Last night I tossed and turned. I got up this morning, I looked in the container, they hadn't changed...I poked at a few of them, I broke a piece off and tried it (at 7am mind you) but nope, still the same. It crossed my mind to have the day off so I could get started on the next batch straight away...but no that would be silly...wouldn't it? I did some research on the net and when I got home from work I dropped my bags and got straight into it.
And when they came out of the oven...ohhhh like little rays of sunshine breaking through the cold and miserable day...they were thin and golden and after 10-15 mins when they had cooled down, they were soft and chewy and perfect!
But don't let my opinion cloud your judgement...what do you think...soft cakey ones on the left, thin chewy goodness on the right...
Now some recipes...
The Soft Cakey Choc Chip Cookies
125g butter
1/2 cup brown sugar
1/4 cup caster sugar
2 large eggs
1 tspn vanilla extract
1.5 cups plain flour
1/2 tspn baking soda
250g chocolate chips
Beat the butter and sugars until creamy. Add in eggs one at a time and beat until well combined. Add vanilla.
Sift in flour and baking soda. Mix until well combined. Stir in chocolate chips.
Roll tablespoons of the mixture into balls and place on a greased baking tray. Flatten slightly with the back of a fork. You will get about 7-8 per tray. I think I ended up with 21 all up. Bake for 10-12 mins or until just golden.
And The Thin and Chewy Choc Chip Cookies
125g butter
1 cup brown sugar
1 cup plain flour
1/2 cup dessicated coconut
1/2 tspn bicarb soda
1/4 cup honey
2 tbspn maple syrup
200g choc chips
Melt the butter, honey, maple syrup and brown sugar together.
Stir in flour, bicarb, coconut and 100g of the chocolate chips (they should melt through your mixture).
Let the mixture cool for 15 mins in the fridge. Stir through remaining choc chips.
Roll tbspns of the mixture into balls and place on a greased baking tray. Flatten with the back of a fork. These ones will spread so only 6 per tray. I got 18 out of this recipe.
Bake at 150C for 10 mins, they will be very soft when you get out of the oven, but they will firm up once you get them out.
But let's be honest, any choc chip cookie is a good choc chip cookie! I just prefer mine thin and chewy, how do you like yours?
Happy Baking!
Em x
Sunday, May 15, 2011
WW Card File Challenge #2 and #3 - Slices!!
Ok so blogger and I, not exactly on speaking terms at the moment. I had written a huge post on all the different types of rice pudding OH and I have been trying this week, there was vanilla, decadent chocolate, vanilla with raspberry sauce, strawberry, strawberry over a base of gooey chocolate cake...it was good, it was mind blowing and mout watering and when I went to check on it on Saturday when blogger decided to speak to me again, it was gone. Gone I say. I could have cried. But instead I turned the computer off and took myself out to lunch with a friend to forget about it. It is now Saturday night and I'm here, but I'm still giving blogger the silent treatment. But just because blogger and I aren't speaking doesn't mean you should all miss out too coz I made some damn good slices this week as part of my Women's Weekly Card File Challenge and I want to share them with you :)
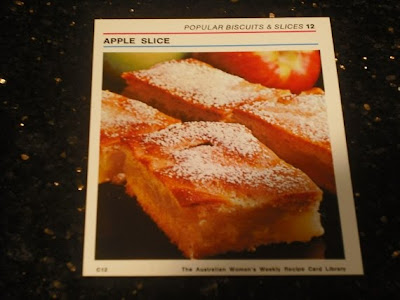
Look good don't they? The thing I love about these card file recipes are that they are old fashioned classics and not only that, they are easy too!
First off we have the Apple Slice (although I must confess I threw some peaches in there too!)
You will need:
185g butter
3/4 cup caster sugar
2 eggs
1.5 cups plain flour
1 tspn cinnamon
1 tspn allspice
400g pie apple
800g peach halves
(Combine the apple and peach so they are nearly smooth, I used my potato masher :) )
2 tbspns white sugar
Beat the butter and sugar until creamy. Add eggs one at a time, beating well after each addition. Stir in the sifted flour and spices.
Spread half the mixture over the bottom of a lined slice tin. Spread evenly with the combined apple and peaches.
Spread remaining mixture over the top. The mixture will be hard to spread so just dot it over the top and they will connect during cooking.
Sprinkle with remaining sugar and bake at 180C for around 50 mins or until golden.
And this one proved to be so popular with the ladies at work, it was all gone before I got to sit the plate on the counter! But what was even better then that was hearing everyone talking about how it reminded them of baking with their Mothers or Grandmothers :)
All you need for the Raspberry Coconut Slice is:
90g butter
1/4 cup caster sugar
1 egg
3/4 cup plain flour
2 tbspn cornflour
1/2 cup raspberry jam
2 tbspns butter
2 tbspns caster sugar
1/2 tspn vanilla
1 egg
1.5 cups coconut
2 tbspns self raising flour
Beat the butter and sugar until creamy. Agg the egg and beat well. Stir in the flour and cornflour and mix well.
Spread the mixture into a lined slice tin and pour the raspberry jam over.
Make your topping by creaming the butter, sugar and vanilla. Add the egg, flour and coconut and beat well.
Spread the topping over the jam and bake at 180C for 25 mins.
Enjoy!! :)
And last but certainly not least....
My darling Mother made this for dessert last night....oh yes, if we thought the bowls of her famous pumpkin soup served with toasted turkish pide (which, by the way, was filled with cheese and balsamic!) were awesome...well we were right...but this dessert was mighty impressive!! Think chocolate mousse layered with strawberry champagne sauce, flake chocolate and whipped cream, layers upon layers of goodness, topped with a shard of caramel mousse filled chocolate?? Hello heaven!!
Apologies for the small photo but I only had my phone with me!!
Hope you all had a fantastic weekend!! I have missed you!!
Em x
Labels:
Baking,
mum,
recipe,
slice,
Women's Weekly Challenge
Saturday, May 14, 2011
Coconut and Sweet Chilli Beef
Wow....just wow.
Our house smells tropical, like if I closed my eyes I could pretty much believe we are lazing on a beach in an open air hut sipping on fruity cocktails and eating this beef, it is that good! And do you know what made it even better? OH cooked it while I sat on the couch reading a magazine :)
You need:
600g beef (diced)
200ml light coconut milk
1 tbspn brown sugar
1.5 tbspns sweet chilli sauce
1/4 tspn ground cinnamon
1 tspn crushed garlic
1 tbspn plain flour
Rice / Steam Vegies to serve
Combine the coconut milk, brown sugar, sweet chilli sauce, cinnamon and garlic in a bowl. Add the beef and mix well. If possible leave it in the fridge for 2-3 hours.
Once the meat is marinated, cook in a fry pan over medium heat for around 10-12 mins or until cooked through. Add in the plain flour during cooking to thicken the sauce.
Once the meat is cooked you can serve it over some steamed rice, with some vegies, or like me, with your steamed rice and vegies mixed through!
It is so delicious!!
Em x
Wednesday, May 11, 2011
Super Easy Tuna Chow Mein
Ok so I forgot to take a photo....
It may be because tuna chow mein is one of my favourite dishes....
It may be because I was starving hungry....
It may be because I was slightly excited about passing my motorcycle learners only a few hours earlier...
Whatever the reason, I still forgot and I apologise.
Let me make it up to you by giving you the recipe to create this delicious dish for yourself :)
You will need:
1/2 cabbage diced
2 small tins of light tuna
1 tin of baby corn cuts
1 red capsicum diced
1 onion diced
1 carrot diced
2 tspns curry powder
225g pineapple pieces drained
1 pkt oriental flavoured noodles
Brown your onion in a fry pan over medium heat. Add curry powder and cook for 2-3 mins or until fragrant.
Add in cabbage, corn cuts, capsicum, carrot, broken up noodle cake and flavouring sachet and 2-3 cups of water. Place the lid on the fry pan and allow to simmer for 20 mins stirring occasionally.
After 20 mins add in the tuna and pineapple and mix in well.
Allow to simmer for another 10-15 mins or until the cabbage is cooked and soft, the majority of the water should have been absorbed.
OH and I get two large bowls and one small bowl for the next days lunch out of this recipe :)
It is a great hearty winter dish and it's low in cals!! It's also my Mum's recipe and one of my favourite dishes from when I was little so I hope you all enjoy it as much as I do!
Em x
Monday, May 9, 2011
Fresh Cinnamon Bread for Breakfast Anyone??
Ok so I know this recipe is on every food blog you read lately but that is because a) it's delicious and b) everyone wants to see if they can actually pull it off.
I have to admit I did want to see if I could pull it off, but I also thought it would be the perfect breakfast to dish up to Mum on Mothers Day but I had a dilema....everyone seemed to be saying that you could let it rise overnight at the first rise...but that would mean in the morning I would have to roll it out, spread with butter and sugar, cut it up, arrange in the pan, let it rise for 30 mins, bake for 40 mins and then sit for 20 mins before I dished it up...and subsequently get out of bed at like 5am....well not this lil black duck I tell you!! So I fiddled and played and this is my version of the Cinnamon Pull Apart Bread that allows you to still be snoozing in bed an hour before it hits the table!
Overnight Cinnamon Pull Apart Bread
For the Dough:
2 3/4 cups plus 2 tablespoons plain flour
1/4 cup caster sugar
7g yeast (about 2 1/4 tspns)
1/2 teaspoon salt
60g butter
1/3 cup milk
1/4 cup water
2 large eggs, at room temperature
1 teaspoon pure vanilla extract
For the Filling:
1 cup caster sugar
2 teaspoons ground cinnamon
60g butter
In a large mixing bowl combine 2 cups flour, sugar, yeast, and salt. Set aside.
In a small saucepan or in the microwave melt together milk and butter until butter has just melted. Remove from the heat or microwave and add water and vanilla extract. Let mixture stand for a minute or two, or until the mixture registers 115 to 125 degrees F (I used my candy thermometer for this).
Pour the milk mixture into the dry ingredients and mix with a spatula or with the dough hooks of your electric mixer. Add the eggs and beat until ingredients are just combined. It will seem like the dough is not very 'doughy' at this stage but stick with it and keep stirring. Add the remaining 3/4 cup of flour and beat for about 2 minutes. Don't panic....the mixture will be sticky. You have done well grasshopper.
Place the dough in a large, greased bowl (I just left mine in the mixer bowl...) and cover with plastic wrap and / or a clean kitchen towel. Place in a warm spot and allow to rest until doubled in size, about 1 hour.
While the dough rises, combine the filling ingredients in a jug or small saucepan and heat until melted. I microwaved mine for about a minute so that the butter was melted and just gave it a good stir. Set aside to cool.
Grease a 9x5x3-inch loaf pan and set aside.
Once the hour is up, deflate the risen dough and knead about 2 tablespoons of flour into it. On a lightly floured surface, use a rolling pin to roll the dough out. The dough should be 12-inches tall and about 20-inches long but who has time to get the ruler out when they are baking...so just roll it out into the biggest rectangle you can.
Use a pastry brush or the back of a spoon to spread the melted butter and sugar mix over the dough. Try and cover the whole surface.
Slice the dough vertically into six equal-sized strips and stack them on top of one another. It will get messy but you will be fine, carry on. Slice the stack into six equal slices once again. Layer the dough squares vertically in the loaf pan kinda like your assembling a choc ripple cake. Place some cling wrap loosely over the pan and place in the fridge. Go to bed and rest...you've earnt it.
Now you need to get up about an hour before you want to put your bread in the oven and take it out of the fridge so it can come back to room temperature. Whilst your up you may as well put the oven on to 180C as well :) Make yourself a cup of tea and go back to bed for an hour.
Tick tock....ok so your hour has passed, sit the loaf tin in a baking dish (incase your sugar mix overflows...which it may very well do) and bake for 35-40 mins. It should be a deep golden colour when done. A nice, dark, golden brown will ensure that the center is cooked as well.
Remove from the oven and allow to rest for 20 to 30 minutes. Run a hot knife around the edges of the pan to loosen the bread and tip out onto a clean board or tray. Place a cake stand or platter on top of the upside down loaf, and carefully flip so it’s right side up. Serve warm with coffee or tea and enjoy!
This bread is just a dream come true, we were all raving about it at brekkie, the bottom is all gooey and sticky, the bread itself is light and fluffy and swirled with cinnamon goodness and it just pulls apart so easy!
I know the recipe looks long and I know some people (like me) are scared of yeast, but honestly, try it, it will change your life or at the very least brighten your morning plus your house will smell of cinnamoney goodness for days and really isn't that reason enough?!
Oh and before I go, here are some shots of OH and I and Mum and Dad at Pancakes By The Pond for Mothers Day lunch :)
Em x
Sunday, May 8, 2011
Happy Mothers Day!
So we all have Mothers yes?
We all love them to pieces and want to spoil them yes?
Stuck for ideas on the best way to spoil your Mum tomorrow?
How about these Monte Carlo Biscuits?
Look impressive don't they?
Here's how it's done :)
You need:
125g butter
1/3 cup brown sugar
1 tspn vanilla
1 egg
3/4 cup of self raising flour
1/2 cup plain flour
1/3 cup coconut
1/2 cup strawberry jam
And for the buttercream you will need:
60g butter
3/4 cup icing sugar
1/2 tspn vanilla essence
Preheat the oven to 160C fan forced and line 3 trays with baking paper.
Beat together the butter, sugar and vanilla essence until light and fluffy. Add egg and beat until combined.
Sift flours over the butter mixture and beat well. Stir in coconut.
Roll heaped teaspoons of mixture into balls and place on trays 3cms apart. Using a fork lightly flatten each ball to 1cm thick.
Bake for 12-15 mins or until lightly golden. Stand on trays to cool for 10-15 mins.
While the biscuits are cooling you can make the buttercream - Beat butter, sugar and vanilla until light and fluffy.
Spread half of the biscuits with the butter cream and spread the other half with the jam. Sandwich together and serve :)
I made a big batch of these last night and will be giving them to all the Mum's at the family lunch today.
So I hope all you Mum's out there are thoroughly spoilt today, brekkie in bed, a nice sleep in, champagne in the bath and at the very least, a plate of home made Monte Carlo biscuits :)
And to my Mum.... we may have our differences, but you are always there for me when I need you, you listen to my ramblings, you go along with my phases, you look after me, you made me who I am today and I love you dearly xx
HAPPY MOTHERS DAY!!
Em xx
Saturday, May 7, 2011
Pineapple Self Saucing Pudding
It looks good doesn't it.
Granted I should have got a photo before OH attached it with cream and ice cream but you know it looks good, you know that pudding is hot and golden and delicious and you know that the first spoonful you have will be filled with light fluffy pudding, thick pineapple sauce and a hint of cream and it's just going to make you all fuzzy inside :)
So this is how it's done!
Pineapple Self Saucing Pudding
1/2 cup dessicated coconut
1 tspn lemon juice
1/2 cup caster sugar
3 eggs (seperated)
2 tbspns self raising flour
1 large can of pineapple pieces drained
1 cup milk
60g butter
In the bowl of an electric mixer combine the butter, sugar, lemon juice and egg yolks. Beat until thick and creamy. Slowly add in the flour, milk and coconut. Beat until combined. Stir in the pineapple.
Beat the egg whites until stiff peaks form and fold into pineapple mixture.
Pour into an oven proof dish and bake at 160C for 40 mins or until firm.
Dust with icing sugar if desired and serve with cream.
I have never made a cake / pudding that has so little flour in it and relied pretty much on the egg whites but oh my goodness, it was so light and fluffy. The pineapple sauce was thick and delicious and the addition of coconut to the mix made this pudding a true tropical delight!
Hope you're all enjoying your weekend!
Em x
Thursday, May 5, 2011
Women's Weekly Recipe Card File Challenge!
A few weeks ago my Mum was clearing out her recipe books and offered me her Women's Weekly Card File. I can't tell you how happy I was, I remember playing with this when I was little, pulling out all the cards, looking at the pictures and putting them all back in the wrong order! My Mum has had this card file since 1973 and she collected all the cards in it during some promotion that Women's Weekly held but only ever made the Pumpkin Scone recipe from it (and I have to say they are damn good pumpkin scones) so I think she was happy to pass it onto someone who was a) very excited about it and b) would put it to good use. So when Mum and Dad came for tea on Tuesday night I had to cook something from the card file!
Italian Rice Slice
Base - 30g butter
1 onion diced
1 cup brown rice
1 egg lightly beaten
3 cups water
Combine the rice and water and cook in the microwave or on the stove for 30-40 mins (or until soft)
Melt the butter in a frypan over medium heat and cook onion until soft and golden.
Once rice is cooked, stir through onion and egg.
Press into the base of 4 individual ramekins or one big baking dish.
Filling - 60g butter
1 red and 1 green capsicum diced
200g sliced button mushrooms
1 onion diced
3 tomatoes finely chopped
1 tspn crushed wet basil
In the fry pan you just used for the base, melt butter and add onion.
Cook until golden and soft. Add remaining vegetables and basil. Cook for around 10 mins or until vegetables are tender.
Arrange vegetables over your rice base.
Topping - 40g butter
1/4 cup plain flour
1 cup milk
1 egg lightly beaten
60g light shredded pizza cheese
.5 tspn crushed wet basil
Melt butter in a saucepan. Remove pan from heat and add flour. Stir until smooth. Return to heat, stirring constantly for 2 mins.
Remove from heat and gradually add milk. Stir until smooth. Return to heat, stirring until mixture boils and thickens. Remove from heat and add beaten egg, cheese and basil. Stir until cheese melts (this will require some muscle power!).
Pour mixture over vegetables and bake in oven at 160C for around 40 mins or until topping is golden and set.
Ohhhhhhhhhhh my god, how awesome was this! I know it seems a bit fiddly with having to prepare 3 different layers but honestly, try it, you won't regret it! The cheese sauce was devine, the vegetables had so much flavour and the brown rice base just pulled it altogether beautifully. Definetly a keeper!
There are so many fantastic recipes in there, Mum and Dad have set me a challenge to try and cook them all so I'm going to aim for at least one dish a week and see how we go!
Em x
Tuesday, May 3, 2011
Chunky Chocolate Ginger Slice
Do you ever have those days where you just need to remove yourself from everything?
Of course you do.
Everyone does.
And yesterday I had one of those days. Normally when I get home from work I put my bags in my room, make my lunch for the next day, go for a walk or put my pjs on, do some chores and get dinner on the go. But not last night. Last night I got home from work, left my bags at the front door and headed for the kitchen. I didn't bother getting changed, I didn't bother doing anything I would normally do, I just wanted to bake. And bake I did. I was in that kitchen for 3 hours straight and the time flew. I didn't feel rushed, I wasn't flustered, it was just me and my cooking and I was so peaceful.
One of the goodies that came out of the kitchen last night was a Chunky Chocolate Ginger Slice
I doubled the recipe and made half in cupcake form to take to work and half as a slice (easy for OH and my Dad to take to work).
The end result was a gorgeous dense ginger cake and whilst initially you do get a bit of a chocolate hit they do leave you with that beautiful gingerbread taste in your mouth. I think maybe next time I would go with slightly less chocolate and more ginger though, although that could just be because at the moment I have a cold and my taste buds have desserted me...
For this delicious slice you will need:
3/4 cup brown sugar
1/3 cup golden syrup
100g butter
2 eggs lightly beaten
1/3 cup milk
100g white choc bits
100g dark choc bits
1 cup self raising flour
1 cup plain flour
2 tspns ground ginger
Pre heat oven to 160C fan forced and grease and line a slice tin.
Combine butter, brown sugar and golden syrup in a jug and microwave for 30-40 seconds until all ingredients are melted together. Set aside to cool.
In a bowl combine choc bits, flours and ginger.
Once butter mix has cooled, add eggs and milk and stir to combine. Pour over dry mix and stir well.
Pour the mixture into prepared slice tin and bake for 25 mins.
Now don't you feel relaxed? Like the weight of the world has been lifted off your shoulders? Don't you love just losing yourself in your cooking? I know I do.
Now sit down with a cup of tea and a piece of chunky chocolate ginger slice fresh out of the oven (coz you just know the chocolate bits will be all melty and gooey) and put your feet up. Go on. You deserve it!
Em x
Sunday, May 1, 2011
Bridal Knees Up!
I have always worked with men, men who swear, men who drink beer, men who don't organise social gatherings and even if they did they wouldn't invite me incase the presence of a girl upset one of their wives....so last November when I began my new job and it was in an office full of women I was a little unsure of what to expect....would they be catty? bitchy? would it be like school with the popular girls and the not so popular? do we go out for lunches and coffees and discuss our shoe collections? I really had no idea and I must say I have been more then pleasantly suprised. It has been like walking into a little family, being the youngest it is almost like having a group of extra mothers. They have accepted me with open arms and made me feel more welcome then I did after 4 years in my previous job. So last week when I got invited to a joint hen's night for two of the ladies I was a bit dubious, but then I looked at all the smiling excited ladies around me and I was sold...and a touch excited too!
The invite for the hen's night called it a Bridal Knees Up and stated that each guest was to bring either nibbles or a dessert, a torch, some small change, warm clothes, something from your own wedding and your champagne. Apparently start and finish was at the same location but sometime in between we would be jumping on a bus and terrorising the city. It sounded fantastic! Two of the ladies at work organise something similar whenever one of the girl's gets married - they even said they would do one for me before our January nuptuals!!
Anyway, last night I rugged up in my warm clothes, put new batteries in my torch, checked my wallet wasn't empty and raided the fridge for something alcoholic and set off on my merry way for my first Bridal Knees Up!
When we arrived, those who brought desserts were allowed to leave them inside and everyone else crammed onto the bus to start our adventure. It was pitch black dark, but everyone was in good spirits with champagne corks being popped left, right and centre. We set off on our merry way and the bus just drove round and round and round until we were all totally disorientated, the bus was full of whispers about where we were going and what we were doing, mixed with random singing and laughter...and then we saw it...the bus slowed down and pulled into a paddock and there in the middle of the paddock was a huge bonfire surrounded by tables and chairs. This was our nibbles stop! We stayed here for awhile, eating our way through biscuits, cheeses, dips and pastries and drinking our way through numerous bottles of champage, cameras were flashing, ladies were laughing and the fire was roaring, it was fabulous! But all too soon we were back on the bus and off to our next destination. As we headed over the river and away from town there were whispers of restaurants and secret locations...and when the bus pulled up at a dark desserted oval we weren't entirely sure what was going on! This was a games stop and we had a three legged relay race, it was hilarious, each of the bride's picked a team, but to be honest no one was taking it too seriously - my team may have cheated slightly - but we still lost!! Back on the bus for more singing and dancing in the aisles while we waited for our next destination...by this stage we were all starving so desperately hoping it was the dinner stop! Eventually we pulled into the Taroona Lounge Bar (known for its wood fired pizzas!) and I have to say there was nearly a stampede getting off the bus and in the door! Seeing as our final stop was dessert, one of the ladies from work and I decided to share a bowl of wedges and a bowl of roast vegies....OMG the vegies were heaven, mushies, broccoli, capsicum, zucchini, tomato, potato, pumpkin and sweet potato all cooked to perfection! As quickly as we arrived we were off again, this time it was back to where we started for the final (and most important) stop - DESSERT!! My god, the table was a sight to behold, there was a sponge with a layer of cream so thick I could barely take my eyes off it, cheesecakes, caramel cups profiteroles, a devine version of Donna Hay's chocolate squishy cake and my lil dessert cups! When we were asked to bring a dessert I started thinking about what would be required...something easy to eat, something light, something delicious and something that would suit all tastes...and this is what I came up with:
Strawberry Cheesecake Pots and Brownie and Chocolate Mousse Pots
Aren't they adorable! And they went really well, out of all the desserts these went first, I was so proud! And they were so easy!
For the Strawberry Cheesecake Pots - Combine 500g extra light philly with 200ml thickened cream, 1 small tub of vanilla yoghurt and 1/2 cup of strawberry jam. Spoon into serving glasses and top with crushed up butternut snap biscuits and a single raspberry.
For the Brownie and Chocolate Mousse Pots - Make up a packet brownie and packet chocolate mousse mix as per directions - or you can use your favourite recipes. Break up the cooked brownies and divide between serving glasses. Top with chocolate mousse and 2-3 raspberries.
Easy, simple, light, delicious and transportable!!
I had such a great night at the Bridal Knees Up - it's just such a good idea, like a more civilised version of the traditional hen's night, I can't wait for my own now!
And as for today, OH has been at work all day - 13 hours and counting so far - so I had a sleep in, laid in bed with a white hot chocolate (new favourite hot drink), got up and did some house work, went out and dropped some stuff off at The Salvos, had a gorgeous salad for lunch with OH, did the groceries, made tomorrow night's dinner and some risotto so I can make risotto balls for OH's and now I'm full on slothed out on the couch awaiting the boy's arrival so we can have bikkies and cheese for tea!
Hope you all had a fantastic weekend :)
Em x
Subscribe to:
Posts (Atom)