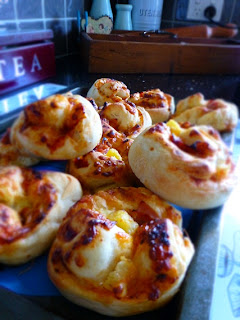
Pizza Scrolls are unfortunately one of the foods Mr B loves in his lunch boxes.
I say unfortunately because I hate making them.
My Dad always said to me that hate is a strong word so let me re-phrase that.... I 'strongly dislike' making them.
Whenever I make them my kitchen somehow ends up covered floor to ceiling in tomato paste and cheese and sticky dough and flour....oh my goodness the flour - it just gets everywhere!
So I tend to just pretend they don't exist for as long as humanly possible, but eventually Mr B will request them and I can't put it off any longer.
After the success of making our Hot Cross Buns in the bread maker this year, I thought I would try making the dough for the scrolls in there and it was a massive win for the home team. The dough resulted in a light, fluffy scroll and only 10% of the kitchen is covered in flour compared to the usual 95%, plus Mr B tells me they are much nicer than the ones I usually make....I chose to just take that as a compliment.
Bread Maker Pizza Scrolls
For the dough you will need:
3 1/3 cups plain flour
2 tspns dried yeast
1 tspn salt
1.5 cups lukewarm water
For the topping you will need:
2 tbspns tomato paste
1 tbspn Gourmet Garden Italian Herbs
1 tbspn crushed garlic
80g shaved ham
1/2-3/4 cup grated cheese
1 sml tin of pineapple pieces drained
*This is just the toppings that I use, you can use whatever you like, 1/2 cup diced capsicum, salami etc.....
To make the dough, place the water, yeast, salt and flour in the bowl of your breadmaker in that order. Select the 'dough' cycle and let it do it's thing. Mine took about 90 mins.
Once the cycle is finished, punch the dough down to knock the air out of it. Place the dough on a lightly floured clean surface and roll it out to a large rectangle - roughly 30cm x 40cm.
Leaving a 1cm gap from the edges on your horizontal sides, spread the tomato paste over the dough. Top with the garlic and herbs. Scatter the ham and pineapple over the base and top with cheese.
Starting from the horizontal edge closest to you, carefully roll the dough up into a scroll shape. Use a sharp knife to cut into roughly 16 pieces. Place each piece, cut-side up, onto a lined baking tray leaving about 1cm inbetween.
Set aside to rise in a warm place for 30 mins. Meanwhile pre-heat your oven to 200C.
Place the scrolls in the oven and bake for 20-25 mins or until golden brown.
These make great lunch box treats, but you should definitely try one fresh from the oven too!
I would like to take a second here to say how gorgeous is the little plate in this picture?? Mum and Dad have been having a massive clean out at their place and a few weeks ago I was lucky enough to have a look through the boxes of goodies destined for the market. Needless to say Mr B and I came home with a car load of treasures including an antique lantern, an old cutlery box for our kitchen bench and a STACK of beautiful antique plates. This one and the one I used in the Leftover Easter Egg Blondies post are my absolute favourite.
It makes me feel kind of nostalgic having these items in my home that I remember being in Mum and Dad's home when I grew up. It also makes me feel very grown up all of a sudden. Antiques were one thing I always swore black and blue would never be in my house. How things change....
Mrs B xx


I would like to thank you for the efforts you have made in writing this article. I am hoping the same best work from you in the future as well. In fact your creative writing abilities has inspired me to start my own BlogEngine blog now. Really the blogging is spreading its wings rapidly. Your write up is a fine example of it.
ReplyDeletebuy Best Bread Machine
Thanks for this recipe, I just made them and they turned out perfect!
ReplyDeleteThank you so much 😊 my fussy 3year old loves the cheese and Vegemite version!
Delete