Showing posts with label recipe. Show all posts

Wednesday, May 8, 2013

Little Chocolate Cars

I have said it before and I find myself  in a position to say it again. Baking is good for the soul.

Last weekend I was feeling a bit flat and needed a distraction. Normally when this happens I would either go for a walk or bury myself in the kitchen and given it was a cold and rainy day I decided a walk would probably do more damage then good.

So there I am standing in front of the cupboard scouring its contents for inspiration and tapping my foot impatiently when I spot 2 king size Milky Ways peaking out at me from underneath a pile of marshmallows and chocolate melts. You see for my Dad's birthday earlier in the year I originally wanted to make him a race track cake with little cars on it, but then my Mum came up with the idea of making the Iced Vovo Tart and well the rest is history!

These little cars were so much fun to make and bring a big smile to my face every time I see them - they are just so adorable! Mr B has been taking them to work in his lunch box and everyone that's seen them has asked him for one! It's amazing how even grown men can be swayed by tiny little chocolate cars....

I even made one into a little trike.....Mr B and my Dad ended up battling it out in a card game to see who would be declared ultimate champion and get to take that one!


You will need:

2 large Milky Way Bars or Mars Bars sliced into thirds
Tiny Teddies
Smarties
1/4 cup milk chocolate, melted

Start by taking your milky way and use the melted chocolate to stick your four smartie 'wheels' on.

Use the melted chocolate to stick on your smartie 'steering wheel' and your tiny teddy 'driver.

Super easy and super cute!! The hardest part is not eating all of your 'car parts' and finding 4 matching coloured 'wheels!'


And here are the cupcakes I whipped up later that same day. I love the look of these and they were also really easy.

Take a basic vanilla cupcake and cut the top off of it using a sharp knife.

Use a small cookie cutter to cut a shape out of the cupcake top. Keep both the piece you cut out and the piece you cut it out of.

Frost your cupcakes with buttercream (I divided mine up into portions and dyed each one a different colour.)

Top your cupcakes with either the cut-out shape or the outline piece.

Enjoy!!

And remember, you're never too old to make, eat or race little chocolate cars!

Mrs B xx

Wednesday, April 3, 2013

Tropical Fruit Salad Butter Cake

This recipe has been in the back of my mind for awhile now and a few weeks ago I finally had the opportunity to bring it back to life. I was so pleased when it tasted exactly how I remembered it because my Mum and I used to make this cake all the time when I was younger. Even though I haven't made it or eaten it in well over 10 years, it's amazing how one bite can bring a world of memories flooding back and I knew I had to make it again so that my Mum and Dad and Mr B could experience it as well.


This is a really simple cake, but it is so moist and light and bursting with fruit that you can serve it hot or cold, for dessert or afternoon tea, but always with a generous dollop of cream.


Tropical Fruit Salad Butter Cake

You will need:

1 pkt of Butter Cake Mix
425g tin of super well drained tropical fruit salad mix (the one I use is a mix of pineapple, peach, banana and passionfruit, but I pick the seeds out!)

Pre-heat oven to 180C and grease your desired size cake tin. If I'm making it for dessert I make it in one large round cake tin or if I'm making it for afternoon tea I make it as two cakes so I can sandwich them together with whipped cream.

Prepare the butter cake mix as per the packet directions.

Stir through the drained fruit salad.

Pour the mixture into your cake tin and bake for 40-50 mins for one large cake or 30-40 mins for 2 smaller ones. The cake is done when golden in colour and bounces back when touched.

Enjoy!

Mrs B xx

Thursday, March 21, 2013

Moroccan Lamb Cigars

Let me tell you what I'm doing right now.....

Mr B and I arrived home from work 2 hours ago and my first thought was 'hooray we are home early and it's a lovely night. Maybe we can sit outside under the pergola with a Baileys and just relax together.'

Fast forward to now and I'm hiding up in our bedroom with the laptop trying not to make any noise while Mr B sits in the lounge room at the other end of the house snoring his head off.

Isn't married life wonderful?!

That is what happens when you 'just sit down for a minute' apparently! But that's ok because in roughly half an hour I will get bored and start loudly closing drawers, doors and anything else that makes noise until he wakes up.....now I know that doesn't sound like I'm going to win any wife of the year awards but honestly, it's for his own good! He won't sleep tonight if he naps too long this afternoon and then he will be REALLY tired and cranky tomorrow....plus I want my Baileys.....

Anyway....y>ou may remember a little while ago I told you about our Moroccan Feast which involved Vegetarian Cigars with Harissa Yoghurt, Spicy Red Cous Cous and Carrots with Minted Fetta? Well seeing as it was such a hit, I thought I would make it again, but this time with Lamb Cigars for Mr B and some salad instead of the cous cous to lighten it up a little.


Moroccan Lamb Cigars with Harissa Yoghurt

1 onion, finely diced
1 tbspn olive oil
1.5 tspn crushed garlic
500g lamb mince
1 tspn cumin
1 tspn cinnamon
1 tspn ginger
1 tspn finely grated lemon rind
1 tbspn lemon juice
10 sheets fillo pastry
1 tbspn butter (melted)
200g greek yoghurt
1 tspn harissa paste
1 tspn lemon juice

In a large frying pan over medium heat, add 1 tbspn olive oil. onion and garlic. Cook for 2-3 mins or until onion softens.

Add the lamb, cumin, cinnamon and ginger. Cook, sitrring frequently, until mince is browned.

Stir in the lemon rind and juice and season to taste. Remove from the heat and allow to cool. 

To put the cigars together, take two sheets of fillo and place them on your work bench with one of the long edges facing you. Cut the fillo vertically into 3 sections. Place 1 heaped tbspn of the lamb mixture along the short end of each rectangle. Roll the pastry over the filling and then fold in the sides and continue to roll up to form a cigar shape. Place cigars seam side down on a baking tray. Repeat to make a total of 15-18 cigars.

Brush the cigars with melted butter and bake at 180C for 20 mins or until lightly browned.

To make the Harissa Yoghurt simply combine the yoghurt, harissa paste and lemon juice in a bowl. Serve drizzled over the cigars or on the side for dipping.


Enjoy!

Mrs B xx

Monday, January 21, 2013

Old-Fashioned Apple Tea Cake

Last Thursday night, Mr B lined up a lunch date with his Grandfather for Friday and seeing as I was going to be at work that day and unable to attend, I did the next best thing - I baked them a cake!

Now on Friday night when I asked Mr B how it was, he broke out some serious descriptive words like 'cakey' and 'appley'...oh and let's not forget 'great,' meanwhile I'm sitting there saying...'but was it moist? dense? light? fluffy? damn it I need to know!' My final understanding, after quite some time, was that it is a beautiful light butter cake, topped with a appley goodness....I'm good with that.


Old-Fashioned Apple Tea Cake

You will need:
180g butter
2/3 cup caster sugar
3 eggs
1 cup self raising flour
1/2 cup plain flour
1/3 cup milk
2-3 apple
2 tbspns boiling water
1 tspn gelatine
2 tbspns apricot jam (or orange marmalade works just as well)
Cinnamon

Grease and line a 20cm deep cake tin or springform pan. Pre-heat oven to 180C

Beat the butter and sugar together using an electric mixer until pale and creamy.

Add the eggs 1 at a time, beating well after each addition.

Add the flours and milk and beat until just combined. Pour the mixture into your prepared cake tin.

Peel, quarter and core the apples. Cut into thin slices. Arrange the slices on the top of your cake. Sprinkle with cinnamon if you want.

Bake for roughly an hour or until a skewer inserted comes out clean. Stand for 5-10 mins before removing from pan.

While cake is still warm, combine the water and gelatine in a jug. Stir well until gelatine is dissolved. Stir in the jam. Brush over the top of the cake.

Allow to cool completely before serving.

This cake makes a lovely afternoon tea on it's own, or if you're feeling a little bit fancy, it would be heavenly with a dollop of whipped cream too.


On Friday night, Mr B and I went out for a romantic Italian dinner for two! We went to a little old local restaurant called Don Camillo's and the food (and the company) was perfect. Plus it gave me a chance to wear my new dress (partly purchased with a voucher Mr B gave me for Christmas!)


On Sunday the sun was shining and for a change the wind wasn't blowing so Mr B and I took the opportunity to jump on our bikes and go for a ride. We headed down the highway to Huonville where we hired a pedal boat and went for a paddle up the Huon River. It was a beautiful day for it and cruising up the river was quite peaceful and relaxing.


On the way home we rode up through Cradoc, Cygnet and Margate, and on the way we passed a big strawberry farm, it seemed like all we could smell for miles was fresh strawberry jam! A quick rest (read thickshake) stop later and we were home.

Another hectic, but lovely weekend in the Mr and Mrs B household!

Mrs B xox

Wednesday, January 16, 2013

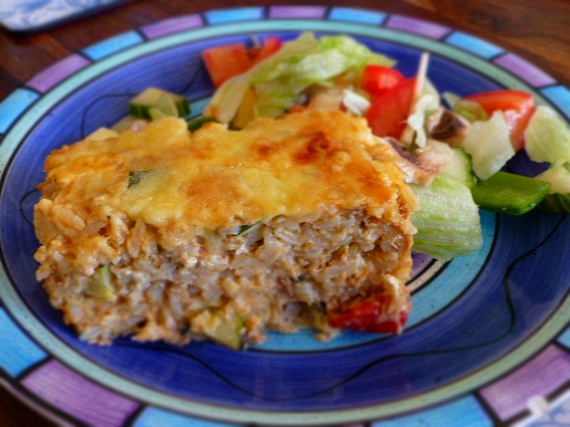
Mediterranean Tuna and Rice Bake

I'm tired. Easy meals are super high on my priority list right now, but they can't just be easy, they have to be easy, nutritious, tasty and economical too! I don't ask for much hey....

This recipe here is all of the above. The other thing I love about this dish is that it is comforting and delicious straight out of the oven, but equally (if not more) tasty when served cold the next day. That versatility, plus the fact it is beyond easy to put together, make this a must cook summer meal. 


You will need: 
1.5 cups cooked long-grain white rice
2 x 185g tins of tuna (I use John West Oven Dried Tomato and Basil, but I think it would also be nice with a Lemon Pepper flavoured tuna as well)
3/4 cup grated cheddar (plus extra to top)
100g semi-dried tomatoes, coarsely chopped
100g fetta, crumbled
1 large zucchini, grated
2 tbspn fresh basil, finely chopped
3 eggs, lightly whisked
Salt and Pepper to season

Pre-heat oven to 180C

Combine all ingredients in a large bowl.

Spoon into a greased and lined loaf tin and top with extra grated cheese.

Bake for around 40-50 mins - it will be puffed and golden when done and if you stick a knife in the middle, it should be reasonable firm and not 'eggy.' Remove from the oven and allow to sit in the pan for 5-10 mins - it will firm up a little more as it cools.

Remove from the pan, slice and serve with salad (or cool completely and wrap up for lunchboxes!)

Enjoy!

Mrs B xx

Sunday, January 13, 2013

Raspberry and Cream Cheese Muffins

Yesterday I had a full day of baking planned and it was so very good to get back into my kitchen - don't get me wrong, the break over the Christmas has been lovely, but yesterday while I was getting my bake on, music up, dancing feet on, I was definitely in my happy place. One of the goodies I baked yesterday was these Raspberry and Cream Cheese Muffins. They smell delicious and Mr B tells me they taste awesome as well! 


Raspberry and Cream Cheese Muffins

You will need:
2 cups plain flour
2 tspns baking powder
1/2 cup firmly packed brown sugar
100ml sunflower oil
125ml milk
2 eggs, lightly beaten
180g fresh or frozen raspberries
110g cream cheese

Pre-heat oven to 180C and line a muffin tin with 12 paper cases.

Place all ingredients, except the raspberries and cream cheese, into a large bowl and mix to combine.

Add the raspberries and just fold through the mixture gently.

Spoon the mixture into the prepared cases, filling them about 2/3 full. Place a small spoonful of cream cheese into the centre of each muffin. Now the cream cheese I had was straight from the fridge and fairly solid, so I used a melon baller to get equal sized portions.

Bake for 25-30 mins or until the muffins are golden and bounce back when touched. Allow to cool in the tin before removing to a wire rack to cool.

Enjoy!

And have a look at these little ginger-dead men I made for Mr B's lunches using some cookie cutters Mum and Dad brought me for Christmas. I admit I did squeal and dance around clapping my hands when they came out of the oven - they are just so cute!!


Mrs B xx

Thursday, December 20, 2012

A recipe from Mr B's Mum!

Sometimes I think that the whole world loses their mind at this time of year.

Traffic increases ten-fold, everyone is super stressed and super rushed (including myself) and sometimes I think we need to remind ourselves what the season is about.

It’s not about how much money you spend on someone or how many presents you have under the tree, it’s about spending quality time with your family and your friends and celebrating and relaxing and putting a smile on someone’s face.


Last weekend we caught up with Mr B’s Mum, Step-Mum, brother, sister, nieces and nephew for dinner as we don’t normally get to see them on Christmas Day. It was a lovely evening filled with chips, cheesecake, Christmas crackers and crafts, but most importantly it was just nice to have everyone together.


So I thought today would be the perfect time to share one of Mr B’s Mum’s recipes with you.

Not long after Mr B and I met, Mr B told me about this recipe and asked if I could make it for him. The original recipe stated that you could make it with crab meat, chicken or tuna.....and of course Mr B wanted crab meat. Now I should mention that when Mr B and I first met I was still very vegetarian and very anti-seafood (except tinned tuna....), but I was in a new relationship and I thought I would try this whole ‘compromise’ thing....needless to say I could barely swallow the crab meat and have never made it again ever since. But a few weeks ago Mr B asked if I could make it again, this time with tuna and I do love me some tuna! It was really easy and so tasty! I hate to admit it but it may even have earnt itself re-entry into regular rotation!


 Mr B’s Mum’s Versatile Curry

You will need:

1 pkt of chicken noodle soup
1 onion – chopped
1 carrot – diced
2.5 cups cold water
310g tin of sweet corn, drained
1 tspn curry powder
400g tin of tuna chunks in springwater (feel free to substitute with 500g chicken breast or 500g crabmeat)
2 cups of milk
2 tbspns of cornflour
Rice to serve

In a large, lightly greased, frypan over medium heat, fry the onion and carrot for 3-5 mins or until onion is softened.

Add the soup mix and water and bring to the boil. Allow the mixture to simmer for 5 mins.

Add the corn, curry powder and milk. Simmer for a further 5 mins.

Add the cornflour and tuna. Simmer with the lid on for 7-10 mins or until mixture is thickened.

Serve over steamed rice.

Enjoy!


Mrs B xx

Thursday, December 13, 2012

Pina Colada Cupcakes

I feel like I should start this post by telling you that at this particular moment in time, I am not being a good wife.

I am sitting on the couch in our garage writing this post, while Mr B paints the ceiling.

Not long after we moved into this house, Mr B converted the garage into a bar and he has done a fantastic job. The walls and ceiling in the garage / bar are like a grey colour and they really needed some livening up so Mr B went out and brought himself some bright blue paint and some bright green paint with visions of green walls with a blue roof and blue trims.

To be honest I thought he was mad and I believe someone may have said it was going to look like Cookie Monster and Kermit threw up.....but despite all this, Mr B stuck with what he wanted and I have to admit, it is looking amazing! I will put some photos up as soon as he is done (which should be just in time for our annual Christmas 8-ball tournament!!)


So how did I get away with sitting on the couch with my feet up whilst Mr B finishes the painting? I made him these Pina Colada Cupcakes of course! And I couldn't help but make them in these two little Christmas pans I got last year, how cute are they!!


You will need:

115g butter, melted
1 cup of caster sugar
3 eggs
1.5 cups of self raising flour
3/4 cup milk
1 tspn rum essence
1 tspn coconut essence
125g tin of crushed pineapple (and juice)

In the bowl of an electric mixer, combine the butter and sugar. Beat until pale and creamy.

Add the eggs and beat until well combined.

Add the flour, essences and milk and beat until mixture is smooth.

Stir through the pineapple and juice, ensuring everything is mixed through.

Grease 2 x 12 hole cupcake tins and line with paper liners. Fill each one 3/4 full and bake for 20 mins. These are a very moist cake so they may not look done, but if you gently press on the top and it bounces back, they are good to go!

This recipe should make around 18 cupcakes.

And here are some Rice Krispie Christmas Trees and Christmas Wreaths I made for Mr B's lunch boxes using this recipe and adding just a couple of drops of green food dye!


Enjoy!

Mrs B xx

Monday, December 10, 2012

Surprise Centre Chocolate Truffles

Over the weekend I did a whole heap of baking and am really pleased with the way it all come out - sending Mr B to work today with a lunch box full of Christmas goodies just made me happy and really makes me feel like Christmas is here.

Mr B's Mum's chocolate truffles were on my Must-Bake list this year, with just a few small tweaks......


Surprise Centre Chocolate Truffles

You will need:
375g tin of Condensed Milk
2 cups of crushed biscuits (I used 2 pkts of Malt Biscuits and put them through the food processor to get a fine crumb)
1 cup of dessicated coconut (plus extra for rolling)
2 tbspns of cocoa
1 bag of marshmallows

Combine the condensed milk, crushed biscuits, coconut and cocoa in a large bowl. Mix until well combined - you may need to get your hands in there!

Place the mixture in the fridge for 5-10 mins to firm up a little.

Remove from the fridge and set yourself up with a baking tray, the marshmallows, a bowl with the extra coconut in it, and a bowl of warm water - I find that having the bowl of water handy is great because the more mixture you get on your hands, the more the truffles stick to you.

Take a tablespoon of the truffle mixture and flatten it out in the palm of your hand. Place a marshmallow in the centre of the mixture and then work the mixture into a ball so that the marshmallow is sealed inside. Roll in the extra coconut and place on the baking tray.

Repeat with remaining mixture and marshmallows. Place in the fridge for an hour to firm up and then enjoy!!!

I know Mr B really enjoyed these. He loves the traditional chocolate truffle balls but sometimes they can get a bit chocolat-ey and biscuit-ey for him so the addition of the surprise centre was a great idea and you don't have to use marshmallows, you could use jubes or brownies or cookie dough - just about anything you want!!

And have a look at what else we made recently.....Ninja-Bread Men!!! These came out about recently when I told Mr B I was on my way inside to make some Gingerbread Men for his lunch, to which Mr B replied 'I don't want Gingerbread Men.....I want Ninja-Bread Men!!!


Mrs B xx

Tuesday, December 4, 2012

Lemon and Lime Crepe Cake

By now I think we all know that I like any excuse to make a cake. So last week when Mum and Dad came for dinner, despite it being 2 days before Mr B's birthday, I decided to make a birthday cake.

I had been given a jar of home made lemon curd a few days before and it gave me the inspiration for this amazing Lemon Curd and Lime Cheesecake Crepe Cake!

This is what it looked like cut in half.


And the birthday boy, who is still talking about the cake and would have eaten the whole thing on his own if we had let him!


Lemon Curd and Lime Cheesecake Crepe Cake

8 crepes
1 cup of lemon curd
200g cream cheese, softened
1/4 cup icing sugar
1-2 tbspns lime juice

Start by making your cheesecake mixture. In the bowl of an electric mixer, combine the cream cheese, icing sugar and lime juice to taste. Beat until smooth and creamy. Set aside.

To assemble your cake, start by placing one crepe on a large plate / platter / cake stand. Spread with 1/4 of the cheesecake mixture. Top with another crepe and spread with 1/4 of the lemon curd. Repeat layers until all of the crepes, cheesecake and lemon curd have been used.

Place in the fridge for an hour to chill.

And that's it! How easy is that! That is what I love about this cake, it's so quick and easy to throw together, but at the same time it's quite impressive to look at when you cut it open and see all the layers. Plus it tastes divine and really there are so many different things you could do with the filling like my Nutella and Strawberry Cheesecake Crepe Cake!

Enjoy!

Mrs B xx

Thursday, November 29, 2012

Tuna and Quinoa Fattoush

Last Tuesday when Mum and Dad came for tea, I wanted to do some sort of nice hearty salad for dinner. The weather here has been warming up a fair bit lately, plus I knew we had a whopper of a cake for dessert as part of the week long birthday festivities for Mr B, so a light dinner was definitely in order.

I have to be careful serving salad up for dinner with Mr B because if I directly use the word salad in relation to what we are having for dinner, he will have talked himself into believing I'm dishing up a bowl of lettuce and it won't matter what I actually serve up, he will still leave the table hungry....plus he will sing 'You don't win friends with salad' from the Simpsons all night....

I have been eyeing this particular recipe off for awhile and, with the addition of the tuna, I think it makes a lovely hearty meal that is quite satisfying and doesn't leave you feeling like you've just eaten a bowl of lettuce.


Tuna and Quinoa Fattoush

You will need:

2 rounds of pita bread
 ¾ cup quinoa
1 cup water
1 red onion, thinly sliced
2 tbspns balsamic vinegar
1/4 cup lemon juice
2 tbspns olive oil
1 tspn sumac
3 tomatoes, cut into wedges
2 lebanese cucumber, thickly sliced
100g feta cheese crumbled (we used 100g of our homemade Farmhouse Cheddar so you could use a sharp crumbly soft cheddar as well)
2 x 185g tuna chunks in springwater, drained
Optional - 4 hard boiled eggs

Preheat oven to hot, 200°C.

In a small bowl, combine onion and vinegar. Set aside 15 minutes.

Tear pita bread into small pieces and place on a baking tray. Bake for 8-10 minutes or until golden and crisp.

Meanwhile, in a small saucepan, combine quinoa with water. Bring to the boil on high. Reduce heat to low. Simmer 10-12 minutes, until tender. Cool 10 minutes.

Combine lemon juice, oil and sumac in a screw-top jar. Season to taste. Shake well. The jar is definitely the go because I tried doing it in a bowl and just ended up with sumac stuck all around the sides and the bottom and a nice pool of lemon and oil in the middle!

In a large bowl, combine quinoa, feta, onion, tomato, cucumber, tuna, pita and half of the dressing. Toss well and drizzle with remaining dressing. Top with sliced hard boiled eggs if you want some added protein!

Next time I think I would add some sliced up avocado as well - but that could just be because I'm going through an avocado phase at the moment and adding it to EVERYTHING!!!

Enjoy!!

Mrs B xx


Sunday, November 25, 2012

Lemon Parmesan Chicken Schnitzel

So it's Sunday night, the weekend has disappeared in a whirlwind as usual and you have to work tomorrow. In reality the last thing you probably want to do on a Sunday night is cook dinner - given the option most weekends I would choose a bowl of cereal or a piece of toast. 

This weekend is no different. Mr B and I had Friday off, but somehow a 3 day weekend does nothing to reduce the amount of things you need to do or how tired you feel come Sunday evening. Today Mr B was offered some overtime so he went to work at 7am....which meant for some stupid reason I was up at 7am too! I mucked around in the kitchen for awhile and finished off the Cream Cheese I started making on Friday, before using the leftover whey to make some Ricotta. Then I straightened my hair, had a bowl of cereal, a cup of coffee and it was only 8am! This was all wrong.....I don't even normally open my eyes till at least 9am on a Sunday!! At about 11am the shearer arrived to shear our little lambies. The poor little things were all wool and look completely different (and a little lanky) now that they are 'nakey,' but hopefully it will keep them cooler through the summer. I'll get some photos of them to show you as soon as they are speaking to me again!  I spent the rest of the day out and about trying to get myself organised for Mr B's birthday this week and for Christmas. I walked back in the door at the same time as Mr B and we both collapsed on the bed, hot, bothered, and exhausted!! Did someone say Fruit Loops for dinner???


This Lemon Parmesan Chicken Schnitzel is really easy to make. The combination of the lemon and parmesan gives it a real flavour kick and the panko breadcrumbs just makes it so crunchy!!  We just served ours with some steamed broccoli and home made potato chips and it was just like going to the local pub for a counter meal, but without the bill at the end of it!! This is definitely something I would keep as my go-to lazy night meal and I'm thinking I will try it with some veal steaks next weekend!

Lemon Parmesan Chicken Schnitzels

Serves 2

1 large chicken breast
1/2 cup dried panko breadcrumbs
1.5 tspns finely grated lemon rind
1 egg
2 tbspns plain flour

Butterfly your chicken breast (cut in half so you have two thin chicken breasts) and set aside.

Combine breadcrumbs, parmesan and lemon rind. Season with salt and pepper and place on a plate.

Whisk egg in a small bowl.

Place flour on a plate.

Coat 1 piece of chicken in flour, shaking off the excess. Dip into the egg and then coat in the breadcrumb mixture. Refrigerate for 20-30 mins.

(Meanwhile, chuck some greens, like beans or broccoli on the boil )

In a well oiled fry pan over medium heat, cook the schnitzels for 5 mins on each side or until golden and cooked through.

Mrs B xx

Tuesday, November 20, 2012

Roast Pumpkin and Garlic Pies

I made these pies last week using a recipe I had adapted from a Women's Weekly Pie book Mr B brought me for my birthday this year. I had been umming and ahhing over the recipe for a little while because I was worried they might be a little bland, but they were downright tasty and delicious. They are also really easy to prepare and make a lovely light meal for a warm night. We served ours with a simple salad but we crumbled some of our home made cheddar through it and wow. Just wow.

This weekend just gone I spent Saturday afternoon getting the Camembert wrapped and in the fridge to age and making a huge round of Colby cheese which will be ready to wax tonight. I am really enjoying this whole cheese making thing, seeing (and tasting) the end result is very rewarding (and delicious) so I am thinking this weekend I might try making some Cream Cheese too!


Roast Pumpkin and Garlic Pies

1 sheet of reduced-fat shortcrust pastry
600g butternut pumpkin cut into 1cm cubes
2-3 tspns crushed garlic
1 tbspn olive oil
3 eggs, lightly beaten
1/2 cup thickened cream
100g reduced-fat fetta cheese, crumbled
2 tspns Gourmet Garden Roast Seasoning (a mix of thyme, rosemary, parsley and garlic)


Pre-heat oven to 200C.

Place pumpkin and garlic on a baking tray and drizzle with the oil. Toss everything together to ensure it is evenly coated. Bake for 20-30 mins or until pumpkin is tender.

Once the pumpkin is cooked, transfer to a large bowl and allow to cool for 5 mins.

Mash the pumpkin and garlic together - it doesn't have to be smooth, you still want it to be a bit rustic looking. Stir in the eggs, cream and herbs. Season with salt and pepper.

Reduce oven heat to 180C. Cut pastry sheet into quarters and place each quarter into the base of a small ramekin. Place the ramekins on an oven tray and cover with baking paper before filling with dried beans or rice. Bake for 10 mins. Remove the paper and beans and bake for a further 5 mins or until they start to develop a light golden colour.

Fill the pastry cases with the pumpkin mixture and sprinkle with the crumbled fetta.

Bake for 30-35 mins or until set. Serve with salad or steamed vegies and enjoy!!

Mrs B xx

Saturday, November 17, 2012

Baked Eggs with Chorizo


I don't know if this dish falls into the category of having breakfast for dinner....or having dinner for breakfast....but either way I have been keen to try making it for ages and Mr B and I were so impressed! We love our eggs runny and these eggs were just perfect for dipping your buttery toast into and then using the rest of your toast to wipe the bowl clean!

Baked Eggs with Chorizo 
Serves 2

2 eggs
2 heaped tablespoons of tomato paste
400g tin of diced tomatoes
50g of sliced chorizo
1 small onion diced
1-2 tspns of crushed garlic (depending on how much you love your garlic!)
1 tspn of wet herbs such as oregano
1-2 tspns of smoked paprika
Salt and Pepper to season
2 Turkish Pide Rolls and Butter to serve

Pre-heat oven to 180C

In a lightly greased fry pan over medium heat, cook the onion and chorizo for 5-7 mins or until onion is softened.

Add the diced tomatoes, tomato paste, garlic, herbs and paprika. Season with salt and pepper and simmer for 10 mins.

Spoon the mixture into two ramekins. Using the bake of a spoon make a hollow in the centre of each one and crack an egg into it.

Place the ramekins onto a baking tray and cook for 12-15 mins (if you like your eggs runny) and 20 mins if you like them solid!

When your eggs are nearly ready to come out of the oven, slice each roll in half and toast. Butter and cut into little portions perfect for dunking!

There was absolute silence around the table while we ate this...aside from the 'oh my god this is delicious' and 'yuuuuuuuuuummmmm' and the excited giggles of two people dunking their buttery bread into gooey eggs - plus there is just so much you can do with this dish, if you want it vegetarian just replace the chorizo with a small tin of chickpeas or kidney beans, you could add some celery, you could mix up the spices and the herbs - the possibilities are endless!

Have a fantastic weekend!!

Mrs B xx

Monday, November 5, 2012

Waffles with Strawberries, Banana and Cream

On a Monday you need dessert. End of story. But dessert doesn't always have to consist of ice cream straight from the tub or indulgent chocolate puddings or decadent cheesecakes, dessert can consist of fruit and still be satisfying and delicious....don't believe me....check these waffles out and tell me I'm wrong. 


This recipe makes 2 of the waffles shown in the picture. 

.6 cup of plain flour
.6 tspn baking powder
1 tbspn caster sugar
1 egg
1/2 cup milk
30g butter, melted
1/2 cup strawberries sliced
2 small bananas sliced
whipped cream

Pre-heat your waffle maker.

Combine the flour, baking powder and sugar in a mixing bowl.

Stir through the egg, milk and melted butter.

Pour half of the mixture into your waffle maker, close the lid and cook for 4-5 mins or until golden.

Repeat with remaining mixture.

Serve topped with strawberries, banana and whipped cream.

I just adore banana and whipped cream and with the addition of strawberries and a freshly cooked golden waffle, it is the perfect dessert. I also love that it's a lovely light way to end a meal, plus it looks really specky so it makes you feel like you are indulging in a decadent dessert without leaving you with that heavy 'oh i've over eaten' feeling!

Enjoy!

Mrs B xx

Sunday, November 4, 2012

Strawberry Cheesecake Slice

This weekend Mr B and I discovered 'Click and Collect' groceries which basically is where we can do our groceries online and collect them the next day at no extra cost! Every weekend I get increasingly frustrated at the amount of time it takes to do the shopping list, go to the supermarket, pick everything up, come home and unpack, but I did have some concerns regarding the freshness and quality of the goods we could receive, so on Thursday night, Mr B and I sat down and did our order online and when we rocked up at the supermarket after work on Friday, there were our groceries all ready to go! We were really impressed, the fruit and vegies were all good quality and everything was well packed, plus it has made such a HUGE difference to our weekend! We have had so much extra time which equals lots less stress and lots more quality time. It has been fantastic!

And to celebrate, I made Mr B one of his favourite snacks for his lunches this week.....Strawberry Cheesecake Slice!


You will need

1 packet of Lattice Biscuits
125g of cream cheese
125g butter
1/2 cup caster sugar
4 tbspns strawberry jam
2 tspns gelatine
1 tspn vanilla essence

In the bowl of an electric mixer, combine the cream cheese, sugar and butter. Beat until smooth, creamy and pale.

Dissolve the gelatine in 1/4 cup of hot water and add to the cream cheese mixture with the strawberry jam and vanilla. Beat until thick and creamy.

Line a baking dish with baking paper and then layer half of your lattice biscuits, shiny side down, in the dish.

Spoon the cheesecake mixture over the top of the biscuits and smooth with the back of a spoon or a spatula.

Top with the remaining biscuits and refrigerate for 3-4 hours or overnight.

Cut into squares and serve!

Anyway, I best be off, I have Apple Pikelets cooking away and I need to get ready because tonight Mr B and I are kicking off a month of celebrations for Mr B's birthday (against Mr B's will, but I love any excuse to celebrate!). We are heading out to dinner and then to a Johnny Cash Tribute Show so it should be a really good night....not to sure how we will go at work tomorrow, but we will worry about that later!

Mrs B xx

Thursday, November 1, 2012

Nutella Stuffed Pikelets

I have been promising Mr B I would make him these Nutella Stuffed Pikelets for weeks now and over the weekend I finally got around to making them. I always see things I want to make so I say to Mr B 'Oh how about this weekend I make this for your lunches?' and he gets all excited and in the meantime I've seen a bazillion other things I want to make and well sometimes the things I promised to make this weekend, don't get made for like quite a few weekends! Anyway, I now have one very happy husband which equals peace and quiet which equals one very happy wife!


For these Nutella Stuffed Pikelets you will need:

1 cup self raising flour
1/4 cup caster sugar
1/4 tspn bicarb soda
1 egg
3/4 cup milk
1 tspn white vinegar
15g butter, melted
Nutella

Place the flour, sugar and bicarb soda into a bowl. Make a well in the centre and add the egg, milk and vinegar and butter. Stir, or beat using an electric mixer, until smooth.

Now here is where I use my pancake maker, but I imagine it's not too different to using a fry pan heated to medium heat and lightly greased with butter.

Drop tablespoons of batter into the frypan (or pancake maker!). When bubbles start to appear, place a teaspoon of nutella in the centre of each pikelet and top with a tablespoon of batter, ensuring nutella is totally covered. Carefully flip pikelets over. They should only need another minute or so and they will be done! Repeat with remaining mixture and nutella.

This recipe makes around 15-20 pikelets depending on the size you make them and how much batter you eat in the process!

These are great freshly cooked when the nutella centre is all gooey and warm, but they are also great cold which makes them fantastic lunch boxes treats!

Mrs B xx

Thursday, October 25, 2012

The Best Chocolate Cake....

I know I just made a big call, like a huge big call....but I have struggled to find a really nice moist chocolate cake recipe for years and I finally have it! 


This recipe makes 2 loaf size cakes and it is moist, chocolatey, keeps amazingly well and....


.....is packed full of beetroot! Yes I said beetroot.

 Beetroot Beetroot Beetroot! 


And before you get all ewwww beetroot in chocolate cake on me....I promise you this cake does not taste like beetroot, there are no big chunks of it and if I didn't tell you (or you didn't make it yourself!) you wouldn't even know it was there! 

You're intrigued now aren't you? You have no choice but to try it for yourself. Believe me, I know because that's what happened to me and I'm so glad it did! 

Here's how you do it....

Beetroot Chocolate Cake

900g tin of beetroot, drained and pureed
2.5 cups of plain flour
2 tspns of bicarb soda
1.5 cups of vegetable oil
4 eggs
2 tspns of vanilla essence
2 cups of caster sugar
1/2 - 3/4 cup of cocoa

Pre-heat oven to 180C and grease and line 2 loaf tins.

Using an electric mixer, beat the sugar, eggs, oil and essence until well combined. 

Add the flour, bicarb, cocoa and beetroot puree. Beat until everything is combined and smooth. 

Pour into your prepared loaf tins and bake for 45-50 mins or until the cakes bounce back when touched or a skewer inserted comes out clean....whichever your preferred method is!

Now when I made this, we ate the first one the very next day with whipped cream and it was off the charts awesome. And today as I sat down to write this post, I had a slice of the other one, straight out of the fridge, 4 days old.....still freakin' amazing and not even a hint of drying out. I am in love (and getting one of my daily serves of vegies through chocolate cake!!) 

Mrs B xx

Wednesday, October 24, 2012

Pumpkin Porridge Whoopie Pies

I have been mega keen to make something with pumpkin and oats....pumpkin and oat cookies, pumpkin and oat bread, just pumpkin and oat SOMETHING!! I eventually decided on pumpkin and oat cookies and whilst I was making them they kind of turned into pumpkin porridge sandwich cookies and then when they were done I realised they were actually pumpkin porridge whoopie pies, but despite having a serious identity crisis, they are yummy! 
 

Pumpkin Porridge Whoopie Pies

1/3 cup rolled oats
1 cup cooked mashed pumpkin
1/2 tspn Cinnamon
1/2 tspn Allspice
1/2 cup packed dark brown sugar
1 egg
60g butter
1/2 teaspoon vanilla extract
1 teaspoon baking powder
1/2 teaspoon baking soda
1 cup all purpose flour

Pre-heat oven to 150C and grease and line two baking trays.

Combine the oats, spices and pumpkin in a microwave proof dish and cook on high for 3-4 mins or until oats are tender. 

Using an electric mixer, beat the butter until pale and creamy. Add the sugar and continue to beat until you reach a smooth consistency. Add the egg ans vanilla and beat well.

In a separate bowl, gently stir together the porridge, flour, baking powder and baking soda until the ingredients are just combined. Add to the butter mixture and beat until well combined.

Drop by rounded tablespoons onto the baking trays and bake for 12-14 minutes. They should look like little mini lumpy (from the oats and pumpkin!) pancakes when they are done.

Now for the filling you will need

80g butter
1 tbspn maple syrup
1 tbspn brown sugar
2 tbspn icing sugar

Beat the butter in the bowl of an electric mixer until pale and creamy. Add remaining ingredients and beat until smooth.

Now that your whoopie pies have completely cooled, divide them up into pairs of roughly equal size and shape.

Spread the flat side of one whoopie pie from each pair with the filling and sandwich together with the other whoopie pie. Place in the fridge for an hour or so for the filling to firm up.

And now for the best part - make a cup of tea, sit down, relax and enjoy!

Mrs B xx 

Sunday, October 7, 2012

Triple Chocolate Jersey Caramel Brownies

It's Sunday afternoon and I am plum tuckered out. It's been a busy weekend so far and Mr B is still outside working on the pergola and I'm still inside plodding through my to-do list. It's not all work though, last night Mr B and I went to a restaurant called Asian Gourmet and had an amazing meal of Lettuce Duck Rolls for entree followed by Sechuan Salt and Pepper Squid for main....hands down, best asian meal I've ever had. And then we went bowling and I actually won....but then I got a bit excited and decided we should play a second game and I lost....obviously I peaked too early. Aside from a lovely night out with Mr B, the boring to-do lists and mundane chores is always broken up by watching our two little mischief makers play in the yard - see how much they've grown!  


The little girl, Blossom is definitely the ring leader....she might look small and innocent, but if there's mischief to be had, she is right there in the thick of it and Loud Mouth is never far behind! Mr B and I are constantly amazed at their antics and can easily sit down and spend hours watching them play.

In the absence of lambs to brighten your day, may I suggest these Triple Chocolate Jersey Caramel Brownies? These are bites of fudgey, chocolatey, caramel heaven and the only issue I had with making them was hiding the jersey caramels from Mr B. For the last few weeks I've been buying a packet of caramels, leaving it in the cupboard and on the weekend when I go to get them for baking, they're gone! So the next week I do the same thing all over again to no avail. This week I tried something completely random and put the jersey caramels in the lolly jar on the kitchen bench in plain sight of everyone.....and you know what, they were still there when I came to use them!


You will need:

125 g butter
120g dark chocolate melts
1/2 cup caster sugar
2 eggs
1 1/4 cups plain flour
2 tbspn cocoa
1 cup mixed chocolate bits (I used a mixture of milk, white and caramel)
1 cup of jersey caramels, sliced thinly

Preheat oven to 180C

Line a slice tin with baking paper.

Place butter and dark chocolate in a heat proof bowl in the microwave and heat in 45 second bursts (stirring in between) until smooth.

Stir in sugar.

Whisk eggs into chocolate mixture until combined.br /> Add sifted flour and cocoa. Whisk to combine.

Fold in chocolate bits.

Spread mixture into prepared pan and scatter jersey caramels over the top. Press down lightly. Bake for 20 - 30 mins or until top is firm to touch.

Set aside to cool before slicing or eat it straight out of the pan....and say HELLO to delicious-ness

Mrs B xx

LinkWithin

Related Posts Plugin for WordPress, Blogger...