Sunday, October 9, 2011

75 Cupcakes and 1 Cake Later......

And we finally have a decision on our wedding cake!

A Raspberry Yoghurt Cake with Vanilla Yoghurt Buttercream!


Raspberry Yoghurt Cake
¾ cup of vegetable oil
2 eggs
1 cup thick raspberry yoghurt (I used Dairy Farmers Raspberries and Cream)
1.25 cups caster sugar
2 cups self raising flour

Pre-heat oven to 180C.

Combine the oil, eggs, yoghurt and sugar in a bowl and stir to combine.

Add the flour and beat with an electric mixer until smooth.

Pour the mixture into a greased tin and bake for 35 mins or until a skewer inserted comes out clean. Once the cake has cooled, frost with vanilla yoghurt buttercream.

Vanilla Yoghurt Buttercream
120g softened butter
1.5 cups icing sugar
3 tbspn full fat vanilla yoghurt

Cream the butter and sugar together with an electric mixer.

Add the yoghurt and beat until smooth and creamy. You may need to add more icing sugar to reach your desired consistency.

This cake was exactly what I have been looking for. It was moist yet dense whilst still being melt in your mouth light and the raspberries and cream yoghurt paired with the vanilla yoghurt buttercream is just the most gorgeous combination....I know yoghurt in a buttercream might seem a touch odd and I know yoghurt in the cake and the frosting might seem like yoghurt overload, but the yoghurt tones down the richness of the buttercream and really is the perfect partner for this cake.

So there you have it, over the last 12 months we have made numerous batches of cupcakes and even a cake trying to find a flavour combination we would be happy to serve at our wedding, I have made our parents and work mates trial them over and over, but each time there was just something missing, they were nice cakes but nothing that really grabbed us...but this cake ticked all the boxes....unique, delicious, simple to make, not too sweet, sickly or rich, something I would be proud to say I made and proud to serve up at our wedding. It's been a long and often very frustrating road, but the end result was well worth it!

And it's only 3 months to go till the big day now, I can't believe how quickly the time is going. 3 months till I'm a wife, 3 months till I walk down that aisle in my big poofy dress and look into the eyes of the man I love. I hope he looks at me in that moment and feels as amazing and as nervous and as terrified and as happy as I am going to. It's going to be one of the biggest and most memorable moments of our lives and I can't believe it's right around the corner....

Em x

Thursday, September 29, 2011

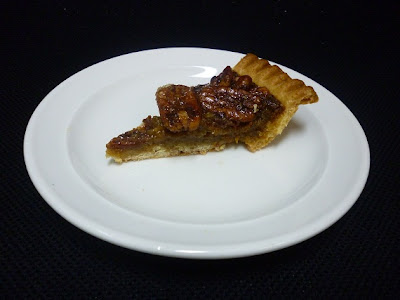
Perfect Pecan Pie

So I finally dragged myself out of the kitchen and crossed some things off my TO DO list....

....I cleaned out my wardrobe and said goodbye to 6 (SIX!!!) pairs of beloved shoes

....I cleaned out an old chest of drawers and got it ready to be sold therefore making room for our new bedroom suite

....I did battle with the wheelie bin and put it out for collection in the morning

....I put on my secretaries hat and did some of OH's paperwork for his business because he is away

....I uploaded a tonne of clothes and shoes and bags and furniture onto the net to sell

....and I gave myself permission to cook this pecan pie as a reward for all my hard work!

Now I have never even tasted a pecan pie before let alone made one, so not only did I have no idea how to make one, I had no idea what it should taste / look like either!

As it turns out, Pecan Pie is dead easy to make and dead easy to eat (so easy in fact I would go as far as to call it dangerous....)

Look a pyramid of pecan pies!

Note that I made 1 big pie, 6 mini pies and had more then enough mixture left to make the scrolls at the bottom of the post so you could easily make 2 pies with this recipe :)


Pecan Pie

2 shortcrust pastry flan case (I used the Pampas one)
1 cup brown sugar
1/2 cup golden syrup
1/4 cup maple syrup
100g butter
3 eggs
1 teaspoon vanilla extract
1 1/2 cups (185g) pecan nuts

If you are using frozen flan cases, pop them on a tray in the oven for 10 mins at 180C while you prepare the filling.

Combine the brown sugar, golden syrup, maple syrup and butter in a saucepan or microwave safe dish. Cook over low heat or microwave for 90 seconds - 2 minutes, stirring regularly until sugar has dissolved.

Remove from heat (if using stove top) and add the eggs and vanilla. Whisk quickly to avoid eggs cooking. Once mixture is well combined pour into a jug.

Arrange nuts over bases of pastry cases and pour over the caramel. Bake for 45-55mins or until set. You can cover the pie with foil during baking to prevent burning if necessary. You will know the pie is set when a skewer inserted in the centre comes out clean. It should appear firm but still have a slight jiggle to it. You can serve the pie fresh out of the oven with a dollop of thickened cream or you can serve it at room temperature - either way it's delicious!!


And seeing as I had roughly 3/4 cup of the caramel filling and some pecans left over, I decided to make these Caramel Pecan Pinwheels.

Even easier then the Pecan Pie, all you need to do is spread one sheet of puff pastry with half of the caramel mixture. Sprinkle with the pecans and roll up into a log. Cut into 2cm sections. Pour the remaining caramel into a baking pan and arrange pinwheels cut side down. Bake at 180C for around 25-30 mins or until puffed and golden. Once they are cooked, alow to cool for 5 mins and invert the pan onto a plate, this will allow the gooey caramel sauce to drizzle over the pinwheels.


1 recipe...2 awesome dishes!

Em x

Wednesday, September 28, 2011

Spiced Apple Sauce Cake with Maple Frosting

For some reason I always seems to have a TO DO list as long as my arm.....often it's longer then my arm.....and I always get cranky because no matter how many things I cross off it, it still gets longer. So when OH told me he was going away for work for nearly 2 months I admit, initially I panicked....then I got slightly cranky, but eventually I moved into my happy place where I realised all the free time I would have to do all those things I never seem to have time for......except that is not quite how it's working out....so far I've cooked, I've cooked some more and when not cooking I have spent time pondering what to cook and then stalking the supermarket aisles to stock my cupboards with plenty of things to cook with.....Oh dear.

And it is that time of year again when I want to cook with pumpkin and with spices and with apples and maple syrup and pecans and ginger and I mean who can focus on a TO DO list when there is Spiced Apple Sauce Cake with Maple Frosting to be made??


For the cake you will need:

2 cups plain flour
2 teaspoons baking powder
1/2 teaspoon baking soda
1/2 teaspoon salt
3/4 teaspoon cinnamon
1/2 teaspoon mixed spice
120g unsalted butter, softened
1 cup brown sugar
1 teaspoon vanilla extract
2 large eggs
1 1/2 cups or 380 grams unsweetened applesauce
1/2 cup chopped pecans

Preheat oven to 180C and grease and line a 8- or 9-inch square cake pan.

In the bowl of an electric mixer, combine the softened butter, sugar and vanilla and beat until creamy.

Add applesauce and eggs, beating well until everything is combined. It will look a little curdled at this stage but it will be OK I promise.

Add the flour, baking powder, baking soda, salt, and spices beating until just combined.

Pour batter evenly into pan and bake until golden-brown and a wooden pick inserted into center comes out clean, about 35 to 40 minutes. Cool in pan 15 minutes before inverting onto a plate.

While the cake is cooling you can make the frosting.

In the bowl of your electric mixer combine 80g butter, 3/4 cup icing sugar, 2 tbspns maple syrup, 2 heaped tbspn brown sugar, 1 tbspn custard powder (optional) and 1 tbspn milk. Beat until smooth and fluffy adding more icing sugar if mix is too thin or more butter if it is too thick.

Once cake is cooled, cover with frosting and sprinkle with chopped pecans.

This cake is so moist and delicious, I wish I had got a photo of it once it was cut, but believe me it just melts in your mouth which makes it perfect for morning tea or served warm for dessert with a dollop of cream.....mmmmm

I also made this recipe as a batch of cupcakes and filled them with the frosting before sending them to work with OH....the boys devoured them in an instant which means this recipe is an all round winner for me!!

See.....totally worth ditching the TO DO list for wasn't it?

Em x

Saturday, September 24, 2011

Fruity Pecan Muesli Bars

OH and I spent today at The Royal Hobart Botanical Gardens with OH's Mum, sister and nephew. The day was slightly overcast, but occasionally the sun decided to come out and it was beautiful and warm. We had a quick picnic before heading off for a wander around the gardens. Eli had never been there before and couldn't quite grasp the concept of 'having a wander' because he kept asking where we were walking too! Eventually his little legs got tired and he retired to the pram - personally I was very jealous, he had the best seat in the house tucked up in his chauffeur driven pram eating his icecream! The Botanical Gardens are full of things to see, we walked for nearly two hours and still didn't see everything, but we did see the fuschia house, the anatartic house (brrrrrr!!), the cactus house, the japanese gardens, the fern house, the floral clock and don't forget the ducklings!!!


It was a lovely day, there are so many beautiful spots at the gardens and at this time of year the daffodils and tulips are in full bloom as well. I could have sprawled out on a blanket with a book and some nibbles and easily filled in the rest of the day!


All that walking requires some serious energy though and these Fruity Pecan Muesli Bars are the perfect energy packed lunch box treat!


All you need is:

1/2 cup honey
1/4 cup caster sugar
75g unsalted butter
1.5 cups muesli (I used one with coconut, sultanas and almonds for added goodies!)
1/2 teaspoon cinnamon
150g dried fruit (I used Fresh Life Triple Fruit Treat Mango, Cranberry and Blueberry)
1/3 cup chopped pecans

Pre-heat oven to 180C

Combine the honey, caster sugar and butter together in a microwave safe dish. Heat for around 60 seconds on high or until sugar is melted and ingredients are combined.

In a bowl combine the muesli, cinnamon, dried fruit and pecans in a bowl. Pour over honey mixture and stir until everything is well coated.

Push the mixture into a greased tin and flatten. Bake for 20-25 mins. Allow the slice to cool on the bench - it is quite fragile when it's still soft so I find it's best to leave it in the fridge overnight before slicing.


These muesli bars are so yummy!! The hardest part is not eating them before they cool!!

I hope your all having a great weekend :)

Em x

Wednesday, September 21, 2011

C is for Cookie......

....and C is also for chocolate and custard....and what do you get when you combine these three things??? Chocolate Custard Creams of course!!


I have been promising OH I would make him shortbread creams for a long time now...but there was an incident involving some very thin sugar cookies, which despite being delicious, were not filling friendly....so I decided to try these chocolate biscuits instead....and while I was there I also made some of our old favourites.As a result our fridge is a little bit like cookie central right now and I may have had issues finding room for the groceries this week...but it was all in the name of good cookies I tell you!!

For the biscuits you will need:
185g butter
3/4 cup caster sugar
1 egg
2 cups plain flour
1/4 cup cocoa powder

And for the custard filling:
.5 cups icing sugar
.5 cups caster sugar
125g butter
1 tbspn milk

Preheat your oven to 160C fan forced and grease 3 baking trays.

Cream the butter and sugar in the bowl of an electric mixer.

Add egg and beat well.

Gradually add the flour and cocoa and beat until mixture is smooth.

Roll tablespoons of the dough into balls and place on trays. Make sure they are evenly spaced as they will spread during baking - I usually go with 8 per tray. Press the dough down with the back of a fork.

Bake for 10 mins. Allow to cool on trays before removing and wait until they are completely cooled before attempting to frost.

While the biscuits cool you can make the frosting!

In the bowl of your electric mixer combine all the ingredients and beat until smooth. If the mixture is too runny, add more custard powder and / or icing sugar to taste and to reach desired consistency. If the mixture is too thick add a splash of milk and if it's just not fluffy enough, add more butter!

Place the mixture in the fridge to firm up a bit while you are waiting for the biscuits to cool.

Once the biscuits have cooled, spread half of them with the custard mixture. Sandwich together with the remaining biscuits.


I got 14 biscuits out of this recipe and they will keep in the fridge for at least a week....that is if they last that long!!

Ohhh and let me show you the mega yummy, mega filling and just all round MEGA omelette, cheese and chutney rolls we had for breakfast on the weekend!


I have been busy making some changes to the layout of the blog, I think I'm just about happy with it, although I still need to figure out how to jazz up the banner abit, but I'll get there! What do you think so far??

Em x

Sunday, September 18, 2011

Moroccan Chicken Pies

My goodness....I have been slack haven't I! Well never fear, I'm here! And I have a handful of posts up my sleeve so I promise I'll be quite chatty over the next few days!

Earlier this year, OH and I visited a local bakery and tried a Moroccan Chicken Pie....it was damn near the best pie we had ever eaten. So, as you do, we set about trying to re-create this delicious dish at home.

The pie is filled with a moroccan spiced mix of chicken, tomato and pasta and then the whole lot is topped with a layer of cheese before the lid is put on and it is baked in the oven...mmmmm cheesey moroccan chicken goodness!!!


Oh and we had ours with some mushrooms chips the other night! They are easy, just chuck some sliced mushrooms in the oven on 180C with some salt and pepper for about 25-30 mins, giving them a stir occasionally and they will be nice and crispy and delicious by the time your pies are ready!


Mmmmmmmmmmmmm I couldn't resist, I had to get a photo of the inside, plus I'm a shocker for eating my pie lid seperate to my actual pie.....

Have I convinced you yet??? These pies are a good idea, they are awesome, they will excite your taste buds and delight your nostrils...and possibly burn your tongue....

I made 2 pies in ramekins with this recipe so I just put pastry over the top of the dish before baking, but I have also 6-8 pies in the pie maker with the same recipe if you wanted a proper pie or say if you wanted to keep them in the freezer or make them for lunch boxes :)

Moroccan Chicken Pies
300g chicken breast (diced)
1 x brown onion (diced)
2 x sticks celery (diced)
2 tspns Moroccan seasoning
400g tin diced tomatoes
50g dry pasta
grated cheese
puff pastry (1 sheet if making in ramekins or 4 sheets if making in pie maker)

Cook your pasta in the microwave or on the stove top as per packet directions. Drain and set aside.

Pre-heat oven to 180C (fan forced)

In a fry pan over medium heat, add your onion, celery and spices. Cook for 2-3mins or until spices are fragrant.

Add the chicken and cook for a further 4-5 mins just to seal on the outside.

Add the cooked pasta and diced tomatoes. Allow the mixture to simmer for 10-12 mins, stirring occasionally so it doesn't stick to the bottom.

Grease 2 x ramekins. Spoon pie mixture into ramekins. Top with grated cheese.

Cut a piece of puff pastry big enough to cover the top of your ramekin and slightly hang over the edge. Place pastry over pie and brush with melted butter, egg or milk (doesn't really matter which, just whatever is easier for you at the time!)

Place the ramekins on a tray and bake in the oven for around 15 mins or until pastry if puffed and golden.

Enjoy :)

Ohhh and look what I got done this week! I went to get my nails done as a trial run for the wedding....although I should point out we are not having teal nails with purple foil at the wedding but I thought while I was there, why not get something sexy! Anyway, I had them done with shellac so no fake nails, just some mighty tough nail polish and apparently they should last for around 3-4 weeks before I need to get them re-done. Helllloooo sexy nails!!! Now is a good time to say that super sexy nails do increase your risk of injury due to inadvertently walking into walls / doors / inanimate objects whilst admiring said nails.....


Well I better go because I'm just about to go out to dinner and I'm currently sitting in my nice warm bed with my pjs on...not sure how the restaurant would feel about me rocking up in my pjs and dressing gown but I'm willing to give it a try!

Em x

Wednesday, September 14, 2011

Confession Time.....

I have a confession to make. It pains me to do this, but I need to put it out there in the open so I can start trying to move on and recover.

As most of you know, I get married this January and after seeing the ridiculous price of paying someone to make our wedding cupcakes, I decided to make them myself.

OH and I decided what flavour we wanted. I made some test batches. They were delicious. Case closed right? Wrong. This is where it gets nasty.....I was going to use a packet mix. I know I know, the guilt, the shame, the fact that they were beautiful soft fluffy vanilla cupcakes with a bright red raspberry swirl is not the point....it has been eating away at me for awhile now and today something just snapped. I cannot bring myself to serve packet mix cake as my wedding cake. I know no one else will know but I will and that’s not cool. I go to enormous effort to make cakes for other people’s birthdays, for morning teas, even just for something to do – but I can’t make my own wedding cake.....that’s not on.

So you know what the means? We are back into the test kitchen!

For the first test batch I’m thinking Lemon Yoghurt Cake (because it’s dense and moist whilst still being light and melt in your mouth awesome) with a raspberry swirl and a vanilla buttercream......

For the second batch I’m thinking a Moist Vanilla Cake (never made one before, but I’m after a moist, soft and flavoursome cake) with a raspberry swirl and vanilla buttercream......

This will also involve some experimentation with a) getting my buttercream as close to white as possible and b) making a raspberry swirl that is packed full of fresh raspberry flavour whilst adding a vibrant red swirl to the cakes.

So there you have it.....I confessed, I am ashamed.....but I am back on the horse, guns (or ovens) blazing and super excited about seeing the results of our first two trials!

Stay tuned for updates over the next few weeks!!

Em x

LinkWithin

Related Posts Plugin for WordPress, Blogger...