Showing posts with label bread. Show all posts

Thursday, July 18, 2013

Eggplant and Mushroom Parmigiana with Polenta and Capsicum Bread


When I was younger Mum did most of the cooking in our house with the occasional appearance of Dad's Chocolate Self Saucing Pudding or, on the nights when Mum was working or away, some creation Dad and I conjured up from our imaginations. But since Mum and Dad have been in the new house I've noticed that the two of them are doing more in the kitchen together and whilst it is funny watching them fighting over a recipe, arguing over who used the last clean cup measure or haggling for bench space, it is also really nice to see them both in there creating stuff together. 

So tonight's dinner is brought to you by my Mum and Dad and in an absolute team effort Mum was in charge of the Eggplant and Mushroom Parmigiana and Dad was in charge of the Polenta and Capsicum Bread.
 

I have seen this recipe for Eggplant and Mushroom Parmigiana many times and I have to admit I always passed it over, but sitting down to it last night, the flavours and the textures were incredible and it quickly became one of my favourite dishes ever. 

To make this for yourself you will need:
250g grated mozarella
1/2 cup grated parmesan
2 eggplants
1.5 cups plain flour
1 tbspn olive oil
Salt and Pepper
1 x onion,diced
200g mushrooms
700g passata
2 cups of panko breadcrumbs

Cut eggplants lengthways into 1cm slices. 
Season flour with salt and pepper and use to coat eggplant.

Heat oil in a fry pan over medium high heat. Shallow fry eggplant in hot oil until golden. Drain well. 
Add the onion to the pan and cook for 1 min. Add mushrooms and cook for 5-7 mins or until softened. Add passata and simmer for 10 mins. 

Layer eggplant slices, tomato and mushroom sauce and mozarella into a lasagne or baking dish, finishing with mozarella.
 
Top with a mixture of breadcrumbs and parmesan. Bake at 200C for 30-40 mins or until golden. Serves 4-6.


Next we have the Polenta and Capsicum Bread.

This is not your average bread recipe as it uses scone mix for the base, but it is dead easy to make and it makes quite a large loaf so if you can manage to exercise some self control, it will last you a few days. There was more than enough here for all of four of us to have several slices with dinner..... and for Mr B and I to take some home....and for Dad to take some in his lunches for the next few days.

This bread was delicious hot out of the oven smothered in butter and I have to say that I just had some cold with a cup of tea and it is just as nice the following day.

To make this Polenta and Capsicum Bread you will need:
535g pkt of scone mix
1/2 cup of polenta
1 cup grated pizza cheese
2 x 75g cans of diced capsicum, drained (or you could use 1 x red and 1 x green capsicum, diced)
1 1/3 cups milk

Pre-heat oven to 200C (180C fan-forced). 
Grease and line a 26x16cm slice tin with baking paper, making sure to leave enough extending over the edges for handles

Combine scone mix and 1/3 cup of the polenta in a large bowl. Make a well in the centre and add capsicum,  3/4 cup of cheese and stir in enough milk to make a soft sticky dough. (You may need a little extra milk).
 
Using clean, damp hands press dough evenly into prepared pan. Sprinkle with remaining cheese and polenta. Bake for 20-25mins or until golden and cooked. To test if the bread is cooked, give it a tap, it will sound hollow when it is ready.  

Stand in pan for 2 mins before removing. Slice to serve.
 

Enjoy!

Mrs B xx

Saturday, May 25, 2013

Home Made Caprese Pizza with Cheesy Garlic Bread


24 hours after day surgery and here I am, back on deck. Well technically I'm back on the couch but I'm up and about at least. Everything went well yesterday. I won't have the actual results of the surgery until I go back to my specialist next week, but the big thing for me is that it is over and done with. Spending half of the day waiting to be called to theatre and then the other half desperately trying to shake off that groggy fuzzy headed feeling is not pleasant. I was so happy and relieved to get home and just curl up with Mr B, who I have to say is taking such good care of me, always making sure my heat pack is hot and making sure I have everything I need.


It's hard to believe that this time last year we were coming towards the end of our European Honeymoon. I think right about now we would have been in Paris.....

Over the last few weeks we have been re-living our trip by reading our travel diary each night and looking at all of our photos, but we have also been trying to re-create some of our favourite meals from when we were away.

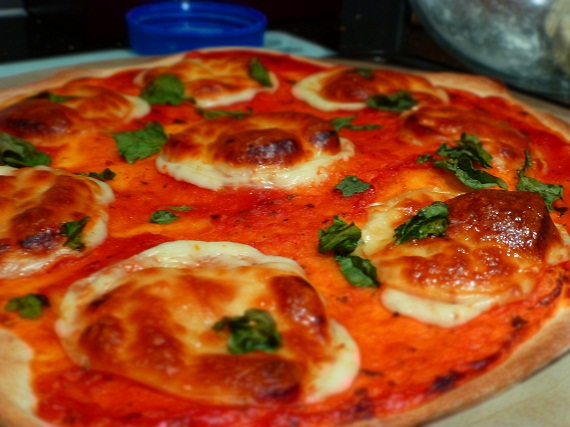
When we were in Italy I fell head over heels in love with the Caprese Salad, the combination of fresh mozzarella, tomato and basil just blew my mind and we both became more than a little partial to a thin and crispy pizza so what better way to reminisce than by making our own Thin and Crispy Caprese Pizza and serve it with a side of Cheesy Garlic Bread?


Now I know the idea of making your own pizza dough can freak alot of people out but stay with me here. This recipe is really simple and makes two large pizzas and apart from a little bit of kneading here and there, you pretty much just throw everything in a bowl!

To make the pizza dough you will need:

1.5 cups plain flour
1 tspn yeast
1 tspn caster sugar
1 tspn table salt
1 tbspn olive oil (we used a basil infused olive oil which I would absolutely recommend if you can find it!)
1/2 cup warm water

Combine the flour, yeast, sugar and salt in a medium bowl and make a well in the centre. Add the oil and enough water to make a soft dough. Knead for 10 mins or until smooth and elastic.

Place the dough a in large oiled bowl, cover and leave in a warm place for 1 hour or until roughly doubled in size.

Turn the dough onto a floured surface and knead until smooth. I usually try and avoid covering my bench in flour so just knead it in the bowl!

Divide the dough in half and roll on a floured surface or between two sheets of lightly greased baking paper until it's roughly 30cm round. Don't worry if it's not a perfect round base, it will give it that rustic look!

Pre-heat oven to 240C and grease two oven or pizza trays. We use a pizza stone which we just lightly dust with flour.

Place the base on the prepared tray and top with your choice of toppings. Bake for 15 mins or until bases are browned and crisp.

For the Caprese toppings we used:

2/3 cup passata sauce
125g mozzarella, thinly sliced
1/4 cup loosely packed fresh basil.

Spread  the pizza base with passata and top with mozzarella and roughly torn basil leaves.


And seeing as we are being extra good and having a thin and crispy pizza base we deserve to splash out on the side dish right? Mr B loves this Cheese Garlic Bread and whilst it isn't for the faint hearted with all of it's butter and cheese, it was the perfect accompaniment to our pizza!

For the Cheesy Garlic Bread you will need:

1 x baguette, sliced in hallf horizontally and then in half vertically.
40g butter, softened
Crushed Garlic, to taste - I used about 3/4 tbspn because I like my garlic bread extra strong.
Salt and Pepper
Shredded Cheese

In a small bowl, combine butter and garlic and season with salt and pepper.

Spread the cut sides of the baguette with the garlic butter and place on a baking tray. Top with shredded cheese.

Bake the garlic bread with your pizzas (240C for 15 mins) and just keep an eye on it, it might only need 7-10 mins and as soon as it's golden and toasty, it's done!


Enjoy!

Mrs B xx

Tuesday, April 16, 2013

Bread Maker English Muffins

Whilst I was doing my usual baking on the weekend, it occurred to me that Mr B and I were planning on having English Muffins for lunch....and that I may have had the last one for breakfast....

So there I was madly trying to figure out how I was going to finish the cupcakes I was making and get to the supermarket before lunch time when it crossed my mind that maybe I should just make the muffins myself.

After about 1/2 an hour of procrastinating that involved several conversations with myself about how hard it would be, not to mention rising times and all sorts of flour related cleaning issues, I actually stopped to read a recipe and as it turns out, they were neither difficult, nor complicated and could be done using the trusty bread maker. Before I knew it I had all the ingredients piled into the bread maker and it was happening.


These were much easier to make then I thought and just as good (if not better) then the ones you buy from the supermarket. I can't wait to try these again with some cinnamon, nutmeg and sultanas added into the dough cycle!

Bread Maker English Muffins - Makes 15
You will need:
1.75 cups milk
45g butter (salted)
2 tbspns sugar
1 egg
2.5 cups plain flour
2 cups wholemeal flour (If you're not keen on wholemeal flour, you can replace it with an additional 2 cups of plain flour.)
2 tspns yeast

Place everything in the bowl of your breadmaker and set it to the dough cycle.

Once the cycle is completed. Remove the dough to a lightly floured work bench and roll out to a large rectangle. Use a large circle cutter or even the top of a large clean empty can to cut the dough into 15 discs. Place the discs on a baking tray and cover loosely with plastic wrap. Allow the dough to rest and rise for 20 mins.

Spray a large cast iron pan with cooking spray. I used a bench top fry pan but you could use a regular fry pan as well. Cook the muffins on low to medium low heat for about 10-15 mins on each side or until they are golden brown. Flip over and repeat on the other side. You don't want your pan to hot or the outside will cook before the inside does.

Serve toasted with butter and jam or butter and tomato and cheese!


Enjoy!

Mrs B xx

Monday, April 8, 2013

Bread Maker Pizza Scrolls

Pizza Scrolls are unfortunately one of the foods Mr B loves in his lunch boxes.

I say unfortunately because I hate making them.

My Dad always said to me that hate is a strong word so let me re-phrase that.... I 'strongly dislike' making them.

Whenever I make them my kitchen somehow ends up covered floor to ceiling in tomato paste and cheese and sticky dough and flour....oh my goodness the flour - it just gets everywhere!

So I tend to just pretend they don't exist for as long as humanly possible, but eventually Mr B will request them and I can't put it off any longer.

After the success of making our Hot Cross Buns in the bread maker this year, I thought I would try making the dough for the scrolls in there and it was a massive win for the home team. The dough resulted in a light, fluffy scroll and only 10% of the kitchen is covered in flour compared to the usual 95%, plus Mr B tells me they are much nicer than the ones I usually make....I chose to just take that as a compliment.


Bread Maker Pizza Scrolls

For the dough you will need:
3 1/3 cups plain flour
2 tspns dried yeast
1 tspn salt
1.5 cups lukewarm water

For the topping you will need:
2 tbspns tomato paste
1 tbspn Gourmet Garden Italian Herbs
1 tbspn crushed garlic
80g shaved ham
1/2-3/4 cup grated cheese
1 sml tin of pineapple pieces drained
*This is just the toppings that I use, you can use whatever you like, 1/2 cup diced capsicum, salami etc.....

To make the dough, place the water, yeast, salt and flour in the bowl of your breadmaker in that order. Select the 'dough' cycle and let it do it's thing. Mine took about 90 mins.

Once the cycle is finished, punch the dough down to knock the air out of it. Place the dough on a lightly floured clean surface and roll it out to a large rectangle - roughly 30cm x 40cm.

Leaving a 1cm gap from the edges on your horizontal sides, spread the tomato paste over the dough. Top with the garlic and herbs. Scatter the ham and pineapple over the base and top with cheese.

Starting from the horizontal edge closest to you, carefully roll the dough up into a scroll shape. Use a sharp knife to cut into roughly 16 pieces. Place each piece, cut-side up, onto a lined baking tray leaving about 1cm inbetween.

Set aside to rise in a warm place for 30 mins. Meanwhile pre-heat your oven to 200C.

Place the scrolls in the oven and bake for 20-25 mins or until golden brown.

These make great lunch box treats, but you should definitely try one fresh from the oven too!


I would like to take a second here to say how gorgeous is the little plate in this picture?? Mum and Dad have been having a massive clean out at their place and a few weeks ago I was lucky enough to have a look through the boxes of goodies destined for the market. Needless to say Mr B and I came home with a car load of treasures including an antique lantern, an old cutlery box for our kitchen bench and a STACK of beautiful antique plates. This one and the one I used in the Leftover Easter Egg Blondies post are my absolute favourite.

It makes me feel kind of nostalgic having these items in my home that I remember being in Mum and Dad's home when I grew up. It also makes me feel very grown up all of a sudden. Antiques were one thing I always swore black and blue would never be in my house. How things change....

Mrs B xx

Tuesday, March 26, 2013

Peanut Butter and Banana Bread

Recently for my Dad's birthday, I borrowed a container off my Mum, filled it up with baked goodies, wrapped it up and gave it to him as a gift. 

Last week my Mum gave me the container back and later on that night when I realised it was actually her's to begin with, I sent her a txt message informing her of her error. 

The answer - We were giving it back so you could fill it up again! 

The cheek! 

They are lucky I love them and I thought that was a fabulous idea! 

So this weekend I got to baking. I had some peanut butter in the cupboard leftover from making this Peanut Butter and Jelly Slice and I had a hankering to pair it with banana bread. And that is exactly what I did! It smells incredible and the sneaky nibble I had (sorry Mum and Dad!) backed up my theory that it was amazing. To be honest, they nearly only got half a loaf.....but I know that I would have sat down and demolished it slathered in butter in one sitting and that would possibly scar Mr B for life so we just won't go there. 


Peanut Butter and Banana Bread

3 ripe bananas, mashed
1/2 cup crunchy peanut butter
2 eggs
1/2 cup caster sugar
1/4 cup brown sugar
1.5 cups plain flour
3/4 tspn baking soda
1/2 tspn ground cinnamon
1/2 tspn ground allspice
1/2 tspn salt
1 tspn vanilla essence
1 tbspn Cinnamon Sugar (optional)

Pre-heat oven to 180C and grease and line a 9x5inch loaf tin.

In the bowl of your electric mixer add the banana, peanut butter, caster sugar and brown sugar. Beat until combined.

Add the remaining ingredients, except for the cinnamon sugar. Beat well.

Pour the mixture into the loaf tin and smooth the surface with a spatula. Sprinkle the cinnamon sugar over the top.

Bake for 45-50 mins or until a skewer inserted comes out clean.

Remove from the oven and allow to rest for 20 mins before removing from the pan to a wire rack. Allow to cool completely....or cut yourself off a slice and enjoy it fresh out of the oven while it's still warm!

Enjoy!

Mrs B x

Monday, February 11, 2013

Pizza Pull Apart Bread

Awhile ago you might remember Mr B and I made this Cinnamon Pull Apart Bread for a special Mothers Day breakfast....well seeing as we are stuck at home at the moment unable to do much besides watch for changes in the bushfires around us, I decided to make a savoury version of this for our dinner last night. This pizza pull apart does take maybe 2-3 hours to make from start to finish, but alot of that is rising time for your dough so don't think you will be chained to the kitchen the whole time, plus the end result is well worth it, our house smelt incredible and we sat down with some of Mr B's home brew alcoholic lemonade and just dug in - pure awesome-ness.

Straight out of the oven, the bread is soft and warm, the cheese is melty, the flavours are incredible and yes we demolished the whole thing and spent the rest of the night laying on the couch complaining about our expanding bellies but after a few hours recovery time, we totally would have devoured another one.....this is the ultimate date night / move night meal.

Pizza Pull Apart Bread

For the dough you will need:
2 cups plain flour plus 3/4 cups extra
2 teaspoons sugar
1 teaspoon salt
2 1/4 teaspoons instant yeast
1/3 cup full cream milk
90g butter
1/4 cup water
2 large eggs, at room temperature

For the filling you will need:
140g tub of tomato paste
1.5 cups of shredded pizza cheese (we used a combination of mozarella, cheddar and parmesan)
150g of sliced salami
1 tomato, diced
1tbspn butter, melted
2 cloves garlic, minced

In the bowl of an electric mixer with the dough hooks ditted, add the 2 cups of plain flour, sugar, salt and yeast. Stir until just combined with a spoon.

In a microwave safe jug, add the milk and 90g butter. Heat for 60 seconds and then stir until the butter had melted. Add the water. Allow the mixture to cool to around 45-50C before pouring over the dry ingredients.

Use the dough hooks of your electric mixer to knead the dough on low speed until everything is fully incorporated - this should take around 3 minutes.

Add the eggs, one at a time, kneading in between each addition.

Add 1/2 cup of the remaining plain flour, kneading it on low speed until the dough is smooth. Add 3 more tablespoons of plain flour and knead until just combined. Remove the bowl from your mixer stand. Using one hand you should be able to work the dough, kneading it gently, until it just comes together into a ball. Cover the bowl with plastic wrap and allow it to proof in a warm, dry place for one hour. During this time it should roughly double in size.

Preheat the oven to 180C

Gently deflate the dough and turn it out onto a lightly floured work surface. Roll it into a rectangle measuring roughly 50cm x 25cm.

Spread the tomato paste over the dough and sprinkle with 3/4 of the cheese. Arrange the salami and tomato over the top and sprinkle with remaining cheese. Trim the edges of the dough so you have straight sides along the rectangle.


Cut the rectangle (width-wise) into 5 equal strips. Cut each strip into 4 equal squares so you have a total of 20 squares. Stack the strips on top of one another so that you have 5 piles each consisting of 4 squares. 

 
Lightly grease a 9"x5" loaf pan. Stack the squares in the centre of the pan against each other, cut-sides down. It's ok if you have extra space on both sides because they will expand.

Lightly cover the pan with plastic wrap and let it proof for 30 minutes.

Place the loaf pan on a baking tray to ensure the bottom doesn't burn and bake it for 15 minutes.

Stir together the melted butter and minced garlic. Remove the pan from the oven and brush the top of the loaf with the garlic butter. Return it to the oven to continue baking for 30-40 minutes, or until the top is golden brown. Remove the pan from the oven and let it rest for 10 minutes before turning the loaf out onto a serving plate.


All that's left to do now is pour yourself a drink, chuck a good dvd on and dig in!

 
Mrs B xx

Saturday, November 17, 2012

Baked Eggs with Chorizo


I don't know if this dish falls into the category of having breakfast for dinner....or having dinner for breakfast....but either way I have been keen to try making it for ages and Mr B and I were so impressed! We love our eggs runny and these eggs were just perfect for dipping your buttery toast into and then using the rest of your toast to wipe the bowl clean!

Baked Eggs with Chorizo 
Serves 2

2 eggs
2 heaped tablespoons of tomato paste
400g tin of diced tomatoes
50g of sliced chorizo
1 small onion diced
1-2 tspns of crushed garlic (depending on how much you love your garlic!)
1 tspn of wet herbs such as oregano
1-2 tspns of smoked paprika
Salt and Pepper to season
2 Turkish Pide Rolls and Butter to serve

Pre-heat oven to 180C

In a lightly greased fry pan over medium heat, cook the onion and chorizo for 5-7 mins or until onion is softened.

Add the diced tomatoes, tomato paste, garlic, herbs and paprika. Season with salt and pepper and simmer for 10 mins.

Spoon the mixture into two ramekins. Using the bake of a spoon make a hollow in the centre of each one and crack an egg into it.

Place the ramekins onto a baking tray and cook for 12-15 mins (if you like your eggs runny) and 20 mins if you like them solid!

When your eggs are nearly ready to come out of the oven, slice each roll in half and toast. Butter and cut into little portions perfect for dunking!

There was absolute silence around the table while we ate this...aside from the 'oh my god this is delicious' and 'yuuuuuuuuuummmmm' and the excited giggles of two people dunking their buttery bread into gooey eggs - plus there is just so much you can do with this dish, if you want it vegetarian just replace the chorizo with a small tin of chickpeas or kidney beans, you could add some celery, you could mix up the spices and the herbs - the possibilities are endless!

Have a fantastic weekend!!

Mrs B xx

Wednesday, August 22, 2012

Beef and Beer Casserole

Whilst Mr B and I were on our mini-moon we came across a sign that said Happy Wife Happy Life.....but what about Happy Husband?

You see all this week....and all last week for that matter, Mr B and I have been hauled up in our garage every night staining our new furniture. Getting new furniture is very exciting, spending 2 hours painting and sanding each night is not. And to top it all off painting is the one thing that Mr B really detests. So needless to say even though we only have one more night of painting to go, it may as well be 3 more months and Mr B is tired, miserable, seemingly allergic to paint fumes and generally over it. In an effort to 'turn that frown upside down' (you do not want to see the look Mr B gave me when I said that....I decided to put my rendition of Happy Little Vegemites on hold until further notice....) I decided to make this Beef and Beer Casserole with fresh bread for dinner tonight because let's be honest, anything involving beef, beer and in Mr B's case, fresh bread is bound to be a winner with the boys!


Beef and Beer Casserole

You will need:

2 tbspns oil
750g topside beef cut into 3cm cubes (you can use gravy beef or any other casserole beef if you wish)
1 leek, trimmed, halved, washed and sliced
1 tbspn crushed garlic
4 short cut bacon rasher trimmed and diced
250g sliced mushrooms
2 tbspns plain flour
2 large potatoes, chopped into 2cm cubes
2 dried bay leaves
1 tbspn crushed thyme (I use Gourmet Garden thyme - comes in a tube, like a crushed herb paste) or you could use 4 sprigs of fresh thyme
375ml beer
1.5 cups beef stock
Fresh crusty bread to serve

Preheat oven to 160°C fan-forced and heat half the oil in a heavy-based, flameproof casserole dish over medium-high heat. Cook the beef, in batches, for 5 minutes or until browned and transfer to a bowl / plate.

Heat remaining oil in the same dish and add leek, garlic, bacon and mushrooms. Cook, stirring, for 5 minutes or until onion has softened. Return beef to dish and add the flour, potato, bay leaves and thyme. Stir well.

Stir in the beer and stock. Cover dish and bring to the boil. Transfer to oven and bake for 2 hours or until beef is tender. Check regularly and stir. Remove the bay leaves (does anyone else have trouble finding them!?) and serve with warm, crusty, buttery bread!

 
Enjoy your  dinner and enjoy the benefits of a happy husband! Mine is so deliriously happy and full right now, he has agreed to dye my hair for me!!

And on a side note, look at our little babies! They are no longer needing us to go out and feed them bottles of milk at all hours of the day and night, they simply have a bottle of water when we get home from work and spend the evening munching their way around the front yard before they go to bed....but the best thing? No matter where they are, as soon as they see us they come flying toward us at full speed as if to say 'Oh wow we have missed you!' and it just makes me melt every time....especially when they forget to brake and skid across the gravel or the grass trying to stop!! From the below picture, can you guess which one has been playing underneath the car and sticking his head in the grease!?


Mrs B xx

Saturday, April 7, 2012

Fully Loaded Honey Roasted Pumpkin, Egg and Bacon Pie

So as far as I'm aware it's Easter yes? The time for 4 days of relaxing with cups of tea, buttery hot cross buns and easter eggs yes? Ahhh no....

On Thursday night Mr B and I kicked off the Easter break with a night out to watch the Shaolin Kung-Fu Monks. My god, these guys (and lady) were off tap, we were on the edge of our seats for the whole show and for a theatre full of people, including small children, the number of times the whole place fell dead silent in awe of what they were about to do, was incredible. I would definitely recommend catching this show if you get the chance.

Yesterday Mr B and I headed out with the bikes to do some skills practise for my upcoming license test. I've had my learners for nearly a year now, so it's time I got myself together. I have no trouble riding on the road, but the finer skills that they test you on like cone weaves and obstacle turns just needed some work. So we spent 5 hours in the cranking hot sun working on my skills...and getting frustrated with each other...and throwing tantrums...and getting very excited when I got things right...and dancing around like lunatics...it was an all over the show kind of day, thank god Mum and Dad came down and brought us hot cross buns, easter eggs and a cuppa for lunch! Thanks Mum and Dad!! After all that practise we were all tuckered out last night and in bed by 6:55pm....oh yeah just call me Nanna B!


Which brings me to today....more practise...and I finally nailed everything...HOORAY!!! (That's literally what I was yelling whilst doing a victory lap of the car park....) And I have video evidence to prove it! I wonder if they would accept that at the test??


Anyway, moving on...let's talk Pie. Like real pie....like a huge big savoury pie stuffed full of eggs, bacon, honey roasted pumpkin, onion, cherry tomatoes and spinach!?! Are you sold yet? You should be.


This pie is huge and so far had fed Mr B and I for two nights and we still have half of it in the fridge for the next 2 nights! Not to mention the overwhelming satisfaction you will get when you pull it out of the tin and see how amazing it looks and knowing you did it all yourself simply by following these very easy steps...

All you will need is:

650g butternut pumpkin cut into 2cm cubes
1 brown onion finely diced
1 small punnet cherry tomatoes halved
100g baby spinach
4 rashers of short crust rindless bacon, finely diced
2 tbspns honey
50g butter (melted)
6 sheets filo pastry
6 eggs
1/2 cup evaporated milk
3/4 cup grated cheese
1 tbspn wet italian herbs (I used Gourmet Gardens Italian Herbs)

Pre heat your oven to 180C (fan forced) and place the pumpkin and onion in a baking dish. Drizzle with honey and toss to coat. Roast for around 20-25 mins. Add the bacon and stir to combine. Roast for a further 10-15 mins or until pumpkin is tender and bacon is browned. Set aside to cool.

Reduce oven temperature to 150C.

Brush the base and sides of a 20cm springform tin with butter. Place 1 sheet of filo on a flat surface and brush with butter. Carefully push filo into pan, allowing it to extend over the edges. Repeat with remaining filo and butter ensuring all surfaces of the pan are covered. (The best way to do this is to layer them in a clockwise pattern around the pan)

Whisk the eggs and evaporated milk together in a bowl. Stir through the herbs, cheese, tomatoes, spinach and pumpkin mixture. Carefully pour the mixture into the prepared pan.

Place the pan on a baking tray and bake for around 55-65 mins or until the filling is golden and set.

Carefully remove the sides of the pan and stare in awe at the amazing pie you have created, take photos, call friends to come have a look at it, but most importantly, serve it up with some salad and enjoy it!!


Wishing you all a Happy Easter for tomorrow!!

Mr and Mrs B x

Monday, August 22, 2011

P is for Pretzels....

....and thats good enough for me!

Now OH keeps telling me that they look like certain other things beginning with P (and I don't mean pony or penguin or any other nice p words you can think of....) but considering they taste delicious and he is devouring them faster then I can cook them I am thinking we will just let that one slide.


This recipe is for Hard Pretzels

1 3/4 cups warm water
1 tbspn sugar
2 tspns salt
1.5 tspns ative dry yeast
4.5 cups plain flour
Milk
Rock Salt

Combine the warm water, sugar and salt in the bowl of an electric mixer and sprinkle the yeast on top. Allow to sit for 5 minutes or until the mixture starts to foam.

Add the flour and, using the dough hook attachment for your mixer, beat until well combined. The mixture should eventually (after 4-5 mins) form a smooth dough that pulls away from the side of the bowl.

Sit the bowl in a warm place for approximately 50 to 55 minutes or until the dough has doubled in size.

Preheat the oven to 180C and line 2 -3 baking trays with parchment paper and lightly spray with cooking oil. Mega important or your pretzels will end up with paper stuck to the bottom side of them...good idea if you want extra fibre in your diet, not a good idea if sharing with guests...people look at you funny when you serve them paper coated food - trust me!

Place enough water into a large saucepan to come 1/3 of the way up the sides and bring to a boil over high heat.

Divide the dough into portions and roll out each piece into a stick. Now you can leave them as sticks or play around and make cool shapes, the choice is totally yours. I recommend making the pretzel shapes though, just coz they look cool :)

Now here is where you need assistance or you need to be able to multi-task. Drop 4-5 pretzels into the boiling water at a time. Leave them for 30 seconds and then remove them to your prepared trays. I had a couple boiling while I made the next 4-5 to go in, but I also had OH on stand by incase I needed back up!

Brush the pretzels with a little milk or melted butter and sprinkle with rock salt. Bake until pretzels are golden brown and hard, approximately 55 to 60 minutes.

These should store in an airtight container for up to 1 week.

I know it's a touch bit involved, but it's worth it, honestly!!

OH also wanted me to show you his mega awesome salad roll that he made for tea the other night. I believe the layers went something like cheese cucumber tomato ham cheese cucumber tomato ham cheese cucumber tomato ham cheese cucumber tomato ham....it was pretty epic!


There really is nothing better then a fresh salad roll :)


Mmmmmm ham salad roll goodness!!!


Happy Monday everyone!!

Em x

Thursday, July 14, 2011

Happy Birthday to Us!!

For those of you who don't know, today is Love, Shoes and Cupcakes first birthday, yep one whole year. It doesn't feel like that long hey! Things have certainly changed in that time though...
- My shoe collection has increased ten-fold (and evolved into a love of tights too)
- Both OH and I have started new jobs and made significant changes in our lives
- We were getting married, then two weeks before the big day we decided to postpone which was one of the hardest things we have ever done, but now we are six months out from our wedding date and you know what, this time it just feels right, it's really going to happen and I couldn't be more excited, we even booked our mini-moon last night and we are about to book our honeymoon to Europe!
- As for the cooking, it's grown from a love of cupcakes and basic baking to a love of all things cooking, I've made things I never thought I could and I still love nothing more then an afternoon in the kitchen :)

So in honour of this milestone last night, Mum and Dad came up for dinner and this is how we celebrated...

Roast Tomato and Lentil Soup with Homemade Foccacia....


This foccacia recipe has been haunting me for ages! I have desperately wanted to try it, but just wasn't sure if I could pull it off, but well last night was the night and it was better then I expected. The herbs and sea salt on the top gave it so much flavour and it was crispy on the outside, but light and fluffy in the middle, just perfect :) Wanna try it for yourself? Here's how...

Foccacia

2 cups plain flour
7g dried yeast
2tbspns of olive oil
2 tspns rock salt
2 tbspns parmesan
2 tspns pizza herbs

Grease a 20cm x 30cm slice tin.

Combine the flour, yeast, parmesan and half of the salt in a bowl.

Make a well in the centre and add 1 cup of warm water and oil. Stir until a soft sticky dough forms.

Knead the dough (in the bowl should be fine) for around 5-7 mins or until the dough springs back when pressed.

Press the dough into the prepared pan and cover with cling wrap. Set aside in a warm place for 1 hour.

Waiting waiting waiting.....pre-heat your oven to 180C....wait some more...

Remove the plastic wrap from dough. Drizzle with some balsamic vinegar or olive oil. Sprinkle with remaining sea salt and herbs.

Bake for 15 mins then reduce temperature to 160C. Bake for a further 10 -15 mins or until top is golden and sounds hollow when tapped.

And for dessert, we had the grand finale (I even had a candle!!) The Double Decker Icecream Pudding!!


Now what to make for this occasion has been a point of contention for me for some time, it had to be something special, something celebratory, something different, something I hadn't made before, something easy yet impressive....this long list of criteria led to me sitting on the floor last Friday, surrounded by every recipe book I own....and after much page turning, huffing, puffing, foot stamping and general tantrum throwing, I settled on a combination of several recipes with my own twists thrown in. (I have to give OH a big shout out here for putting up with me during the decision making process!!)


And you know what? It was so easy!!

Double Decker Icecream Pudding

1.25L of light vanilla icecream
1 cup of store brought or homemade vanilla custard (I made some at home)
10-15 mini vanilla meringues (crushed)
16 choc ripple biscuits (leave 8 whole and roughly crush the remaining 8)
Peppermint essence
Green and pink food colouring
250g of fresh strawberries (hulled and diced)
2 tbspns strawberry jam
Ice Magic

Line a large mixing bowl (with steep sides) or a large pudding steamer with cling wrap.

In a large bowl, combine the vanilla icecream with the custard, meringues and crushed biscuits.

Place half of the mixture in a seperate bowl.

Add 2 drops peppermint essence and 2-3 drops green food colouring to one bowl. Combine. Spoon the mixture into your prepared bowl and place in the freezer.

Cook the strawberries and the jam in the microwave or on the stove top for 4-5 mins or until they have cooked down. You want them to be mushy, but you still want some strawberry chunks too!

Stir the strawberries and 2 drops of pink food colouring through the remaining icecream. Place the bowl in the freezer.

After 2-3 hours the mint layer should be set enough to pour your strawberry mixture over the top. Place back in the freezer for an hour.

Layer your remaining chocolate biscuits over the strawberry icecream to form a 'base' for your pudding. Place back in the freezer overnight.

When you are ready to serve the pudding, place a large plate over the bowl and flip upside down. The pudding should come out of the bowl easy enough. Remove the bowl and peel the cling wrap from the pudding.

Pour ice magic over the top and leave for a minute or two to set.

Serve and enjoy!!


I was really happy with the way this came out, it looked fantastic, it tasted great and I couldn't think of a better way to end our first twelve months!

So thank you to OH, Mum and Dad for putting up with my cooking madness and thank you to all of you for sharing the ride - I can't wait to see what the next year has in store!!

Em x

Tuesday, June 7, 2011

Mum's Pasta Surprise

This is a recipe my Mum makes all the time and when I was little the sight of tinned pumpkin soup in the cupboard could only mean one thing - Mum's Pasta Surprise! It earnt the name Pasta Surprise because the vegetables in it usually depended on what was in the fridge at the time! Some of you may remember that for Christmas last year my Mum gave me a book with all her recipes written in it. This was one of them and I decided it would be the perfect winter treat for OH and I to have this week :)

You will need:

200g dry pasta
2 x 540g cans of Campbell's Butternut Pumpkin Soup
125g of bacon (or similarly you could use some sliced sanitarium vegetarian sausages)
2 x celery stalks diced
1 x onion diced
1 x capsicum diced
150g mushrooms diced
(Or similarly you could use a mix of peas, corn, capsicum and carrot)
1 cup grated cheese

Cook the pasta in a microwave dish or on the stove top.

Meanwhile fry the onion and bacon in a frypan over medium heat. Add the vegetables and cook for 8-10 mins or until softened. Season with salt and pepper.

Combine the vegetables, pumpkin soup and pasta in an oven proof dish.

Top with grated cheese and cracked pepper. Bake at 180C for 20 mins or until golden.


This is a delicious and hearty winter dish that is very versatile. I think the pumpkin soup also makes a nice change from other pasta bake sauces.

Enjoy :)

Em x

Monday, May 9, 2011

Fresh Cinnamon Bread for Breakfast Anyone??


Ok so I know this recipe is on every food blog you read lately but that is because a) it's delicious and b) everyone wants to see if they can actually pull it off.


I have to admit I did want to see if I could pull it off, but I also thought it would be the perfect breakfast to dish up to Mum on Mothers Day but I had a dilema....everyone seemed to be saying that you could let it rise overnight at the first rise...but that would mean in the morning I would have to roll it out, spread with butter and sugar, cut it up, arrange in the pan, let it rise for 30 mins, bake for 40 mins and then sit for 20 mins before I dished it up...and subsequently get out of bed at like 5am....well not this lil black duck I tell you!! So I fiddled and played and this is my version of the Cinnamon Pull Apart Bread that allows you to still be snoozing in bed an hour before it hits the table!


Overnight Cinnamon Pull Apart Bread

For the Dough:

2 3/4 cups plus 2 tablespoons plain flour
1/4 cup caster sugar
7g yeast (about 2 1/4 tspns)
1/2 teaspoon salt
60g butter
1/3 cup milk
1/4 cup water
2 large eggs, at room temperature
1 teaspoon pure vanilla extract
For the Filling:
1 cup caster sugar
2 teaspoons ground cinnamon
60g butter

In a large mixing bowl combine 2 cups flour, sugar, yeast, and salt. Set aside.

In a small saucepan or in the microwave melt together milk and butter until butter has just melted. Remove from the heat or microwave and add water and vanilla extract. Let mixture stand for a minute or two, or until the mixture registers 115 to 125 degrees F (I used my candy thermometer for this).

Pour the milk mixture into the dry ingredients and mix with a spatula or with the dough hooks of your electric mixer. Add the eggs and beat until ingredients are just combined. It will seem like the dough is not very 'doughy' at this stage but stick with it and keep stirring. Add the remaining 3/4 cup of flour and beat for about 2 minutes. Don't panic....the mixture will be sticky. You have done well grasshopper.

Place the dough in a large, greased bowl (I just left mine in the mixer bowl...) and cover with plastic wrap and / or a clean kitchen towel. Place in a warm spot and allow to rest until doubled in size, about 1 hour.

While the dough rises, combine the filling ingredients in a jug or small saucepan and heat until melted. I microwaved mine for about a minute so that the butter was melted and just gave it a good stir. Set aside to cool.

Grease a 9x5x3-inch loaf pan and set aside.

Once the hour is up, deflate the risen dough and knead about 2 tablespoons of flour into it. On a lightly floured surface, use a rolling pin to roll the dough out. The dough should be 12-inches tall and about 20-inches long but who has time to get the ruler out when they are baking...so just roll it out into the biggest rectangle you can.

Use a pastry brush or the back of a spoon to spread the melted butter and sugar mix over the dough. Try and cover the whole surface.

Slice the dough vertically into six equal-sized strips and stack them on top of one another. It will get messy but you will be fine, carry on. Slice the stack into six equal slices once again. Layer the dough squares vertically in the loaf pan kinda like your assembling a choc ripple cake. Place some cling wrap loosely over the pan and place in the fridge. Go to bed and rest...you've earnt it.

Now you need to get up about an hour before you want to put your bread in the oven and take it out of the fridge so it can come back to room temperature. Whilst your up you may as well put the oven on to 180C as well :) Make yourself a cup of tea and go back to bed for an hour.

Tick tock....ok so your hour has passed, sit the loaf tin in a baking dish (incase your sugar mix overflows...which it may very well do) and bake for 35-40 mins. It should be a deep golden colour when done. A nice, dark, golden brown will ensure that the center is cooked as well.

Remove from the oven and allow to rest for 20 to 30 minutes. Run a hot knife around the edges of the pan to loosen the bread and tip out onto a clean board or tray. Place a cake stand or platter on top of the upside down loaf, and carefully flip so it’s right side up. Serve warm with coffee or tea and enjoy!

This bread is just a dream come true, we were all raving about it at brekkie, the bottom is all gooey and sticky, the bread itself is light and fluffy and swirled with cinnamon goodness and it just pulls apart so easy!

I know the recipe looks long and I know some people (like me) are scared of yeast, but honestly, try it, it will change your life or at the very least brighten your morning plus your house will smell of cinnamoney goodness for days and really isn't that reason enough?!

Oh and before I go, here are some shots of OH and I and Mum and Dad at Pancakes By The Pond for Mothers Day lunch :)


Em x

Wednesday, March 23, 2011

Low Fat Creamy Mushroom Pasta


I have avoided pastas with creamy sauces for years, living in fear of the calories and the fat, plus for some reason I really do just prefer a pasta with a good tomato sauce. But anyway, I found this recipe for a low fat version of Pasta Boscaiola, roughly translated means pasta with mushrooms, and it sounded delicious plus I had a hankering for pasta with a lovely creamy sauce that wasn't too rich so I had my fingers crossed that this might be it!

All you need is:

250g pasta
1 x onion (diced)
2 tspns crushed garlic
125g 98% fat free short crust bacon diced (rind removed)
200g button mushrooms (sliced)
1/4 cup dry white wine
250ml tub of light cooking cream (I used the Philadelphia one)

Cook the pasta as per packet directions, I used spaghetti and just chucked it in a big pot of boiling water while I made the sauce.

Spray a large fry pan with non stick oil and add the onion, garic and bacon. Cook for 3-4 mins or until onion has softened.

Add mushrooms and cook for another 2-3 mins.

Add the wine and bring to the boil. Stir in the cooking cream and make sure everything is well combined.

Allow the mix to simmer for 5-6 mins, season with salt and pepper if desired.

Check your pasta, if it's ready, then drain and return to the pot. Pour the sauce into the pot and stir well to combine.

This dish serves 4 and it is spot on. It's not too rich or too creamy, but just a lovely light meal that both OH and I really enjoyed (and it's rare that a full fat meat loving man will agree with this little calorie conscious vegetarian girl!)

Hope you all enjoy as much as we did!

Em x

Wednesday, February 2, 2011

Caramel Bread and Butter Pudding

You know secretly I think OH is enjoying this whole 'I'll make you whatever you want for dessert to make up for me having pudding' thing because last weekend when I asked him, instead of the standard 'i dunno' he said 'oh well I had a look in the recipe folder and (pause while he rifles round in the kitchen cupboard looking for the recipe folder - wtf - I didn't even know he knew we had recipe folders let alone where they were!) I wouldn't mind trying this Caramel Bread and Butter Pudding.' Several seconds later my jaw and my mouth re-connected and I said something along the lines of 'oh well yes very well then I haven't made one before that would be good' and kind of quietly babbled to myself while I took the folder back to the kitchen to review the recipe! Now I have always wanted to make a bread and butter pudding and have oodles of recipes for different varieties but given I have never tried one I was unsure of the textures and consistencies and was a big ol' scaredy cat really. But this one looked pretty simple so why the hell not!

Caramel Bread and Butter Pudding

3/4 cup brown sugar
80g butter plus extra for spreading
300ml thickened cream
2 cups milk
4 eggs
3/4 loaf of white bread (crusts removed)
Maple syrup

Preheat oven to 180°C/160°C fan-forced.

Place brown sugar, cream and butter in a saucepan over low heat. Cook, stirring, for 10 minutes or until melted and smooth. At this stage is tastes spectacular...resist the urge to eat it all....Set aside to cool completely - preferably in a different room to avoid temptation...

Meanwhile spread one side of each slice of bread with butter. Cut in half diagonally and arrange, overlapping, in a greased dish. Try and arrange them so they look pretty but are kind of well packed in there.

Whisk milk and eggs together in a jug and then add to caramel. Mix well. Pour over bread and if you have time, set aside for 15 mins to absorb.

Place dish in a large baking dish. Pour boiling water into baking dish until halfway up side of smaller dish. Bake for 50 minutes or until golden and just set. Cool for 10 minutes.

Drizzle with maple syrup when fresh out of the oven.

Serve with vanilla ice cream or whipped cream :)


Really not that hard to make and to be honest I had no idea how it would come out, but it was delicious, the custard set beautifully and the bread had soaked up so much flavour and was crispy and golden on top. Massive fan of this one and will be trying some other variations in the future!!

Happy Wednesday :)

Em x

Sunday, January 23, 2011

Sunday Baking and The Catch Up.....

So what do you do when your stuck at home all day and you can't go for a nice lil Sunday drive?

You make yourself a whole fleet of lil cars : )


And some lil creatures that you can pretend you saw whilst on your Sunday drive in your new vehicle!


I got these awesome cake pans for Christmas from my parents so took the opportunity to try them out today and my god was I impressed! Can't wait till I have lil ones to make these for and with....

Ok so the catch up...what has been happening, yes I know I have been avoiding the subject. Well I should start by saying that the new job did not start off as planned, but things are now starting to look up in that department and hopefully I can start doing the job I was hired for which would be nice. Secondly the house is coming along well, have spent the last half of today trying to get the retainig wall finished out the back (and trying to work off the million calories in frosting that I consumed this morning)...also this morning, just on a side note, we had fresh honey like right out of the honeycomb this morning on freshly baked bread and the only words I have are oh my gooey honey goodness!! Now what else is going on....today was the first time I have actually done some proper baking since like before Christmas...not good, not good at all!

What else....OH and I went for a road trip the other weekend and on the way home we stopped at a road house which we thought would serve your average selection of greasy food....we were proven wrong when OH got this massive marinated steak burger and mine was the same but with a massive vegie pattie!! Best burger and chips I have had for a very long time.


And given that we had spent the weekend in a room with views like this


Whilst enjoying meals on our balcony like this


We had a pretty good mini-break!!

But for my final piece of news...some of you might remember I have been talking about planning a wedding and trial cupcakes and blah blah blah....well the wedding should have been on the 8th of Jan so about a fortnight ago...but for a few reasons it didn't go ahead. We decided a few days before Christmas to postpone it and take twelve months to work on things. I will be the first to admit that the 8th of Jan was an awful awful day and I don't know if things are going to work out or not, but I know that we were not ready to take that step so only time will tell I suppose. And I still have my baking and my shoes...even if my love life is up in the air!

Anyway, thats it, my last month or so in a nut shell...things will return to normal around here from now on, I have had my appropriate sulking period and now am willing to proclaim myself as officially BACK!!

Em xx

Tuesday, December 21, 2010

Spinach and Cheese Damper and Some Sparklies!

So tonight I made a big batch of pumpkin soup for Mum and Dad for dinner, and I decided the best thing to go with that was some nice crusyt hot out of the oven damper!


This is a Spinach and Cheese Damper and was really easy to make! I had horrible visions of it being rock solid and awful but it was crusty on the outisde, soft on the inside and ,most importantly, delicious!

This recipe served 4 and I used the following:

1 cup self raising flour
25g butter chopped
1/4 cup milk
1/4 cup grated cheese
80g baby spinach

Pre-heat oven to 200C and line and grease a baking tray.

Sift flour in a bowl and rub in butter to form crumbs.

Cook spinach in the microwave until wilted and squueze to remove excess moisture. Add spinach and cheese to flour and stir to combine.

Make a hole in the centre of the mixture. Combine milk with 1/4 cup water and pour into well. Use a knife to stir dough. You may need to add a bit more flour to reach a nice soft, sticky, yet workable consistency.

Knead dough on a lightly floured surface until smooth.

Roll into a ball and place on baking tray. Brush with a little milk and cut a cross into the top.

Bake for 20-25 mins or until base sounds hollow when tapped.

So nice fresh out of the oven with some butter!! And can you see all the melty cheese goodness in there??


Only 4 more sleeps!!


Em x

LinkWithin

Related Posts Plugin for WordPress, Blogger...