Sunday, September 16, 2012

Pie, Pie and more pie!

Well what a day today has been! The day started off cold, wet and windy and Mr B and I feared our day off would go to waste, but then Mum and Dad showed up to lend a hand and they brought enough motivation with them to bring the sun back out for a little while. Mum and I got our green thumbs on in the garden, potting plants and tidying up some of our garden beds whilst Dad and Mr B got stuck into building our new pergola. It's amazing how much difference all the work makes to the look of the house! Just as we had all finished lunch, our ears pricked up to the sound of a car in the driveway and it was none other than Ali and baby Noah calling in for a long awaited catch up. A great day turned into an awesome day (who would have thought I would be saying any day that involved gardening was an awesome day.....)

Whilst we are on the confessional trail, I have another one to make.....we have had pie for dinner EVERY night this week.... but in all fairness Mr B brought me a family sized pie maker for my birthday last week and we all know I get a little excited about new kitchen appliances.....


One of the pies we made this week was this Haloumi and Fish Pie. The combination of the fish and the rice with the currants topped with melty haloumi is fantastic on it's own, but then add in the golden, crispy, flaky pastry and you are on a winner! 


Haloumi and Fish Pie 

You will need:

1 brown onion, finely chopped
  • 1 tspn crushed garlic 
  • 1 tspn crushed wet basil
  • 1/2 cup long-grain white rice 
  • 1/4 cup currants
  • 1/3 cup dry white wine
  • 400g tin of diced tomatoes 
  • 250g firm white fish fillets
  • 1 x 250g pkt haloumi, coarsely grated or thinly sliced
  • 1 sheet of reduced fat puff pastry
  • 1 sheet of reduced fat shortcrust pastry

  • Preheat oven to 180°C. 

  • In a lightly greased frypan, add the onion and garlic and cook for 3-4 minutes or until onion softens. 

  • Place the rice in a microwave safe dish, cover with hot water and cook in 5 minute bursts on high, stirring regularly, until cooked. 

Place fish fillets in an oven proof dish and cook for 15 mins if fresh, 25 mins if frozen. 

Add the diced tomato, basil and wine to the onion and garlic. Bring to the boil and then allow to simmer for 12 minutes. Stir in the cooked rice and currants. 

Once the fish is cooked, break it up with a fork and then stir through the sauce mixture in the fry pan. Now if you want, you can serve it up right here and now with some thinly sliced haloumi on top and some crusty bread. Believe me, this is how I had the leftovers and it was delicious. 

Or you can carry on and turn it into a pie! 

If you have a pie maker, pre-heat it and cut the pastry into the appropriate size discs. Use the shortcrust pastry for the base and if you have a family sized pie maker, use about 2 cups of the mixture for your filling. 

Cover with thinly sliced or grated haloumi and then top with your puff pastry lid. Now in a family sized pie maker, this will take around 15-20 mins to cook. In a smaller pie maker it would take around 10-12 minutes. I found that this recipe made enough to fill the family size pie and there was still a bowl leftover for lunch the next day.  

  • If you don't have a pie maker, never fear, you could follow the same steps with a pie dish, brush with some melted butter or egg-wash and place it in the oven to cook for around 20-25 mins or until the pastry is golden. 

We served ours with some cabbage casserole. My Mum used to make this all the time when I was younger and it was the one thing I just baulked at every single time but now, I love it! Go figure hey! 


Mrs B xx

Friday, September 14, 2012

Mum's Cheesy Vegie Filo Pie

Hello RDO - how I have missed you! You know since I changed my hours at work to having every second Friday off, the week where I actually work 5 days seems to go FOREVER!! But then you wake up on Friday's like today where it's cold and wet and all I have to do is get out of bed, let the lambies out for a run around and make Mr B and I brekkie before I crawl back into a nice warm bed. And this RDO is extra exciting because last night Mr B and I started playing with the Cheese Making Kits he brought me for my birthday. At the moment I am staring at some farmhouse cheddar which is nearly ready to move from the press and there is a beautiful big ball of fresh ricotta in the fridge that we made with the left over whey last night! We had a sneaky sample of the ricotta last night and it is honestly like silk, smooth, creamy, silky ricotta...I'm in love. Sorry Mr B - although I caught him making eyes at the cheddar several times last night....

So with all this cheese we are going to be making, we need some tasty cheesy recipes and my Mum is THE go-to person for cheesy recipes....like this one for her Cheesy Vegie Filo Pie! This pie is packed with vegies and it's got loads of flavour - if you're into garlic and cheese, you're going to want to get all over this pie! 


You will need:

6 sheets filo pastry
1/4 cup melted butter
1 x head of broccoli diced
2 x carrot sliced into thin sticks
1 x onion diced
1 x capsicum diced
2 x small zucchini sliced into thin sticks
4 cloves of garlic crushed
1 cup of grated mozarella or colby cheese
1 cup of grated cheddar cheese

Grease a rectangle oven proof dish and pre-heat oven to 180C

Combine cheese and garlic in a large bowl.

Line dish with 3 sheets of the filo pastry, brushing each layer with butter and sprinkling with some of the cheese mixture.

Arrange vegetables on top of filo pastry. Sprinkle with some more of the cheese mixture. Season with pepper.

Top with remaining filo sheets, brushing each layer with butter and sprinkling with the last of your cheese mixture. Finish with a layer of filo. Make sure the edges are sealed all the way round - this ensures your vegies steam nicely.

Bake for 50-60 mins or until pastry is golden.

Enjoy!!

Mrs B xx

Sunday, September 9, 2012

Feelin' The Birthday Love!

There was some serious birthday love going around for my big day this year!

Mr B spent hours in the kitchen every night this week creating my birthday cake - I'm so proud of him and the morning of my birthday, when he just couldn't wait any longer, he brought it in to show me at 8am! I think he might be pretty proud too - and so he should be! I just love everything about it, from the little bow with purple glitter on the front to the lolly jewel heel - and not only did he dye the frosting but the actual cakes are pink and blue as well!!


And you might think that ok on your birthday it's cool to be woken up at 8am with a glorious shoe cake and presents, but then you like go back to sleep right? Uh no.

We had a breakfast date with Mum and Dad! This was just incase my old-age dementia had already kicked in and I couldn't find my spot at the breakfast table.....


And this is me with a hot cup of tea and my freshly toasted english muffins, smothered in avocado, tomato, cheese...oh and don't forget the birthday candles!


Now I think I have mentioned before, the way we do birthdays in our family basically means that if it's your birthday, you have next to no say in it. Everyone else gets together and plans the day out and you just go along for the ride. I love the way we do birthdays, I couldn't imagine doing it any other way!

Once we left Mum and Dads, our first stop was North Hobart. Dad and Mr B dropped Mum and I off at the top end of the street and the general idea was we would work / shop our way down to the bottom end of the street where they would be happily browsing at a Harley shop. This was very exciting as there are lots of lovely shops in North Hobart that Mum and I both love, but never get a chance to look in. I think you could tell we were slightly out of practise with the shopping because we barely got a quarter of the way down the block and the boys were back! It didn't matter though, we had shopped up some gorgeous bargains and found a hidden gem of a florist / gift shop on the way!

Our next stop was further down the road in town and after a nasty incident where Dad squashed Mr B behind a door, Mum and I decided to investigat The Stocking Shop, which is full of all things scarf, stocking, socks, jewellery, hat and glove related....it's one of those shops where you just love so much that you get scared and run out without buying anything....which is exactly what we did!

All that shopping makes you hungry so we headed down to waterfront and I was super excited when we pulled up outside Jam Packed. It's a lovely little cafe set that opens up into a beautiful huge stone atrium. And the best thing is it's so peaceful in there, you wouldn't know you were right next to a busy road or right on the waterfront.


The menu was packed full of so many delicious things that we didn't know what to have.....well OK the boys did, it was mainly just Mum and I who had some serious deciding to do, but EVERYTHING looked so good!

This is what we ended up with clockwise from the top....Dad had fried eggs on toast with chips (which he used to dip into the runny eggs much to Mum's horror!), Mum had mushroom bruschetta, I had a mushroom and gruyere cheese omelette with sourdough and Mr B had fish and chips! And yes the lime milkshake is mine....but it was my birthday!  All the meals were delicious and we were all extremely impressed - I think it will become a regular haunt of ours! Plus Mr B surprised me at lunch with a gorgeous charm for my pandora bracelet of a high heel boot with the Harley emblem on it - it's so cute!


After lunch we headed back to Mum and Dad's where they absolutely spoilt me with gifts. Not only did they buy Mr B and I a new coffee table, but they also brought me some gorgeous scarves (the scarf addiction is nearly as bad as the shoe addiction!!), some beautiful brooches and PURPLE GUMBOOTS - complete with fleecy gumboot socks!


When we left Mum and Dad's, Mr B took me bowling! We used to go bowling all the time and I'm so glad we went today, it was so much fun! Although I definitely peaked somewhere in the middle of the first game, it was all downhill from there!

Then we stopped and picked up some Praties for dinner (I have been hanging out for Praties for AGES!) and some Southern Comfort and Lime (I have been hanging out to try this for AGES too!) and headed home to put our pj's on, our feet up and watch a DVD!


And look at what Mr B brought me to play with!!


I read about this family sized pie maker in a magazine a few weeks ago and was so excited to try one out!

And I spotted these cheese making kits at our local home brew shop awhile ago and told anyone who would listen about them. The Specialty Cheese Kit makes Brie, Camembert and Blue Cheese and the Hard Cheese Kit makes cheeses like Cheddar, Coldby and Gouda, plus it tells you how to turn the whey into Ricotta so nothing goes to waste! I can't wait to give them a go and see what the results are like.


Oh um...yeah....we tried the birthday cake too....it was delicious!!


 See....birthday love!


And we can't forget the Happy Day After Your Birthday breakfast....bacons and heart shaped eggs on toast! 


So that's it for another year! I had such a great day - Mum, Dad and Mr B put in a massive amount of planning and effort to bring the day together and to keep it all a surprise and I think that's what makes it so special - not what you do or what you get, but the fact that the people who mean the most to you all get together and plan a day that they think you will love and then you get to experience it with them. I can't thank them all enough. 

Mrs B xox

Friday, September 7, 2012

Rainbow Cake

A few months ago when a friend of mine approached me to see if I would make a Rainbow Cake for her, I will admit I was a little taken aback when I saw the photos - these things were freakin' amazing! And they wanted me to do one? My first thought was 'are you insane!?' but my second thought was 'I'll give it a go!' 

Thankfully my birthday fell roughly 2 weeks before she required the cake so it was the perfect opportunity for a test run and this is how it went down....

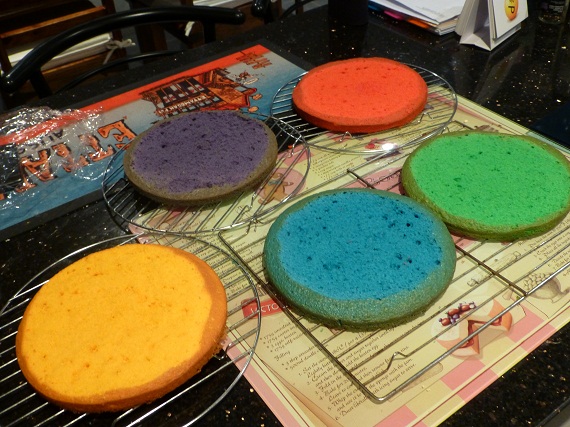
Earlier in the week I made two vanilla cake batters and divided them evenly between 5 bowls. I used Wilton icing colours to dye each one a vibrant colour......

Post-baking and levelling to ensure 5 equally sized cakes......

After a night in the fridge, all stacked up and ready for a crumb coat of frosting......

4 batches of frosting, 1/2 a kilo of butter and a colony of chocolate butterflys later and we're done!! Mr B and I had to show some MEGA restraint NOT to cut into it last night. We were so keen to see how it looked!

The spread at work today - Flowers, cards and morning tea!
Who's a spoilt girl then!?

Ta-Da!! Cue happy dance, excited squealing and the taking of far too many photos....

Inside shot! 

Oh yeah - the rainbow cake....a total success!! 

Mrs B xx

Thursday, September 6, 2012

Cranberry Rice Krispie Bars

I am experiencing a conundrum and I just don't know that I like it. You see right now, I am sitting on the couch, having been banished from my own kitchen for the majority of the evening....I was allowed in for long enough after work to frost my birthday cake to take to work tomorrow and that was it....banished. I mean it's not all bad, Mr B is in there slaving away on my birthday cake, but for there to be cooking and baking and things involving cake and frosting going on in my kitchen without me? Well. I just don't know how comfortable I am with that! And yes I did say birthday - my birthday is this Saturday so I'm doing the right thing and taking a cake to work tomorrow and it is one spectacular cake! Well I think it is, I hope it is when we cut into it anyway!! All will be revealed tomorrow!!


Anyway, earlier this week I was throwing together Mr B's lunch box and had a minor melt down when I noticed he was running rather low on snacks. After berating myself for being a bad housewife and not doing any baking over the weekend, I decided to search the cupboards for something that would work.

I found rice bubbles, dried cranberries, marshmallows and cranberry jelly crystals....you know where this is heading don't you!

Cranberry Rice Krispie Bars

You will need
60g butter
200g marshmallows
1 pkt cranberry flavoured jelly crystals
4 cups rice bubbles or rice krispies
1 cup dried cranberries

Add the butter and marshmallows to a large microwave safe bowl. Heat in 40 second bursts, stirring inbetween, until melted and combined.

Mix through the jelly crystals, rice bubbles and dried cranberries.

Grease and line a small slice tin.

Press mixture into the tin - if you have trouble with the mix sticking to your spoon or whatever your using to press it down, try running the spoon under hot water first.

Leave in the fridge overnight to set.

Remove from the tin, slice and enjoy!!

And Mr B has officially declared these THE BEST rice krispie treats he has ever tried....at this stage I don't feel it's necessary to point out they contain fruit dried or otherwise!

Mrs B xx

Wednesday, September 5, 2012

Chicken Cacciatore - Mr B Style!

Mr B picked this recipe out of a magazine I was reading and with a few tweaks here and there, it quickly became Chicken Cacciatore, Mr B Style so I think it is appropriate for none other than Mr B himself to tell you all about it! Hello Guest Post!!!

 
Hello there INTERMENET peoples its Mr B here. Tonight i made something special for someone very very   special... ME lol no only joking it was actually for my beautiful wife. It was really easy to make... but don't tell her that - i told her it was really difficult to make. Not being one to brag but it was awesome who said blokes cant cook. Mum taught me well .Well i am off so do try it you wont regret it.   ENJOY.
Mr B
 
Chicken Cacciatore (serves 2)

You will need:

2 skinless chicken breasts (cut in half horizontally to make 4 equal sized fillets)
1 tspn olive oil
1 tbspn crushed garlic
1/2 cup dry white wine
1 small onion, sliced
1/2 cup chicken stock
1 tspn caster sugar
400g diced tomatoes (we used a brand that incorporated tomato paste in with the diced tomatoes....if you can't find that then add 1-2 tbspns tomato paste)
1/4 cup fresh parsley finely diced
100g dry pasta
Salt and Pepper

Heat the oil in a large frypan over high heat.

Add the chicken and cook until sealed on both sides. Remove from the pan and set aside.

Add the garlic and onion to the pan. Cook for 3-4 mins or until onion softens.

Add the wine and simmer until mixture has reduced by half.

Add in the diced tomatoes (and tomato paste if using), sugar and stock. Bring mixture to the boil and then return the chicken to the pan. Season with salt and pepper.

Reduce heat so that the mixture is just simmering, partially covered, for 20 - 25 mins.

Meanwhile place the pasta in a microwave safe dish and cover with hot water. Cook in the microwave on high in 4 minute bursts until tender. 

When the chicken mixture is nearly done, stir through the parsley.

Serve pasta topped with chicken cacciatore.

And as Mr B said, enjoy!!!

Mrs B xx 

Sunday, September 2, 2012

Happy Fathers Day!

Today has been a lovely day. The sun has been shining and the company has been fantastic and now I'm sitting on the couch with a full belly and Mr B curled up next to me asleep and I'm pondering whether to cook raisin toast for dinner or just to serve up rice cakes with tomato and cheese!?  All the signs of a great Fathers Day!

The one thing my Dad wanted more then anything for Fathers Day this year was to spend the day going for a bike ride with Mum, Mr B and I. Thankfully it was also the second day of Spring and the cold weather eased up enough to let the sun, and the warmth, shine through.

Mum and Dad arrived at our house early this morning and Mr B had runny eggs and crispy bacon on buttery toast on the table for him and Dad in record time! Mum and I tried some avocado and tomato on toast and whilst I have never been a fan of avocado, the last few times I've tried it, I've been quite partial to it - maybe I am growing up after all!

A Fathers Day tradition in our house is to go and visit the graves of Mr B's father, Dad's father and Mum's father. Sometimes in the hustle and bustle of every day life it's easy to overlook these things and I am a big believer in remembering people as they were, but I also believe it's important to visit, especially on days like today. It makes me so thankful to still have my Dad with me.

Our next stop was an old favourite - the Riverview Inn. We used to go here for lunch alot when I was younger and it was good to see the meals were still as big and as delicious as always! Dad had the tried and true chicken parmy, I had salt and pepper squid, Mum had oven baked mushrooms stuffed with pesto and feta and Mr B had the chef's special - oven cooked chicken breast topped with prawns, scallops and squid in a cheesy sauce!


After such a big lunch, we needed to walk it off! So we headed up to a place called Soldier's Walk. Soldier's Walk is a memorial walk with more then 500 plaques recognising local men who lost their lives during war, and along the walk you take in some of the most picturesque views of Hobart. But that's not the best bit, the best bit, and the reason we were there today, is that my Dad played a huge roll in planting all the trees at each memorial plaque and looking after the area so he was able to give us a guided tour today!


Then four tuckered out people headed home for a relaxing drink, more laughs and, of course, presents!!


One of which was a whole batch of this Peanut Butter and Corn Flake Slice that Dad had picked out of a recipe book of mine a few months ago. I had a little bit of it the other day when I made it and my goodness was it good! Crunchy, chewy, peanut butter and chocolate heaven! And this is how you do it..........


Peanut Butter and Corn Flake Slice

You will need:

125g butter
1/2 cup caster sugar
1/3 cup light corn syrup or glucose syrup
2/3 cup crunchy peanut butter
4 cups corn flakes
375g milk chocolate

Line a 20cm x 30cm slice tin with baking paper and lightly grease.

Place the butter, sugar, syrup and 1/3 cup of the peanut butter in a large microwave safe bowl. Heat in 40 second bursts on high until sugar is dissolved. Heat for a further 60 seconds and stir to combine.

Gently stir in the corn flakes. Spread mixture into pan and press down firmly. Now place the remaining 1/3 cup peanut butter in a microwave safe bowl or jug and heat in the microwave for 30 seconds. Pour over the corn flake mixture. Refrigerate for 30 mins.

Place the chocolate in a microwave safe bowl and heat in 40 second bursts, stirring in between, until melted and smooth. Pour over the corn flake mixture and place back in the refrigerator for at least an hour before cutting.

Happy Fathers Day Dad!!

Mrs B xx

LinkWithin

Related Posts Plugin for WordPress, Blogger...