Monday, December 19, 2011

Christmas Chocolate Cups


I love these!! OH and I made some of these yesterday and I'm going to make some more later in the week for the Christmas Day lunch my work holds every year. They are so quick and easy and they just look adorable!!

All you will need for the tartlets is:

250g packet Arnott's Butternut Snap Cookies
1/3 cup cream
200g milk or dark chocolate melts
65g unsalted butter, chopped
(If you don't have unsalted butter, use the salted and add 1/2 cup caster sugar)

Pre-heat oven to 180C.
Place butter, cream and chocolate in a microwave safe bowl and microwave on medium high in 40 second bursts, stirring inbetween until melted and smooth.

Pour into clean and dry bowl and refrigerate until cool but not set - approx 20 minutes.

Place 12 biscuits over each hole of a twelve hole patty pan tin.

Bake for 2-3 minutes or until soft.

Remove from oven then carefully press softened biscuits into tin with the back of a spoon to mould into a cup shape. Allow to cool. Remove from tin and transfer to serving plate. Repeat with remaining biscuits.

Fill biscuit cases with 1 heaped teaspoon of chocolate mixture then place in refrigerator for about 20mins or until set.

Now here is where it's good to get the kids...or OH involved! Line up your jaffas, marshmallows (big and small), spearmint leaves, star shaped pretzels (found in the bags of mini pretzels) and 1/2 cup chocolate frosting on the bench like so...


To make the little reindeers....
Cut a regular marshmallow in half and place cut side down for the snout.
Stick a jaffa to the marshmallow using some chocolate frosting.
Place two mini marshmallows onto the tart for the eyes. Add a small drop of black food writing gel or chocolate frosting to the eye whites.
Cut mini star shaped pretzels in half and gently push into chocolate filling to make ears.

To make the little holly leaves....
Place a jaffa in the middle of the tart.
Place two spear mint leaves on either side to make the leaves.

These really are very easy and something great to get the kids involved in this Christmas :) even if you don't have little kids, I recommend making these with a friend, is there anything better then sitting in your kitchen with someone you love creating something yummy and adorable!

Hope you all have a fantastic week :)

Em x
Em x

Saturday, December 17, 2011

Gingerbread Cheesecake Bites

Want a quick, easy and delicious Christmas treat? Then try these Mini Gingerbread Cheesecakes...


All you need is....
1 pkt gingerbread cookie mix (you can find it with the cake mixes at the supermarket)
250g cream cheese
1 cup icing sugar
1/2 tspn vanilla essence

Heat oven to 180C and grease a 12 hole muffin tray - you will probably only use 8 holes though.

Make the gingerbread dough up as per packet directions.

Shape 1 heaped tablespoon of dough into a ball and place into each muffin cup.

Press thumb or use two teaspoons to make a deep indentation in the centre of each ball.

Using an electric mixer beat the icing sugar, vanilla and cream cheese until smooth.

Spoon the filling into the indentations.

Bake for about 10-12 mins or until a skewer inserted into the gingerbread comes out almost clean.

Allow them to cool completely before removing.

Store in the fridge :)


Not long now!!!!

Em x

Wednesday, December 14, 2011

Roast Vegetable and Polenta Stacks

Have you got your Christmas tree up yet?

Last year I made a vow that this year I would have my tree up at the start of December, it would be up for the entire Christmas season and our house would be a virtual Christmas wonderland.....

Apparently I lied. So due to issues coordinating everyone and holidays and wedding planning commitments, here we are, nearly half way through December, 12 days out from Christmas and we are just putting our tree up. Granted our home is more festive and has more decorations then usual so thats one part achieved at least....next year I will conquer you tree just you wait!!


Look at that cheeky little elf in the background!


Anyway, on Monday night, Mum and Dad came up to help OH and I put the tree up so I thought the least I could do was feed them!


This recipe is dead easy, not to mention light and packed full of flavour!

All you need is:

1 cup of polenta
2 cups of vegetable stock
1 cup of water
1/2 cup of milk
1 jar of basil pesto
2 red onions cut into small wedges
4 roma tomatoes quartered
2 zucchini thinly sliced lengthways
1 red capsium cut into chunks
2 bbq flat mushrooms sliced
200g of extra light ricotta

Ok so the night before combine the polenta, stock, water, milk and half of the pesto in a microwave safe bowl. Microwave covered for 6 minutes on high, but stop and give it a stir every 2 minutes. Continue in 2 minute bursts until all the liquid is absorbed and you have a nice thick mixture, pour into a greased slice tin or oven dish and pop it in the fridge overnight.

The next night....

Pre-heat oven to 200C. Grease an oven dish and add the onion, tomatoes, zucchini, capsicum and mushrooms. Bake for 40-45 mins, giving them a toss occasionally.

Combine the ricotta with the remaining pesto and place back in the fridge.

When the vegies have about 20 mins remaining, get the polenta out of the fridge. Slice into 8 even bits and place in an oven tray. Bake for 15 mins or until the vegies are done.

Now to dish up I just placed one of the polenta slices on the plate and spread it with a spoonful of the ricotta mixture. Spoon over 1/4 of the vegies and top with a big dollop of the ricotta mixture. Finish with another slice of polenta and a sprinkle of parmesan.


Oh yum!! That polenta with the pesto mixed through it is just bursting with flavour!

A great light and easy meal for a warm summer's evening :)

Hope you are all having a fantastic week!

Em x

Monday, December 12, 2011

My Bridal Knees Up :)


Yep, that’s me baby....a bride....I still can’t quite match the word up with myself in my head you know, like me? A bride? Are you insane? And like that wasn’t hard enough, being a Bride means having a Hen’s night and that is something I just never ever thought would happen. Like the idea of a typical Hen’s night didn’t interest me much....but then the ladies I work with introduced me to their idea of a Hen’s night and I was sold!

Invitations went out a few weeks ago and all they told us was where to meet.....that we would be doing a local version of The Amazing Race...and to bring food, a picnic blanket and a torch....oh and you had to travel in car loads and did I mention each car / team had to have a theme??? Eeeeeekkkkk.


My team consisted of my gorgeous bridesmaid Ali, my beautiful Mother and two of my longest and most treasured friends, Alice and Alana. Our team decided to run with the Bridal theme, thrown in with some hot pink, some black and some bling! I made all of our shirts with iron on transfers and stick on rhinestones and they came up really well!


OH’s sisters came as the ‘Monsters In Law’ – how cute were their shirts!!


There was also a team of Pirates and Wenches complete with fake tattoos, tea leaf stubble and blacked out teeth– definitely winner of the best costume award


And the Grey Nomads, purely based on colour, not on age!

The night started at a local park where we were given our first challenge. There was a huge slide that went down the side of a hill and you got 10 points for each team member that went down the slide in a certain time frame....I’m sure we looked hilarious but it was so much fun, the worst part was walking back up the hill to do it all again!


Next it was back in the cars with 3 pages worth of cryptic clues to guide us on our race....along the way there were various questions to answer and challenges to complete, it was so much fun, although we did get horribly lost, we still managed to have a ball doing it! After making our was around most of Sandy Bay, Taroona and Kingston, our team arrived at the final destination (albeit half an hour after everyone else.....) which was a stunning property with an equally stunning garden. The other teams had set up all the picnic blankets and food down by the pond and we had ourselves a very civilised waterfront picnic.


Then it was time for games! There was ring toss....I think you can imagine what we were throwing rings on....and using my Hen’s Night super powers I actually got one on!! OH’s sister also managed to get one on so I think this means she is next in line!!! And we also had a bit of a scavenger hunt which saw ladies running around the property like women possessed....obviously because the prize was chocolates!!


And what Hen’s Night would be complete without a jelly cake???


And here is the cake I made to take on the night too :) It was part of our theme as it matched the one on my top!


So whilst our team may not have won the race, it didn’t matter...I am very lucky and feel very honoured that people went to so much trouble for me and I couldn’t have asked for a better night or better people to spend it with.

Em x

Friday, December 9, 2011

Mini Boozy Christmas Pudding Cake Balls

Tomorrow night is a big night for me :) Awhile ago you may remember I wrote a post about a Bridal Knees Up that I went to which was organised by some ladies I work with for two of our co-workers who were about to get married....well this weekend it's my turn! I'm so excited and nervous and scared all in one because a) I never thought I would have a hen's night and b) all any of us know is where to meet up and that it's kind of going to be like the amazing race...that's it!!

Anyway I have been working on a cake to take to the party tomorrow night (stay tuned for a full run down on the night AND the cake!!) and I had a big bowl full of mud cake off cuts that I had big plans for!


So you will need:

Roughly 3-4 cups of mud cake
1/2 cup of chocolate frosting
60ml of whiskey
Red glace cherries (halved)
375g of milk or dark chocolate melts
100g of white chocolate melts

To make these I crumbled up the mud cake off cuts, added the chocolate frosting and whiskey and mixed it all up until it was holding together well. Place in the fridge for 2-3 hours.

Roll tbspns of the mixture into balls (or I used my lil gadget that puts holes in and fills cupcakes to make them nice even shapes) and place on a lined tray and back in the fridge for a few more hours.

Melt the milk or dark chocolate in 50g batches. Roll the balls in the chocolate to cover and using a fork or a toothpick place them back on the tray and repeat with remaining chocolate and balls and you guessed it, back in the fridge till set.

Melt the white chocolate and drizzle a teaspoon over the top of each pudding. Top with 1/2 a red glace cherry. Back in the fridge one last time and your done!!

Oh yummmmm....mud cake...chocolate...glace cherries and hellloooo whiskey!!!

Happy Friday night everyone :)

Em x

Sunday, December 4, 2011

Candy Cane Whoopie Pies

The first week of December is always very exciting in our house, not only does it mean the onset of Christmas but it also means the Toy Run. The Toy Run is where thousands of bikes, laden with toys, ride together into the city where we fill up the waiting Salvation Army trucks, have a drink and just revel in the fact that the entire waterfront is just full of bikes as far as the eye can see....and anyone who rides a bike will know the sound of all those bikes thundering down the highway is incredible...but what I love the most? All the people that come out and line the streets, the excited kids, the families, the oldies, it just attracts everyone and being a part of it is the best feeling. Hopefully next year I will be confident and experienced enough to take my own bike :)


This year we were treated to an air show by 6 jets whilst we were down at the waterfront.


Dad's bike, my Uncle's new bike and OH's bike


OH and I ready for a drink in the sun and a sticky beak at all the bikes!

The onset of Christmas to me means Christmas trees and decorations and lots of time with family and friends....but it also means christmas baking! My head is filled with ideas involving marshmallows and gingerbread and reindeer and holly sprigs...but at the top of my list??

These Candy Cane Whoopie Pies!


For the whoopie pies I used the Classic Chocolate Whoopie recipe from Amy Treadwell's Whoopie Pie cookbook, although I halved it, and I also adapted the Mint Buttercream recipe from that book as well.

Classic Chocolate Whoopies

Just under 1 cup of plain flour (about .8 or .9 of a cup)
1/3 cup cocoa
.75 tspn baking soda
1/4 tspn salt
4 tbspns butter melted
.5 cup sugar
1 egg
.5 cup milk

Combine all the ingredients in the bowl of an electric mixer and beat until smooth.

If the mixture seems too thin, let it sit for a few mins and it will thicken up.

Heat the oven to 180C and spray 2 x baking trays or whoopie pie trays with cooking spray.

Drop tbspns of the batter onto trays about 3-4cms apart. Place the trays in the oven, one at a time for 10 mins or until they spring back when lightly touched.

Allow the cakes to cool before filling.

Candy Cane Buttercream

2 cups icing sugar
125g butter
1 tspn peppermint essence
1/2 tspn strawberry essence
1-2 drops pink food colouring (you might not need this if your strawberry essence is pink)
12 long candy canes

Combine everything except the candy canes in the bowl of an electric mixer and beat well. The buttercream should be nice and thick. The best way to check it is to get a tablespoon full and hold it upside down, if it holds its shape and stays on the spoon it's good! Set the frosting aside.

Carefully snap the top ends off your candy canes to creat 12 mini candy canes. Set these aside.

Put the remaining candy cane ends in a freezer bag (I suggest double bagging), take them outside and bash them with a mallet until they are nice and crushed.


Now for the assembly!

Take 1 of your whoopie pies and place a good tablespoon of filling in the centre. Top with another whoopie pie and squeeze the two gently together to push the filling out to the sides. Now roll the edges in the crushed candy cane. Place about 1/4 tspn of filling on top of the whoopie pie and push one of the mini candy canes into it. Repeat with remaining whoopie pies and filling.


These just look so cute!! And they taste amazing...believe me, we struggled not to eat all the filling while the whoopie pies were cooling down!!

Hope you all had a fantastic weekend!

Em x

Thursday, December 1, 2011

Birthday Suprises

So I think I mentioned to you all before that for OH's Bday I had decided to take him on a suprise holiday to Queensland (about a 3 hour flight from where we live...and about 20C warmer most days!)

We had the most amazing trip. The weather was gorgeous, the cocktails were cold, the view was stunning and the company was perfect :)

Let me show you the trip in pictures....


"SUPRISE!! We have a plane to catch!!"


Watching the sunset on our first night at Caloundra...


And enjoying some of the local lobster....


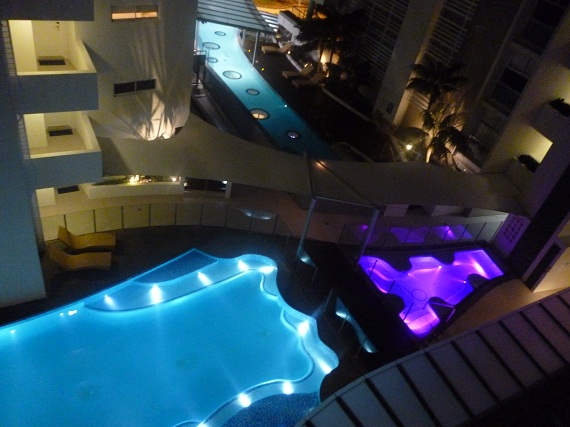
Looking down from our balcony to the resort's pool and jacuzzi....


We were up early every morning and down at the beach for a walk and paddle


Not far from where we were staying was the famous Ettamogah Pub, it's such a cool place!


And also in the area was the Big Pineapple....


And the Ginger Factory! I even found myself a sailor!


But who needs a sailor when you have a man like this??


There is also a chocolate shop at the Ginger Factory....would you believe these shoes are made of chocolate??? I don't know wether to eat them or wear them!


And how cute is this lil evil elf?? I just wanted to take him home!!


We even found a Harley shop....and I nearly came home with a new toy!


But that was nothing compared with what I wanted to bring home from here! This Christmas shop was HUGE and amazing, I felt like a kid on...well on christmas morning!!


We had lunch at a place called Legends Cafe which was like an old American Diner filled with all sorts of Warner Bros. and movie memorabillia...


...and then we checked into our next hotel which was located on the Gold Coast...and again the view was stunning (the beach looked pretty good too!!)


To try and escape the weather we went to an indoor mini golf course...OH blames the fact that he lost on having to constantly do battle with dinosaurs and being kidnapped by King Kong....


This was the view from our balcony at night...just when you thought it couldn't be more beautiful.


On OH's Bday we went to the Hard Rock Cafe for dinner, the meals were amazing, the cocktails were great, but the best part?? When the entire restaurant sung OH Happy Birthday :)


And when we finally arrive home from our big trip, tired and burnt but relaxed and happy I finally got to give OH the birthday cake I made for him :) It's a penguin made from chocolate mud cake, his body is covered with chocolate frosting, his eyes are coated in white chocolate and his feet and nose are covered in banana frosting. I hollowed out the belly and filled it with vanilla ice cream before I served it and scattered some sour penguin lollies around. I'm so happy with how it came out!


Happy Birthday to my gorgeous boy xxx

Em x

LinkWithin

Related Posts Plugin for WordPress, Blogger...