Showing posts with label cheesecake. Show all posts

Wednesday, July 3, 2013

Kit Kat Brownie Cheesecake Bars

Let me just say you need to make these bars.

They are not just regular old cheesecake bars or brownies.....they are cheesecake bars AND brownies, sandwiched TOGETHER with Kit Kats....

Um excuse me but where have you been all my life?!

Initially I was a little hesitant that they would be complicated to make or that Mr B would not be entirely thrilled with them given they were bound to be rich and indulgent but wouldn't you know it, they were dead easy and Mr B fell head over heels in love with them!

I think that aside from how incredible they taste, one of the best things about these bars is how they look when you cut them, I love the defined layers and chunks of Kit Kat!


To make these Kit Kat Brownie Cheesecake Bars you will need:

For the Brownie layer....
115g butter
45g dark chocolate
1/4 cup cocoa
1 1/4 cups caster sugar
1 tspn vanilla
1 egg
3/4 cup plain flour
5 regular sized kat kat bars or one bag of fun size kit kats

For the Cheesecake layer
450g cream cheese, softened
2/3 cup caster sugar
2 eggs
2 tspns lemon juice
2 tspns vanilla

Pre-heat oven to 175C and line an 8x8 inch pan with baking paper or a silicone mat.

To make the brownie base, start by combining the butter and chocolate and heat in a microwave safe bowl for 40 seconds and stir until smooth.

Add the cocoa, sugar, vanilla, egg and flour. The batter will be very thick, but that's good. Beat until combined. Spoon the batter into your pan and smooth the top.

Layer the Kit Kat bars over the top of the brownie batter in one layer, ensuring the whole surface is covered.  It will look something like this....


Now, onto the cheesecake. In the bowl of an electric mixer, combine the cream cheese and the sugar and beat until smooth.

Add the eggs one at a time, beating well after each addition.

Add the lemon juice and vanilla and beat until smooth.

Pour the cheesecake mixture over the Kit Kat layer, smoothing the top with a spatula or the back of your spoon. Bake for 35-40 mins or until the top is firm but still has a bit of jiggle to it. A toothpick or skewer inserted should come out clean.

Allow the bars to cool completely and refrigerate overnight before cutting.

Enjoy!

Mrs B xx

Tuesday, May 28, 2013

Strawberries and Cream French Toast Roll Ups

This week whilst I am taking it easy, Mr B is stuck with doing most of the cooking and he is doing a really good job of taking care of me. I think sometimes he is not entirely sure what to do with me because the entire time we have been together I have been active, I hate sitting still and am always cooking or cleaning (ok so like 90% cooking, 3% cleaning, 7% avoiding cleaning) or doing something, but this week I am completely the opposite, and he is completely freaked out by the whole thing.

To be honest though I didn't think it would be like this.

When the Doctor said I would need a week off to recover, I literally laughed at him and begged him to let me go back to work early and when he said No, I planned a huge long list of things I wanted to do like spring clean the house, clean out the wardrobe, go on a mega shopping spree, walk 2 or 3 times a day and cook up an absolute storm.....but now I'm thinking he had a point because I have just enough energy to get out of bed sometime before lunch, make breakfast, stare at the computer for an hour or two and then I need a sleep.
 
Sigh.

Anyway, yesterday I decided I would do something nice for Mr B and I for dessert. Something easy obviously, but also something semi-french inspired to remind us that this time last year we were leaving Paris and on our way home from our honeymoon.

It does not get much easier then these let me tell you. For a fairly simple dessert, these looked fantastic when they were all dished up and we felt like we were indulging ourselves in something decadent, plus they tasted incredible! I was actually really surprised because Mr B does not do french toast, but he loved these and asked for them again tomorrow night....it would have been tonight but then he discovered there is still Cider Jelly in the fridge....


For these Strawberries and Cream French Toast Roll Ups you will need:

6 slices of white bread, crusts removed and flattened with a rolling pin
strawberry jam
100g cream cheese, softened
1/4 cup thickened cream
2 tbspns caster sugar
1 egg, lightly beaten
1 tbspn milk
dash of vanilla
20g butter

Combine the cream cheese, cream and caster sugar and beat until smooth and fluffy.

Place a tablespoon of the cream cheese mixture on one half of each piece of bread. Top with a heaped teaspoon of strawberry jam. Roll the bread up to enclose the filling and place on a plate, seam side down.


In a fry pan over medium heat, melt the butter. While this is happening, combine the egg, milk and vanilla and beat well with a fork.

Dip each piece of bread into the egg mixture, ensuring it is completely coated, and place seam side down into the fry pan. Repeat with remaining bread.

Increase the fry pan heat to medium-high and cook the bread for 30-40 seconds on each side or until golden.

Serve hot with whipped cream for dipping. Or I imagine they would be equally nice drizzled with chocolate (or nutella!) and a big dollop of cream on the side too.                                   


Enjoy!

Mrs B xx

Wednesday, March 20, 2013

Baileys Irish Cream Cheesecake

Earlier in the week I told you about the Baileys Irish Cream Cheesecake I made Mr B for St Patrick's Day and I think it's about time I shared it with you!

Mr B and I both love Baileys soeven though we only buy ourselves a bottle as a treat maybe once a year, it has still managed to feature in some of the major moments of our life.....

....like the night Mr B and I got engaged and we sat drinking a glass of Baileys to celebrate,

.....or the night we moved into our first home together and I put a bottle of Baileys on the kitchen bench and said I don't care how much you drink but we are not going to bed until everything is unpacked!

.....or last year when we were in Ireland on our honeymoon and one afternoon whilst relaxing in a little Irish Pub I sent Mr B to the bar to get me a Baileys and milk....the whole bar went silent and the bar man leaned over and quietly asked if it was some sort of weird Australian hangover cure.....


And now we can add 'making a super awesome and delicious cheesecake' to that list.

The rich Baileys cheesecake filling paired with the Baileys whipped cream and the dark chocolate ganache is a sure fire hit in our book - so much so that when I took my Dad his regular care package of baked goodies last night, there was no way Mr B was letting a slice of this walk out the door with them. Needless to say I spent all night talking about, and flashing photos of, this cheesecake that was sitting at home in our fridge and Dad was none to pleased to discover he had missed out!


Baileys Cheesecake - easily serve 8-10. (Updated November 2013)

To make the base and the filling you will need:
1 x 250g pkt of plain sweet biscuits
75g butter, melted
500g cream cheese, softened
3/4 cup caster sugar
3 tspn gelatin, dissolved in 1/4 cup hot water
1/4 cup Baileys Irish Cream
1 cup thickened cream

Place biscuits in a food processor and process until they are down to fine crumbs.

Add the melted butter and mix well. Press the mixture into the base of a lined 24cm springform pan and place in the fridge.

Whip the cream and set aside.

Using an electric mixer, combine the cream cheese and sugar until smooth. Add the Baileys and gelatin and beat until combined. Gently fold through the whipped cream.

Pour the filling into the prepared crust and refrigerate for 3-4 hours or until set.

To make the whipped cream topping you will need:
1 cup thickened cream
1 tbspn Baileys Irish Cream

Beat the cream until it's nice and thick. Add the Baileys and beat until just combined.

Spread the whipped cream over the cheesecake filling and place back in the fridge for 30 mins.

To make the dark chocolate ganache you will need:
100g dark chocolate melts
2 tbspns thickened cream

Place the chocolate and cream in a microwave safe jug and place in the microwave for 40 seconds on high. Stir until smooth.

Set aside to cool for 5-10 mins until the ganache thickens slightly. Use a spoon to drizzle over the top of the whipped cream.

Place in the fridge until ready to serve.

VARIATION - I have made this cheesecake using Oreo's for the base and adding a dash of vanilla to the filling. I also gave the whipped cream topping and ganache a miss and dusted it with a little bit of cocoa instead and it was fabulous!


And here are some cupcakes I whipped up for Mr B for Easter - I was aiming for little Easter baskets and even though I was a bit rushed in doing them, but basically I just made some vanilla cupcakes, spread a thin layer of vanilla frosting on top, piped a ring of frosting around the edges and then filled the ring with jelly beans! How easy is that and I think they are really sweet and really effective!


Enjoy!!

Mrs B xx

Wednesday, March 6, 2013

The Not So Mythical Lemon Cheesecake


As long as I have known Mr B he has been obsessed with my Mum's lemon cheesecake.

Not bad seeing as he had never tried it.

I'm not sure how it came up in conversation, but one night Mum mentioned her Famous Lemon Cheesecake and I have to say it was met with lots of puzzled looks around the table. I'm now 27 and I don't remember ever trying it.....Dad has a vague memory of it.....but for Mum it's still there at the forefront of her mind, she included it in a book she made for me of all of her favourite and most popular recipes and even still knows the recipe off by heart!

Needless to say, over the years Mum has copped a lot of flack about the 'mythical' cheesecake. Mr B is not one to let up on anything....especially when it comes to cheesecake.

So last night when we went to Mum and Dad's for tea....our very first dinner cooked in their brand new kitchen...and after a little bit more furniture moving and a delicious frittata made in Mum's brand new oven-proof fry pan...Mum presented Mr B with her homemade (and non-mythical) lemon cheesecake! Mr B is actually lucky he didn't end up wearing it because Mum banned him from looking in the fridge all night, to the point where Dad stood guard in front of it to stop any sneaky looks, not that it stopped him from trying...or from stirring Mum up about what was actually in there.

I love this series of photos, look how excited Mr B is and how proud my Mum is....


All that was left to do now was top it the cheesecake with whipped cream and a light sprinkling of nutmeg and dig in!


Is there anything better than a big slice of cheesecake with a gorgeous buttery biscuit base, light as air filling and fluffy whipped cream?? Oh that's right there is....sharing it with your nearest and dearest. And I think it was the perfect way to christen Mum and Dad's new kitchen.


Here is a sneak peek at the kitchen in Mum and Dad's new house (and my Mum pottering around in it!).....isn't it amazing? It's so bright and there's so much space to move around and don't even get me started on the storage space. I just love it.


Now back to the Famous Lemon Cheesecake

You will need:

375g plain sweet biscuits
115g butter
1 tspn mixed spice
225g cream cheese
1/2 cup caster sugar
1 pkt of lemon jelly crystals
1 cup boiling water
Juice and ring of 2 lemons
1 tin (375ml) of Carnation evaporated milk
Whipped cream and nutmeg to serve

Place the biscuits in the bowl of a food processor and process until fine crumbs.

Add the butter and mix spice. Process to combine.

Lightly grease a round 25cm diameter springform tin with butter. Press the biscuit mixture firmly into the base and up the sides of the tin. Try and get as close to the top as you can around the sides. Place in the fridge to chill.

In the bowl of an electric mixer combine the cream cheese and sugar. Beat well.

Meanwhile, combine the jelly crystals and boiling water with the lemon juice and lemon rind. Set aside to cool.

In a clean bowl, beat the evaporated milk until stiff.

Gently fold the evaporated milk into the cream cheese mixture.

Add the jelly mixture to the cream cheese mixture and beat on low speed until all ingredients are combined and mixture is smooth.

Pour the filling into the prepared biscuit case. Place in the fridge for at least 3-4 hours to set.

Serve topped with freshly whipped cream and a sprinkling of nutmeg.

Enjoy!

Mrs B xx

Tuesday, December 4, 2012

Lemon and Lime Crepe Cake

By now I think we all know that I like any excuse to make a cake. So last week when Mum and Dad came for dinner, despite it being 2 days before Mr B's birthday, I decided to make a birthday cake.

I had been given a jar of home made lemon curd a few days before and it gave me the inspiration for this amazing Lemon Curd and Lime Cheesecake Crepe Cake!

This is what it looked like cut in half.


And the birthday boy, who is still talking about the cake and would have eaten the whole thing on his own if we had let him!


Lemon Curd and Lime Cheesecake Crepe Cake

8 crepes
1 cup of lemon curd
200g cream cheese, softened
1/4 cup icing sugar
1-2 tbspns lime juice

Start by making your cheesecake mixture. In the bowl of an electric mixer, combine the cream cheese, icing sugar and lime juice to taste. Beat until smooth and creamy. Set aside.

To assemble your cake, start by placing one crepe on a large plate / platter / cake stand. Spread with 1/4 of the cheesecake mixture. Top with another crepe and spread with 1/4 of the lemon curd. Repeat layers until all of the crepes, cheesecake and lemon curd have been used.

Place in the fridge for an hour to chill.

And that's it! How easy is that! That is what I love about this cake, it's so quick and easy to throw together, but at the same time it's quite impressive to look at when you cut it open and see all the layers. Plus it tastes divine and really there are so many different things you could do with the filling like my Nutella and Strawberry Cheesecake Crepe Cake!

Enjoy!

Mrs B xx

Sunday, November 4, 2012

Strawberry Cheesecake Slice

This weekend Mr B and I discovered 'Click and Collect' groceries which basically is where we can do our groceries online and collect them the next day at no extra cost! Every weekend I get increasingly frustrated at the amount of time it takes to do the shopping list, go to the supermarket, pick everything up, come home and unpack, but I did have some concerns regarding the freshness and quality of the goods we could receive, so on Thursday night, Mr B and I sat down and did our order online and when we rocked up at the supermarket after work on Friday, there were our groceries all ready to go! We were really impressed, the fruit and vegies were all good quality and everything was well packed, plus it has made such a HUGE difference to our weekend! We have had so much extra time which equals lots less stress and lots more quality time. It has been fantastic!

And to celebrate, I made Mr B one of his favourite snacks for his lunches this week.....Strawberry Cheesecake Slice!


You will need

1 packet of Lattice Biscuits
125g of cream cheese
125g butter
1/2 cup caster sugar
4 tbspns strawberry jam
2 tspns gelatine
1 tspn vanilla essence

In the bowl of an electric mixer, combine the cream cheese, sugar and butter. Beat until smooth, creamy and pale.

Dissolve the gelatine in 1/4 cup of hot water and add to the cream cheese mixture with the strawberry jam and vanilla. Beat until thick and creamy.

Line a baking dish with baking paper and then layer half of your lattice biscuits, shiny side down, in the dish.

Spoon the cheesecake mixture over the top of the biscuits and smooth with the back of a spoon or a spatula.

Top with the remaining biscuits and refrigerate for 3-4 hours or overnight.

Cut into squares and serve!

Anyway, I best be off, I have Apple Pikelets cooking away and I need to get ready because tonight Mr B and I are kicking off a month of celebrations for Mr B's birthday (against Mr B's will, but I love any excuse to celebrate!). We are heading out to dinner and then to a Johnny Cash Tribute Show so it should be a really good night....not to sure how we will go at work tomorrow, but we will worry about that later!

Mrs B xx

Sunday, October 28, 2012

Cookies and Cream Cheesecake

It's a sad afternoon here in the B house....we have just come to the end of 4 lovely days off and whilst this morning we woke up feeling like we had definitely had more then the normal 2 days off, it was over all too quickly, and here we are, Sunday evening with work in the morning....massive thumbs down to that!

So before I disappear into Sunday night misery, let's talk about how Mr B and I spent our 4 days off.

On Thursday Mr B did some work outside while I stayed inside and had a craft day. I think I have told you all before that I make my own jewellery and I also sell it too. Anyway recently I was looking for a new way to present my items and then I remembered my old stamping kit! When I was younger my Mum and I got right into stamping and we had all the gadgets and the ink pads and the embossing powders and we used to always make our own Christmas cards and Birthday cards and it was so much fun. I really enjoyed getting back into it and I am so happy with the outcome. Here is a pair of earrings that I made on one of my new backing cards....


Then on Friday Mr B and I went shopping for some furniture to go in our new pergola, we have our eye on a wine barrel for the table, but we can't find any barstools to go with it - everywhere expects you to buy the stools as part of a set with a matching table, but we will keep looking. We also caught up with our friends and their beautiful baby for lunch, I got my nails done, Mr B got a tetanus shot, we had a nanna nap and followed our tradition of watching the long weekend fireworks.


On Saturday Mr B did some more work outside and I tackled my To-Do list (damn that To-Do list!). It started with a visit to Mum and Dad who had just returned home from a week away and boy was it good to see them! Next stop was the grocery shop, oh how I hate grocery shopping, the supermarket is like a big black hole, you walk in and rush around and you walk out loaded up to the eyeballs with heavy bags and all of a sudden an hour has gone by! Then by the time you get home and unload, it turns into a half day job! Anyway, my next stop was right down in town - I was headed to the local craft superstore to check out their range of stamping stuff. After my little play around the other day I was keen to get back into it. As it turns out, the world of stamping has jumped ahead in leaps and bounds and there were little tiny thin adhesive stamps that you stuck onto big clear blocks to use and to be honest I just wanted some tried and true wooden stamps. I did leave with plenty of ideas though.

My next stop was a local organic health food store that I have been dying to spend some time exploring. Oh my goodness how much fun did I have. I have had a hankering for muesli lately, but not your regular supermarket muesli, I wanted specific things in it, like banana and coconut and big juicy sultanas and I didn't want 'weird' stuff in it, like paw-paw - I have issues with dried glace style fruit in my muesli. I did a couple of laps of the store just to get a feel for everything and then I grabbed my basket and loaded it with all the goodies I could find. Did I mention the peanut butter?? I have always wanted to make my own peanut butter and with the peanut butter hating Mr B nowhere to be seen, I pounced on the machine and added some freshly made crunchy peanut butter to my basket too! Now I just have to wait until next weekend to actually try my muesli creation.....

Last night Mr B had a craving for pizza so we descended on Pizza Capers and managed to demolish 3 delicious pizzas -all of which, totally unintentionally, had potato on them.....chicken and potato, potato and bacon, potato, rosemary and beef.....hello potato pizza heaven. Then we waddled our way to the movies and watched Frankenweenie 3D, Mr B has been dying to see it and frankly if it stops him walking around saying 'Frankenweenie!' all the time, then I'm willing to give it a go, plus it was a Tim Burton film and you generally can't go wrong there!


And today - the last day of our 4 days off, and the first day of sunshine so it was time to get out and make the most of it! After our usual Sunday morning Egg and Bacon breakfast, we jumped on the bikes and hit the road. The last time we went for a ride it was super windy and I got blown around all over the show which led to me totally freaking out and bursting into tears....I have been really hesitant about getting back on the bike, but I knew the longer I left it, the harder it would be. Mr B and I had such a lovely ride, the sun was shining, the road was quiet and to top it all off we stopped up at Meadowbank Dam for a laze around in the sunshine.


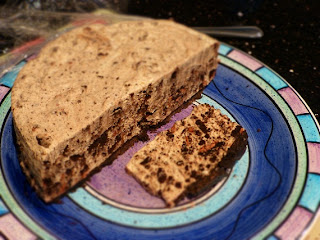
Do you know what would have made that laze around in the sunshine absolutely perfect? Obviously, it was sunny and warm and I had my gorgeous Mr B there with me....but some cookies and cream cheesecake would have just topped it off nicely! Mr B and I have demolished this cheesecake for dessert over the last week and to be honest, this is not a Mrs B creation, this one was all Mr B's doing! If you want to whip one of these babies up for yourself, here's how it's done....

Cookies and Cream Cheesecake (Updated November 2013)

3 x 150g pkts Oreo Cookies (I used 2 x chocolate and 1 x classic)
50g butter, melted
500g cream cheese, softened
3/4 cup caster sugar
3 tspn gelatin, dissolved in 1/4 cup hot water
2 tbspn lemon juice
1 cup thickened cream

Place 1 pkt of the oreos into the bowl of a food processor and process until they are down to fine crumbs.

Add the melted butter and mix well. Press the mixture into the base of a lined 20cm springform pan and place in the fridge.

Place the remaining biscuits into the food processor and process so that they are broken up into small chunks, but not to the point where they are crumbs, you want chunks of biscuit in your cheesecake!

Whip the cream and set aside.

Using an electric mixer, combine the cream cheese and sugar until smooth. Add the lemon juice and gelatin and beat until just combined. Gently fold through the whipped cream.

Stir through the cookie chunks and pour the filling into the prepared crust. Refrigerate for 3-4 hours or until set.

Now when we made this cheesecake we thought 'well you know it's not huge, but if we get 2-3 nights out of it that will be great.' 5 nights later we are still going!! I made some lindt chocolate whipped cream to go with it and it was superb.

Well there is no avoiding it...time for lasagne, followed by pancakes....ice cream....bed!!

Mrs B xx

Monday, June 11, 2012

Bavarian-on-a-Biscuit


Hello out there!! 

We are back into baking with a vengeance in our house!! It has been a long weekend here so not only did 3 whole days off provide for extra sleep in time, but it also provided for extra baking time!! 

Friday evening / Saturday morning resulted in these Bavarian-on-a-biscuits....Sunday evening resulted in a carrot and vanilla cake, some cheese and vegemite twists, cheese and chutney scrolls and some lemon muffins with strawberry cheesecake filling!! Did I mention I missed my lil kitchen while we were away? I just feel at home pottering in there, with the electric mixer going, trays lined up waiting for the oven, ingredients scattered across every bench top.....it makes me happy and I feel content there. We do have our disagreements from time to time....the appliances and the ingredients conspire and recipes don't turn out how they are supposed to, but then we have our moments when things just work - like these Bavarian-On-A-Biscuits! 

What could be better then chocolate chip cookies, topped with creamy bavarian and smothered in a fudgey chocolate ganache? Not much really, but I am about to jump into a hot bubble bath with my bavarian, a book I haven't been able to put down, House of Night No. III - totally better then the Twilight books, and a large glass of Captain Morgan's spiced rum, totally became addicted to it and Jameson's while we were away. I'm thinking between the bath, the dessert, the book and the rum, I could be onto a winning combination! 

Anyway, if you want to make these sweet little treats to indulge yourself either in a hot bath, snuggled up on the couch, hiding in the wardrobe, whatever takes your fancy, this is how it's done.....

You will need:

100g cream cheese at room temperature
1 cup thickened cream
2 tbspn cocoa
1 cup icing suger
20 chocolate chip cookies - 12 to be crushed and used in the bavarian and 8 to be kept whole for the assembly
300g chocolate melts
2 tbspn butter

In the bowl of an electric mixer, combine the cream cheese, cream, cocoa and icing sugar. Beat until smooth. 

Fold in the crushed chocolate chip cookies. Place mixture in the freezer for 4-6 hours or overnight.

When the bavarian mixture is chilled, place the chocolate melts and butter in a microwave safe bowl and heat in 30 second bursts, stirring in between until smooth.

Place the remaining cookies on a baking tray. 


Using a small ice cream scoop, scoop bavarian onto each cookie - be sure to press the bavarian gently onto the cookie to ensure it sticks.


Working quickly, dip each cookie, bavarian side first, into the chocolate. Don't be scared to push it right down into the chocolate to ensure your bavarian is totally covered. I find the best thing to do is have your chocolate in a deep jug and just push the biscuit straight in and pull it straight out. Place the biscuit on your tray and move onto the next one. Place the tray in the freezer for 4-6 hours to set before transferring to an airtight container. Now just remember it is a ganache on the top, so they won't be set set, but they will firm up. And do I even need to mention how the biscuit goes all soft and chewy and delicious!?


How has your weekend been? 

We have had a busy, but productive weekend. Alongside all that cooking, we managed to get in a bike ride to see Mr B's Pop - which involved us being fed a lovely roast lunch and getting to show off all our holiday snaps....and my first night time ride on the way back....which also led to my first 'night time run out of fuel on the side of the highway', but hey, that's what reserve tanks are for!! On Sunday we went to visit Mum and Dad at their new favourite local B&B - aptly named Emily's cottage - then on the way home we treated ourselves to Photoshop Elements 10 - first a new camera and now this....we are becoming quite the lil photographers!!! And that brings us to today...sleep in.....brekkie in bed.....groceries....walk around the paddock to check for lambs - 5 of our sheep are ready to have their lambs any day now which is all new and exciting for me - and we finished the day off with a visit from our friends - Ali is 6 months pregnant and she is just one of those people who looks stunningly beautiful the whole way through her pregnancy and really brings to life the definition of 'glowing' and her partner Matt just gets along so well with Mr B...they are scarily alike...they are the sort of friends you just love to see, doesn't matter if you are having a crisis or a bad day or a celebration, you know that if they are there, there will be smiles and laughter and good times so it was lovely to see them and catch up on all the travel stories and photos. Mr B also did some serious showing off in the kitchen tonight by cooking chicken involtini for dinner - totally worth it's own post later in the week....and that brings us to right now...my bath is run, my rum is cold and my bavarian is waiting so I hope you all had a lovely weekend and enjoy the week to come! 

Mrs B xxx

Monday, April 16, 2012

The King of all Desserts!


Let me just start by saying three simple things....

Gooey Chocolate Pudding....

Cheesecake..........

Creamy Chocolate Mousse....

Are we all on the same page here? I thought so.

This dessert is easy to throw together, will impress even the fussiest of guests, and is a chocolate lovers delight!!

All you need to do is whip up a Chocolate Self Saucing Pudding and when it comes out of the oven, mush it all up and allow it to cool.

For the next layer beat 250g of softened extra light cream cheese with 1/2 cup of caster sugar and 300ml of thickened cream. Pour over the cooled pudding.

For the third and final layer combine one packet of prepared chocolate mousse mix with 100ml of thickened cream and 2 tbspns chocolate sauce. Pour over the cheesecake layer.

I swirled some chocolate sauce through the top of mine and placed it in the fridge to set overnight - totally worth the wait, such a fantastic combination of flavours and just what the Doctor ordered after a very long Monday!!

On the flip side, I sold my car on the weekend, I have been trying to sell it for 9 months now, advertising in the local paper, getting up early to park it on the side of the road and wouldn't you know it, out of the blue someone comes to look at it, takes it for a cruise and pays cash for it within the hour....so lucky I got my bike license last week isn't it!!

We also picked up our tickets and final itinerary for Europe and Ireland tonight too, I can't believe this time in a fortnight we will be in Galway....totally blows my mind...also totally freaks me out - I don't do flying!

Anyway, I will fill you in on the trip more over the next few days - in the mean time, make some Triple Chocolate Pudding and enjoy yourself xx

Mrs B xx

Monday, October 24, 2011

Strawberry Cheesecake Brownies

This weekend just gone was one of the best weekends I've had for a long time. OH is working away at the moment and not only was he home for 3 whole days but the weather was simply gorgeous as well. On Friday we picked up some new furniture for our bedroom, posted off all of our wedding invites and went out for a lovely seafood dinner with friends. Then on Saturday we went for a ride up to Meadowbank Dam and sat out on the jetty with our lunch.....


And that night we chilled out on the couch with the world's biggest plate of nachos (which OH washed down with an equally huge glass of buorbon!)


Yesterday we had a bit of a sleep in and spent the day pottering around in the garden before taking my bike out for a quick spin, OH even taught me how to ride the ride on mower and dump the oil out of my bike so it's ready for a service :)

So what better way to top off a beautiful summer's weekend then with these decadent Strawberry Cheesecake Brownies?


You will need:
125g butter
180g dark chocolate melts
1/2 cup caster sugar
2 eggs, lightly beaten
1 1/4 cups plain flour
3 tbsp cocoa powder

Preheat oven to 180C / 160°C fan-forced.
Line a slice tin with baking paper.
Place butter and chocolate in a heat proof bowl in the microwave and heat in 45 second bursts (stirring in between) until smooth.
Pour into the bowl of an electric mixer and beat in the sugar.
Add eggs and beat until well combined.
Add the flour and cocoa and beat well. Mixture will be fairly thick.
Spread mixture into prepared pan and pour cheesecake mix over. Bake for 20 - 30 minutes or until top is firm to touch. Set aside to cool.

For the cheesecake mix you will need:

180g cream cheese
1/4 cup caster sugar
1 egg
1/3 cup strawberry topping

Combine all the ingredients in the bowl of an electric mixer and beat until smooth.

I hope you all had a fantastic weekend and made the most of the weather!

Em x

Sunday, June 12, 2011

Some Weekend Treats :)

So what does one do on a cold long weekend? One bakes of course!!


These lil babies were for OH's lunches, but they would be awesome desserts....some chocolate self saucing pudding topped with some creamy strawberry rice...the combination is decadent but so very good!!

Then we got invited round to OH's step mother's for dinner and because I believe it is rude to show up empty handed we made these lil strawberry swirl cheesecakes :)


You will need:
500g cream cheese
2/3 cup caster sugar
3 eggs
1 tspn vanilla essence
strawberry topping
2/3 cup sour cream
100g white chocolate melted
1 pkt butternut snap biscuits

Pre-heat your oven to 135C and line 2 x 12 cup muffin trays with muffin / cupcake cases. Place a butternut snap biscuit in the bottom of each case.

In the bowl of an electric mixer combine cream cheese and caster sugar. Gradually add eggs and vanilla.

Then add around 1/4 cup of strawberry topping and the sour cream. Beat until well combined. Pour in the melted white chocolate and continue beating.

Pour mixture into cases, you will only need to fill them about 3/4 as they will rise. Once this is done, squirt a small amount of strawberry topping onto each cheesecake. With a skewer gently swirl it through the mixture.

Bake for 20-25 mins and then refrigerate for 4 hours.

These are so delicious, OH refused to let me take them all to the dinner because he wanted to keep some for himself!!

And last but not least, some savoury goodness! We were in Melbourne last week and when we got home we needed a quick and easy dinner...like these Sauteed Mushrooms on Toast


For enough to serve two people you will need:
250g mushrooms sliced
1 tspn smoked paprika
1 tspn smoked bbq seasoning
250g cherry tomatoes halved
200g cottage cheese
*We had this with 1/2 a loaf of Tigger bread but you could use any thick crusty bread

Combine the cottage cheese with the smoked bbq seasoning and place in the fridge.

In a frying pan over medium heat, cook the mushrooms and paprika with a tspn of butter for 6-8 mins or until golden. Add the cherry tomatoes and cook for a further 6-8 mins until the tomatoes have broken down. Season with salt and pepper.

Serve with cottage cheese mix and crusty bread :)

This was such a yummy dinner, a great combination and so easy!!

Hope you are all having a fantastic weekend :)

Em x

Thursday, March 3, 2011

Jelly Slice

This is another one of those things I have wanted to make for years but have never been game enough to try, but during a weekend baking frenzy I thought why the hell not!


For the base you will need:

1/2 pkt of crushed biscuits (Marie, Butternut Snap, Teddy Bears, whatever you prefer)
125g melted butter
A good spoonful of frosting (I had some leftover brown sugar frosting in the fridge so I added that - but you could use around 100g melted milk chocolate too)

For the filling you will need:

1 tbspn gelatine
2 tbspn water
250g cream cheese (at room temperature)
395g tin of condensed milk
1/4 cup lemon juice
150g white chocolate (melted)

For the jelly topping you will need:

1 x 85g pkt of jelly crystals
1 cup boiling water

Begin by lining a slice tin with baking paper.

Combine base ingredients in a bowl, if the mix looks too dry add more frosting / chocolate or butter. Press into the base of the tin and chill in the fridge while you prepare the filling and jelly topping.

Combine jelly crystals and boiling water in a small bowl and stir to combine. Place in the fridge to cool.

Combine the gelatine and water in a small bowl or jug and heat in the microwave for 10 seconds. Stir and heat again for a further 10 seconds. Stir well so that the gelatine is dissolved and allow to cool slightly.

In the bowl of an electric mixer beat the cream cheese and condensed milk until smooth.

Add the lemon juice and melted white chocolate. Beat until all ingredients are combined. Now might be a good time for a quick taste test to see if you want to add a lil more lemon juice - I like mine to have a real zing.

Add the gelatine mixture and beat for 3-4 mins, scraping down the sides as you go. Spread the filling over the chilled base and allow to chill in the fridge.

After around an hour the cheesecake filling should be set and the jelly should be cool. When this occurs, gently pour the jelly over the filling and place back in the fridge to set for around 2 hours.

Try not to sit down and eat it all in one go with a big spoon....I warn you it is very very tempting...and I must confess when I got it out and cut it up, the kitchen happy dance made a come back!!

Em x

Sunday, August 29, 2010

What a Weekend!!

Well I have lamb shanks cooking in my brand new ceramic dish so here is a quick look at the weekend so far!!

OH made his curry with coconut cream and it was spectacularly good, I found the woolies light organic coconut cream the best one calorie was and it tasted brilliant, just added a bit of creaminess to the sauce without making it too rich, definetly a keeper!

On Saturday we spent the day fishing here


Then today I went shopping and brought these...I'm particularly fond of the lil cardy : )


Before coming home and making these Cherry Ripe Cupcakes, first batch was a failure coz I tried to make dark choc cupcakes with cherry essence and the cocoa just took over, second batch I made vanilla cupcakes with a handful of dark chocolate chips, some cherry and coconut essence and then finished them off with a dob of chocolate frosting, a glace cherry and a sprinkling of coconut, they look and smell soooo good!


Also whipped up some Mini Turkish Delight Cheesecakes for OH to take to work this week, they were very very easy! No photos but here is the recipe - you could replace the turkish delights with 150g frozen raspberries if you want too but OH is going through a turkish delight phase!

350g philly cream cheese
1 pkt fun size turkish delights chopped
1 cup caster sugar
3 eggs
1 pkt oreos finely crushed
40g butter melted
1 tspn rose water essence

Line 2 x 12 cupcake tins and pre-heat oven to 160C (fan forced)
Combine the crushed oreos and butter in a bowl and press tspsn of mixture into each case. Bake for 5 mins.
Beat philly until light and fluffy.
Gradually add sugar. Beat well.
Add eggs one at a time.
Stir through turkish delights and rose water.
Spoon mix over bases and bake for 10-15mins or until just set.
Leave to cool in the oven with the door ajar.

Anyway, it's been such a busy weekend, but it's been great because I feel like we have got heaps done. We got to spend the day together yesterday, went to a friend's bday last night and then had today to potter around the house, clean, cook and we even went out for lunch and got the most delicious salad wraps!

I'm off to check on OH's shanks and cook my chicken and vegies : )

Till tomorrow xx

Em

LinkWithin

Related Posts Plugin for WordPress, Blogger...