Tuesday, May 27, 2014

Cherry and Chocolate Chip Blondies

Do you believe in love at first sight?

I do.

You see when I first saw this recipe for Cherry and Chocolate Chip Blondies I just knew I had to make them. Actually it was before I even saw the recipe (I'm shallow like that....), it was a photo of these blondies bursting with juicy cherries and chocolate chips that won me over and despite Mr B insisting that he did not like cherries in any form except glace, I decided to make them anyway.

This recipe is super simple to throw together and I really love the big chunks of cherries combined with the subtle sweetness from the blondie and the chocolate chips, plus I think the inclusion of fruit makes a nice change to your regular chocolate chip blondie. Don't be fooled into thinking you are limited to cherries though, oh nooooo, this is one versatile recipe - you can use blueberries, strawberries, raspberries or a combination of all of the above depending on what's in season (or clogging up your freezer!).  I'm thinking dark chocolate and raspberry blondies....blueberry and white chocolate....oh the combinations are endless!

And do I even need to mention the fact that 'cherry hating' Mr B LOVES them and whole heartedly refused when I said I would save him 'suffering through them' and take them to work (sorry girls!).

We have been taking these as lunch box treats but I also think they would be incredible served fresh from the oven with a dollop of cream.


Cherry and Chocolate Chip Blondies - Makes 12

115g butter
1 cup brown sugar, packed
1 egg
2 teaspoons vanilla essence
1 cup plain flour
3/4 cup chocolate chips (I used a mix of dark, milk and white chocolate chips)
1 cup cherries (or combination of raspberries, blueberries, strawberries, blackberries; fresh or frozen)
I used whole frozen cherries because I wanted big chunks of fruit but you can chop the fruit up if you prefer smaller pieces

Preheat oven to 175C and line an 8x8inch pan with baking paper.

Melt the butter in the microwave on medium high for about 60 seconds.

Add the brown sugar and stir to combine.

Add the egg, vanilla, and stir to combine. Add the flour, salt, and stir until just combined. Be careful not to over mix the batter as it will make your blondies tough.

Gently fold in the chocolate chips and the fruit (if you use frozen fruit, ensure it is still frozen at this stage or it will bleed through your batter). Pour the batter into your prepared pan and smooth it lightly with a spatula.

Bake the blondies for 27 to 32 minutes or until the edges begin to slightly pull away from the sides of the pan and the center is set.

Once cooked, let your blondies cool for at least an hour before slicing and serving.


Enjoy!

Mrs B xx

Saturday, May 24, 2014

Spinach and Yoghurt Sauce

A few weeks ago I was lying on the couch flicking through the channels waiting for something to take my fancy. As usual there was nothing on and just when I was about to give up and have a nap, a cooking show caught my eye.

I'm a sucker for any sort of cooking show plus I noticed that the lady was making lamb chops which are ALWAYS guaranteed to win brownie points with Mr B......except for that time I attempted to make spiced lamb chops and overdid the cinnamon effectively turning them into cinnamon donut lamb chops.....

Anyway, the thing that really intrigued me was not so much the lamb chops, but the Spinach and Yoghurt Sauce they made to accompany them. The sauce looked fresh and vibrant and I could not wait to try it out, plus I could do it under the proviso of cooking Mr B a special lamb chops dinner (hello brownie points) and serve it over some chicken for myself - totally win-win!!


Spinach and Yoghurt Sauce - Serves 4

150g fresh baby spinach (you can certainly use frozen spinach, I have tried it both ways but I think you get a better flavour using the fresh stuff)
2 tbspns olive oil
1 small onion, finely diced
1 tbspn crushed garlic
Juice and zest of 1/2 lemon
Pinch mexican chilli powder
200g Greek or Natural yoghurt
lamb cutlets or chicken breast to serve

In a large pan, heat 2 tablespoons of olive oil over a medium heat and add the onions and garlic. Once the onion is soft and translucent add the spinach and cook for 2 minutes or until the spinach has wilted.

Add the spinach mixture to a food processor and puree. Now add the lemon juice and zest, and mexican chilli powder and puree again until very smooth. Add the yoghurt and briefly process until combined. Season with salt and pepper. If you find your food processor is not quite doing the job (like mine) you can also use a stick mixer like a bamix.

Serve sauce over grilled lamb cutlets, chicken breast or fish.

You could also do a slight twist on this recipe, as suggested by my Mum, and reduce the amount of yoghurt to 120-150g, making the sauce a little thicker and ta-da you have a beautiful fresh Spinach and Yoghurt Dip.


Enjoy!

Mrs B xx

Saturday, May 17, 2014

Sweet and Spicy Vegetable Tagine

So for possibly the first time ever, I found myself asking Mr B if we could just stay home this weekend. We had absolutely no plans which in itself is rare enough (and normally makes me feel like I've either forgotten something or like we should make the most of it by making plans to go out and do something....and yes I do know that defeats the purpose of having no plans).

Anyway, our last few weekends have been so booked solid that I was actually really looking forward to just pottering around at home and doing all those things I never seem to have time for like painting my nails and trawling through hours of blogs and online shopping.....and then there's the fun stuff like vacuuming and dusting and washing which I always seem to have time for but avoid like the plague!

Initially Mr B was fairly shocked by this extreme change in behaviour but quickly put it down to pregnancy weirdness and made a bee line for the shed.

Despite my intentions, it's now late on Saturday afternoon, Mr B has just come inside for lunch and told me how productive he has been and asked how I've been going...

'Have you done a blog?'    Um, no....

'Did you get to look up that website you mentioned?'     Nope.....

'Did you do any of the baking you wanted to do?'     Um yeah well actually no......

'So um....what have you been doing?'

This is where I had an issue because to be honest I'm not entirely sure where the time has gone.....

Do you ever notice that when you start looking through blogs and websites and things that you seem to enter some sort of black hole and all of a sudden it's 5 hours later and you have no memory of how you got here or what you did? No? Oh....well....me either....

So before my day entirely disappears, I should do what I originally switched on the laptop to do roughly 6 hours ago which was to tell you about this Sweet and Spicy Vegetable Tagine.

I love all things moroccan flavoured and what I really love about this tagine is that it is hearty and simple and full of flavour, plus you can sit down and have a huge bowl for lunch or dinner without ending up with that heavy feeling often associated with some of our favourite winter comfort foods!


Sweet and Spicy Vegetable Tagine - Serves 4

1 onion, diced
1 heaped tbspn crushed ginger
1 heaped tbspn crushed garlic
2 tspns cumin
1 tspn paprika
500g pumpkin, chopped into 2-3cm cubes
400 sweet potato, chopped into 2-3cm cubes
250g parsnip, chopped
350g carrot, chopped
3 x small zucchini, diced
2 cups vegetable stock
400g tin of diced tomatoes
2 tbspns honey
1.5 cups dry couscous
Juice from 1/2 lemon

Heat 2 tbspns oil in a large casserole dish. Add the onion and cook for 2-3 mins or until softened. Add the garlic, ginger and spices and cook for 1 minute or until fragrant.

Add the pumpkin, sweet potato, parsnip, carrot, stock, diced tomatoes and honey to the pot and bring to the boil. Reduce heat to a simmer and cook for 15 mins. Add the zucchini and simmer for a further 20 mins or until vegetables are tender. Season to taste.

Place the couscous in a large bowl and cover with boiling water. Place a tea towel over the bowl and allow to sit for 5 mins. Fluff the couscous with a fork and squeeze over the lemon juice. Serve the couscous with the tagine and curl up and enjoy!


Enjoy!

Mrs B xx

Monday, May 12, 2014

Mothers Day 2014

Yesterday was Mothers Day which of course in our family means a day full of family, relaxation and just the right amount of spoiling.


This year was extra special because Mr B's Mum, who is a shift worker, had the morning off so was able to join us for breakfast.


Mr B and I were in charge of breakfast so we decided to go with one of our favourite dishes - the 'Sunday Morning Spectaculars.' Basically it is what we have for breakfast every Sunday, coffee (mandatory), buttery toast, bacon (for the non-vegetarians), tomato, avocado and our homemade yoghurt balls. Believe me it tastes just as 'spectacular' as it sounds!


This year was also a little bit special because next year will be my very first Mothers Day.....

I am beyond pleased to finally tell you that Mr B and I are currently 18 weeks pregnant with our little TJ and could not be more excited or proud or completely in awe of the whole thing if we tried.....

Even though I'm not quite a Mum yet, apparently being an 'expectant Mum' means you're also entitled to super cute Mothers Day gifts and cards.....this is definitely something I could get used to!

You will notice in the photo there is a pencil.....that is a 2B pencil from my Dad.....because I'm a Mum-To-Be.....get it!?


After breakfast, the boys disappeared to the shed in record time....that should have been my first sign that mischief was afoot.

Seconds later this is the sight Mum, Mr B's Mum and I saw whizzing past the lounge room window......


Mr B had been doing some work on the project bike him and Dad have and was excited that he got it going, which of course meant they had to take it for a test ride. Boys will be boys.


After breakfast we headed over to see Mum's Mum - so far we had seen four Mothers, and all before lunch time! We were on fire!!


In saying that however, it was lunch time, and we had places to be!

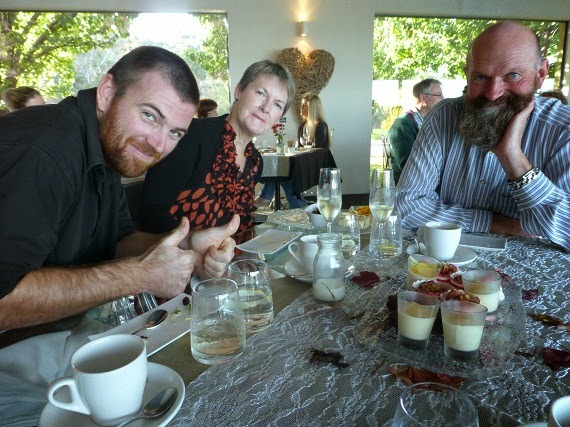
Dad and I had managed to track down a new local venue called Glen Albyn Estate offering Mothers Day High Tea that just happened to be set in the most stunning location - good food and a beautiful view?! We were in!


When we arrived at the Estate, Mum, Dad and Mr B were given a complimentary glass of champagne. Mr B is not a champagne drinker, but never one to turn down a free drink, he decided to give it a go.


We were soon seated for our High Tea and it didn't take long to figure out that we were actually seated above the pool which had a perspex cover over it. It was very different and very pretty....but also a little bit freaky, every time someone walked past our table my Dad's chair would rock with the water!

The savoury food soon came out and it was delicious, but the highlight was definitely the dessert selection. We were treated to a decadent selection of strawberry meringues with chocolate cream and fairy floss, baked ricotta cheesecake with stewed rhubarb, orange panna cotta and gooey chocolate brownies. Everything was incredible but I think my favourite was the ricotta cheesecake which surprised me because I thought it would be my least favourite!


Thumbs up all round!


And just when we thought our bellies were going to burst, the wait staff brought around giant trays of fresh baked scones with jam and cream......and let's be honest, no high tea is complete without a good scone and of course, a cup of tea!


By the time we had finished lunch it was close to 4pm so we headed home for presents!


It was such a big day and I have to say that by the end of it we were all buggered! But at the same time it was a really lovely day. I love any day that involves us all spending the day together and I can not believe that this time next year we will have a new little addition to our family to share it with!

Mrs B xx

Wednesday, May 7, 2014

Homemade Ricotta

Previously I have talked about our adventures in cheese making including a recipe for making your own ricotta using the whey that is often leftover at the end of the cheese making process.

Our recent success making Ricotta Gnocchi left me in desperate need of a way to have fresh ricotta on hand even when I didn't have whey to use. A quick search through some of my cheese making books and the internet led me a very simple recipe that requires no fancy ingredients and no special equipment bar a thermometer and some cheesecloth. The end result is a very high yield of beautiful soft, creamy ricotta that is miles better then anything you will ever buy in the supermarket. And the best part? It requires a whole 30 mins of your time plus 2 hours for draining.

Depending on what you are planning on using it for, you could easily halve this recipe if you only wanted a smaller quantity.

Homemade Ricotta - 1 kg

4 litres full fat homogenized milk
4 cups (1 litre) full fat cream
1 tbspn salt
150ml white vinegar

Combine the milk, cream and salt in a large pot and stir over medium heat until the temperature reaches 85C - this will take about 15-20 mins.

Add the vinegar and stir for 15-20 seconds. Turn the heat off and allow the mixture to sit undisturbed for around 20 mins.

Line a colander with cheesecloth. Gently spoon the curds from the pot into the cheesecloth. Allow the mixture to drain for at least 2 hours. The longer you leave it to drain the firmer it will be.

Once your ricotta is finished draining it is ready to serve! Store in the fridge for anywhere between 7-10 days but it won't last that long!


Aside from making ricotta last weekend, Mr B and I managed to squeeze in a trip to Salmon Ponds for their 150th anniversary celebrations and were lucky enough to be accompanied by Mr B's brother and niece. The rain and the wind actually disappeared for a few hours so it was a lovely day to wander around the grounds and soak up a bit of sun.


There was so much to see and do between the multitude of food stalls, cooking demos and bands, not to mention the free face painting, maypole dancing, craft and ice cream for the kids. This was all in addition to the every day activities like feeding the fish, the historical museum and the hatchery!


After sampling the most delicious goat pie with yoghurt and elderflower dressing and indulging in a devonshire tea, our only mission left for the day was to make it to the front of the line for face painting. We had waited all day for the line to go down but all it seemed to do was get longer so we were left with no option but to persevere and wait....and wait....and wait.....

But all the waiting was worth it when this little one (who had never had her face painted before) saw the finished product in the mirror. The ladies doing the face painting were incredible to watch, they were so quick!!


I'm so glad we made the decision to go because it was a really fantastic day full of family, great food and new experiences and to top it all off we even got to play in the Autumn leaves.....


Enjoy!

Mrs B xx

Sunday, May 4, 2014

Italian Risotto

As the nights here get colder, I recently found myself craving a big bowl of hearty risotto.

I immediately remembered a recipe I posted last year for Italian Mozzarella Stuffed Arancini  and set about making some minor alterations to it. I decided to use the basic risotto recipe from the arancini and bulk it up with some roasted cherry tomatoes, zucchini and some spinach.

I was really pleased with the way this dish turned out and I love that it is so simple to make yet full of colour and fresh flavours. You just can't go passed basil, tomato and mozarella in my book!


Italian Risotto - Serves 4

1 tbspn oil
3-5 cups of chicken stock
1.5 cupc arborio rice
1 onion, diced
1 tspn crushed garlic
1 tbspn Gourmet Garden Italian Herbs
1/3 tspn chilli
100g thinly sliced / shaved mozarella
1/2 cup grated parmesan
1 tbspn butter
250g cherry tomatoes
1 x zucchini thinly sliced
150g baby spinach

Pre-heat oven to 200C. Place the cherry tomatoes and sliced zucchini on a baking tray. Season with salt and pepper and drizzle with olive oil. Place in the oven for 15-20 mins or until tomatoes are blistered and zucchini is cooked.

Meanwhile, cook your risotto by heating the oil in a fry pan over medium high heat. Add onion and cook for 3-5 mins. Add the garlic and cook for a further 2-3 mins.

Add the rice and stir to combine.

Add 1 cup of stock and cook until absorbed. Repeat with remaining 2-4 cups of stock. This should take around 15-20 mins. The rice should be tender, but still firm to bite. If the rice is not yet cooked, add another 1/2 - 3/4 cup of water and cook until absorbed.

Stir through the chilli, herbs, parmesan, butter, tomatoes, zucchini and spinach. Season with salt and pepper.

Top with shaved mozarella to serve.

And before I go I just wanted to share this recipe of the dinner we had at Mum and Dad's last week - steamed green beans, roasted smashed potatoes and curried vegetarian mince - pure winter comfort food at it's finest and you can bet I inhaled every bit of it!!


Enjoy!

Mrs B xx

Thursday, May 1, 2014

Yoghurt Panna Cotta with Raspberries and Honeycomb

So this week I handed over my giant folder of sweet recipes to Mr B and told him to pick something for dessert. The only issue with this is that whereas I flick through the folder going 'ooohh too complicated' or 'ooohhh to fattening,' Mr B flicks through it and goes 'ooohhh that looks delicious, I want that one' with no regard for the ingredients required or the steps involved.

I say this is an issue but it's also probably a good thing because it pushes me to try making things that I frequently skip over, like this Yoghurt Panna Cotta with Raspberries and Honeycomb. I have been terrified of this recipe for years, certain it could not possibly work out and wouldn't you know it, it actually turned out to be one of the easiest and most delicious desserts we have ever made! So now I've gone from being scared of this recipe to looking forward to trying it again next week using blueberry flavoured greek yoghurt!


Yoghurt Panna Cotta with Raspberries and Honeycomb - Serves 4

250ml full cream milk
400ml thickened cream
130g caster sugar
1 tspn vanilla essence
3/4 tbspn gelatine powder
300g thick greek style yoghurt (I used a vanilla-bean greek yoghurt)
125g fresh or frozen raspberries (if using frozen, allow them to come to room temperate before serving)
100g honeycomb, crushed - optional (I used a normal sized Crunchie bar for this)

In a medium saucepan over low heat, combine the milk, cream and sugar and heat until gently simmering. Do not allow it to come to the boil. Once the mixture is simmering, remove from the heat and add the vanilla.

Pour 2 tbspns boiling water into a small jug and gently sprinkle over the gelatine. Stir until gelatine is dissolved and then add immediately to the cream mixture. Stir to combine and then strain the mixture into a clean bowl. Allow to cool for 5-10 mins.

Stir the yoghurt through the cream mixture. Pour the mixture into four 1 cup ramekins and refrigerate for at least 4 hours or overnight until set.

To serve - Roughly smash the raspberries with the back of a fork or spoon. Spoon over the top of the panna cotta and sprinkle with crushed honeycomb if using.

Enjoy!

Mrs B xx

LinkWithin

Related Posts Plugin for WordPress, Blogger...