Friday, March 29, 2013

Happy Easter!!

Every Easter, rather than exchange eggs, Mum, Dad, Mr B and I get together for a Good Friday eggs-travaganza brunch. It still involves eggs, but it also involves copious amounts of Hot Cross Buns slathered in butter and some quality family time and it's one of those times in the year I really look forward too (and not just for the chocolate and Hot Cross Buns either!) 

This year we were lucky enough to be joined by my Nan too but judging from the photo below, I'm unsure of whether it's my Nan who's the bad influence on Mr B or the other way round........


This was our brunch, a mixture of chocolate, fruit and fruit-less Hot Cross Buns, some cheese, camembert, loads of butter, all the different varieties of mini easter eggs Mum could get her hands on, some lil caramel and vanilla creme filled chocolate covered sponge cakes and last but not least some super milky, super creamy coffee topped with a cute little cinnamon sugar star! 


Every year in the lead up to Easter I refrain from having any Hot Cross Buns and tend to only buy Mr B and I a bag (or 2!) of mini eggs to share because I look forward to our family Easter brunch and all the goodies that go with it! 

Obviously the next logical thing to do after lunch was head out onto the deck for a family photo shoot!


I love this photo of Mr B and I. 


And this one, three generations all together....Me, My Mum and My Nan


And the whole motley crew....


And somewhere in there I ran around like a lunatic with this statue of a bunny raving about having found the Easter Bunny....

I blame it on the coffee....

And these are the Hot Cross Buns Mr B and I made last weekend. I wasn't going to make any this year, but then I realised that I have made them every single Easter since Mr B and I met. Mr B takes them in his lunches in the lead up to Easter and then on Easter Sunday we always have some for lunch, it's our little tradition and it just didn't feel right to not make them


I hope you all have a lovely Easter filled with chocolate, bunnies, Hot Cross Buns and of course, family. 

Mrs B xx 

Tuesday, March 26, 2013

Peanut Butter and Banana Bread

Recently for my Dad's birthday, I borrowed a container off my Mum, filled it up with baked goodies, wrapped it up and gave it to him as a gift. 

Last week my Mum gave me the container back and later on that night when I realised it was actually her's to begin with, I sent her a txt message informing her of her error. 

The answer - We were giving it back so you could fill it up again! 

The cheek! 

They are lucky I love them and I thought that was a fabulous idea! 

So this weekend I got to baking. I had some peanut butter in the cupboard leftover from making this Peanut Butter and Jelly Slice and I had a hankering to pair it with banana bread. And that is exactly what I did! It smells incredible and the sneaky nibble I had (sorry Mum and Dad!) backed up my theory that it was amazing. To be honest, they nearly only got half a loaf.....but I know that I would have sat down and demolished it slathered in butter in one sitting and that would possibly scar Mr B for life so we just won't go there. 


Peanut Butter and Banana Bread

3 ripe bananas, mashed
1/2 cup crunchy peanut butter
2 eggs
1/2 cup caster sugar
1/4 cup brown sugar
1.5 cups plain flour
3/4 tspn baking soda
1/2 tspn ground cinnamon
1/2 tspn ground allspice
1/2 tspn salt
1 tspn vanilla essence
1 tbspn Cinnamon Sugar (optional)

Pre-heat oven to 180C and grease and line a 9x5inch loaf tin.

In the bowl of your electric mixer add the banana, peanut butter, caster sugar and brown sugar. Beat until combined.

Add the remaining ingredients, except for the cinnamon sugar. Beat well.

Pour the mixture into the loaf tin and smooth the surface with a spatula. Sprinkle the cinnamon sugar over the top.

Bake for 45-50 mins or until a skewer inserted comes out clean.

Remove from the oven and allow to rest for 20 mins before removing from the pan to a wire rack. Allow to cool completely....or cut yourself off a slice and enjoy it fresh out of the oven while it's still warm!

Enjoy!

Mrs B x

Sunday, March 24, 2013

Chicken, Lemon and Parmesan Burgers

It's 4:54pm on Sunday evening and after a full day in the kitchen (Ok so by the time I got out of bed it was a half day, but still....) I'm conked out on the couch exhausted. There is just no way I'm getting up any time soon to prepare dinner, which is OK because we only just had lunch....but I'm actually not that convinced I'll be moving from this spot anytime in the next 24 hours so Mr B may have to fend for himself tonight. 

On night's like these, it's great to have a stash of go-to meal ideas that are easy, delicious and most of the time you have all of the ingredients in your cupboard. Plus let's be honest, it's either these, a bowl of cereal or a packet of microwave pasta....I know which one I'd prefer! 

These burgers are packed full of flavour and unbelievably juicy and moist - you will find that your dragging yourself off the couch to go back for seconds in no time! 


Chicken, Lemon and Parmesan Burgers

You will need:

2 x chicken breast, cut into chunks
1 egg
2 tspn crushed garlic
1/2 cup breadcrumbs
1 tspn wet italian herbs (I used Gourmet Garden brand) or alternatively you could use 1 tbspn finely chopped fresh basil
Rind from 1 lemon, finely grated
1/3 cup parmesan cheese
1/4 cup plain flour
1 tbspn olive oil
4 x soft rolls
Lettuce, tomato and cheese

Place all ingredients, except flour, into a food processor. Process until all ingredients are combined. The chicken should be completely minced up with no big pieces remaining in your mixture.

Place the flour in a bowl or on a plate. Shape the chicken mixture into 8 patties and lightly dust with flour.

Place the floured patties on a plate and let them firm up in the fridge for 20-30 mins.

Heat the oil in a fry pan over medium heat. Cook the patties in batches for 7-10 mins before turning over. Cook until both sides are golden and patties are cooked through.

Serve in rolls with lettuce, tomato and cheese.

Enjoy!!

Mrs B xx

Thursday, March 21, 2013

Moroccan Lamb Cigars

Let me tell you what I'm doing right now.....

Mr B and I arrived home from work 2 hours ago and my first thought was 'hooray we are home early and it's a lovely night. Maybe we can sit outside under the pergola with a Baileys and just relax together.'

Fast forward to now and I'm hiding up in our bedroom with the laptop trying not to make any noise while Mr B sits in the lounge room at the other end of the house snoring his head off.

Isn't married life wonderful?!

That is what happens when you 'just sit down for a minute' apparently! But that's ok because in roughly half an hour I will get bored and start loudly closing drawers, doors and anything else that makes noise until he wakes up.....now I know that doesn't sound like I'm going to win any wife of the year awards but honestly, it's for his own good! He won't sleep tonight if he naps too long this afternoon and then he will be REALLY tired and cranky tomorrow....plus I want my Baileys.....

Anyway....y>ou may remember a little while ago I told you about our Moroccan Feast which involved Vegetarian Cigars with Harissa Yoghurt, Spicy Red Cous Cous and Carrots with Minted Fetta? Well seeing as it was such a hit, I thought I would make it again, but this time with Lamb Cigars for Mr B and some salad instead of the cous cous to lighten it up a little.


Moroccan Lamb Cigars with Harissa Yoghurt

1 onion, finely diced
1 tbspn olive oil
1.5 tspn crushed garlic
500g lamb mince
1 tspn cumin
1 tspn cinnamon
1 tspn ginger
1 tspn finely grated lemon rind
1 tbspn lemon juice
10 sheets fillo pastry
1 tbspn butter (melted)
200g greek yoghurt
1 tspn harissa paste
1 tspn lemon juice

In a large frying pan over medium heat, add 1 tbspn olive oil. onion and garlic. Cook for 2-3 mins or until onion softens.

Add the lamb, cumin, cinnamon and ginger. Cook, sitrring frequently, until mince is browned.

Stir in the lemon rind and juice and season to taste. Remove from the heat and allow to cool. 

To put the cigars together, take two sheets of fillo and place them on your work bench with one of the long edges facing you. Cut the fillo vertically into 3 sections. Place 1 heaped tbspn of the lamb mixture along the short end of each rectangle. Roll the pastry over the filling and then fold in the sides and continue to roll up to form a cigar shape. Place cigars seam side down on a baking tray. Repeat to make a total of 15-18 cigars.

Brush the cigars with melted butter and bake at 180C for 20 mins or until lightly browned.

To make the Harissa Yoghurt simply combine the yoghurt, harissa paste and lemon juice in a bowl. Serve drizzled over the cigars or on the side for dipping.


Enjoy!

Mrs B xx

Wednesday, March 20, 2013

Baileys Irish Cream Cheesecake

Earlier in the week I told you about the Baileys Irish Cream Cheesecake I made Mr B for St Patrick's Day and I think it's about time I shared it with you!

Mr B and I both love Baileys soeven though we only buy ourselves a bottle as a treat maybe once a year, it has still managed to feature in some of the major moments of our life.....

....like the night Mr B and I got engaged and we sat drinking a glass of Baileys to celebrate,

.....or the night we moved into our first home together and I put a bottle of Baileys on the kitchen bench and said I don't care how much you drink but we are not going to bed until everything is unpacked!

.....or last year when we were in Ireland on our honeymoon and one afternoon whilst relaxing in a little Irish Pub I sent Mr B to the bar to get me a Baileys and milk....the whole bar went silent and the bar man leaned over and quietly asked if it was some sort of weird Australian hangover cure.....


And now we can add 'making a super awesome and delicious cheesecake' to that list.

The rich Baileys cheesecake filling paired with the Baileys whipped cream and the dark chocolate ganache is a sure fire hit in our book - so much so that when I took my Dad his regular care package of baked goodies last night, there was no way Mr B was letting a slice of this walk out the door with them. Needless to say I spent all night talking about, and flashing photos of, this cheesecake that was sitting at home in our fridge and Dad was none to pleased to discover he had missed out!


Baileys Cheesecake - easily serve 8-10. (Updated November 2013)

To make the base and the filling you will need:
1 x 250g pkt of plain sweet biscuits
75g butter, melted
500g cream cheese, softened
3/4 cup caster sugar
3 tspn gelatin, dissolved in 1/4 cup hot water
1/4 cup Baileys Irish Cream
1 cup thickened cream

Place biscuits in a food processor and process until they are down to fine crumbs.

Add the melted butter and mix well. Press the mixture into the base of a lined 24cm springform pan and place in the fridge.

Whip the cream and set aside.

Using an electric mixer, combine the cream cheese and sugar until smooth. Add the Baileys and gelatin and beat until combined. Gently fold through the whipped cream.

Pour the filling into the prepared crust and refrigerate for 3-4 hours or until set.

To make the whipped cream topping you will need:
1 cup thickened cream
1 tbspn Baileys Irish Cream

Beat the cream until it's nice and thick. Add the Baileys and beat until just combined.

Spread the whipped cream over the cheesecake filling and place back in the fridge for 30 mins.

To make the dark chocolate ganache you will need:
100g dark chocolate melts
2 tbspns thickened cream

Place the chocolate and cream in a microwave safe jug and place in the microwave for 40 seconds on high. Stir until smooth.

Set aside to cool for 5-10 mins until the ganache thickens slightly. Use a spoon to drizzle over the top of the whipped cream.

Place in the fridge until ready to serve.

VARIATION - I have made this cheesecake using Oreo's for the base and adding a dash of vanilla to the filling. I also gave the whipped cream topping and ganache a miss and dusted it with a little bit of cocoa instead and it was fabulous!


And here are some cupcakes I whipped up for Mr B for Easter - I was aiming for little Easter baskets and even though I was a bit rushed in doing them, but basically I just made some vanilla cupcakes, spread a thin layer of vanilla frosting on top, piped a ring of frosting around the edges and then filled the ring with jelly beans! How easy is that and I think they are really sweet and really effective!


Enjoy!!

Mrs B xx

Monday, March 18, 2013

Ginger and Lime Corned Beef with Colcannon


Mr B and I returned home from our weekend away yesterday afternoon and my bags hadn't even hit the ground before I was elbow deep in flour, sugar and cream cheese - just the way I like it. Before I knew it we had a kitchen full of goodies including Easter Basket Cupcakes and Baileys Cheesecake (which I will tell you all about later in the week!).

Given that it was  St Patrick's Day, we indulged in some Ginger and Lime Corned Beef with Colcannon (and copious amounts of Baileys.....) and whilst it may not have been pretty, it was delicious.

To make this Ginger and Lime Corned Beef (Serves 4) you will need:

1.5kg of  Corned Beef
10-12 peppercorns
4 litres of ginger ale
2 tbspns crushed ginger
1 lime, quartered
1 tbspn crushed garlic
1-2 tspns crushed chilli

Place the corned beef in a large saucepan and cover with ginger ale. Add the remaining ingredients.

Bring to the boil and then reduce to a simmer for 1.5 hours.

When the Corned Beef has around 1/2 hour to go, get started on your Colcannon.

5 pieces of shortcut bacon
1/2 cup finely diced spring onions
1/2 savoy cabbage, diced
4 large potatoes, peeled and quartered
50g butter plus 40g extra
2 tbspns milk

Place the potatoes in a pot and cover with water. Bring to the boil. Drain and set aside.

In a fry pan over medium heat, cook the bacon, cabbage and 1/2 of the spring onions for 7-10 mins or until cabbage is softened and bacon is cooked. Season with salt and pepper.

Add the milk and butter to the potatoes and mash well.

Stir through the cabbage and bacon mixture.

To serve the Colcannon, make a well in the centre and add the extra butter. Top with the remaining spring onion.

Remove the Corned Beef from the pot, slice and serve with English Mustard.

Enjoy with a tall glass of icy cold Baileys!

Mrs B xx

Thursday, March 14, 2013

Cinnamon Roll Rice Krispie Treats

Just stopping by for a quick post today because I'm off out to dinner tonight and then tomorrow Mr B and I are finally heading away on a belated Valentines Day road trip! We were supposed to go on Valentines Day (obviously....) but due to the bushfires around home we had to postpone. Nevermind though because it's finally here and tomorrow we are heading off to the north of the state for a few days to do all sorts of exciting things like sampling some whiskey at Hellyers Road Distillery, camping, visiting a planetarium, museum and science works, staying in a swanky hotel that we fell in love with on our mini-moon and just generally hanging out and relaxing, I can't wait!

But before we disappear off into the sunset (...or sunrise given the time Mr B tells me we have to be on the road tomorrow morning!) let me tell you about these Cinnamon Roll Rice Krispie Treats I made for Mr B a few weeks ago, I was keen to try something different and have been toying with this idea in my head for awhile now. Thankfully Mr B loved them, he said they taste just like a cinnamon roll (obviously in rice krispie form) but without me having to deal with all that annoying yeast and dough and kneading! 


Cinnamon Roll Rice Krispie Treats

You will need

For the bars
60g butter
200g marshmallows
4 cups rice bubbles or rice krispies
1 heaped tspn cinnamon

For the topping
60g softened butter
1 heaped tbspn brown sugar
1 tspn cinnamon

For the glaze
1/4 cup icing sugar
1/2 tspn vanilla essence
1 tspn milk

Add the butter and marshmallows to a large microwave safe bowl. Heat in 40 second bursts, stirring inbetween, until melted and combined.

Mix through the rice bubbles and cinnamon.

Grease and line a small slice tin.

Press mixture into the tin - if you have trouble with the mix sticking to your spoon or whatever your using to press it down, try running the spoon under hot water first. Leave in the fridge for an hour before applying the topping and glaze.

To make the topping, combine the butter, brown sugar and cinnamon and spread over the top of your rice krispie bars. Try the mixture and change it up to suit your preference, add more cinnamon if you want to.

To make the glaze, combine the icing sugar, vanilla essence and milk until you have a smooth consistency. Use a spoon to drizzle over the top of your rice krispie bars and place in the fridge for 3-4 hours or overnight to set.

Remove from the tin, slice and enjoy!!

Mrs B xx

Sunday, March 10, 2013

Home Made Halloumi


Mr B and I have decided to retire and become cheese makers.

Ok maybe not like full on cheese makers, maybe just Cheddar, Colby, Paneer and Halloumi cheese makers.

Ok maybe not like cheese makers that sell their cheese.....maybe just cheese makers that make and then eat lots of cheese.

Do you think someone would pay us for that?

You see a few weeks ago, we made our first batch of Halloumi Cheese and we were so impressed that today I was up early making a big double batch so we had enough to share with friends and family and of course, some for us! To start with I was abit unsure about the whole Halloumi making thing because I mean even though we have made some awesome cheeses, I couldn't for the life of me comprehend that we would be able to pull off a beautiful salty, squeaky Halloumi, but you never know if you don't try right?!

So try we did. I spent an afternoon making the Halloumi and that night Mr B dutifully BBQ'd it....we both sat down at the dinner table, excited and nervous and silent. We dug in. I was nearly too scared to chew but then I heard Mr B squeaking away and saw the grin on his face, we had somehow pulled it off! You have never seen two people so excited about some squeaky cheese I tell you. It tasted like the real deal and it had come out of our kitchen and all for the cost of a 2ltr carton of milk.....not bad hey!

You can most certainly do this yourself - just pop into your local home brew show and they should have some rennet and calcium chloride or I think you can buy them online pretty easily too. Plus don't forget you will get a nice sized portion of ricotta out of the leftover whey too!

Home Made Halloumi Cheese - Yield approx 300g

2 litres of unhomogenised full cream milk
1/2 tablet rennet dissolved in 2 tbspns cold water
1 ml calcium chloride

In a large saucepan, heat the milk over medium heat to 45C.

Add the rennet and calcium chloride and stir well. Turn the hot plate off, but leave the saucepan sitting there for around 45 mins or until a firm curd has formed.

Once the curd is formed, cut the curds vertically and horizontally into roughly 1 inch squares.

Heat the saucepan to 35C, stirring the curds gently with a slotted spoon for 10 mins.

Line a colander with butter muslin and place it over a large bowl. Scoop the curds out of the saucepan and into the lined colander. Cover the top of the cheese with muslin and place a weight such as a large bowl of water on the top. Leave to drain for 60 mins, flipping over half way through.

Meanwhile, use all that whey to make some ricotta!

Ok, back to the halloumi now.....once it has finished draining, remove the halloumi from the muslin and slice into your desired shape / size.

Bring a large saucepan of water to the boil on the stovetop. Gently place the halloumi into the saucepan and gently stir occasionally.

Once the halloumi rises to the surface it is done - remove it to a rack using a slotted spoon and sprinkle both sides with cheese salt.

Now all that's left to do is throw it on the BBQ, fry it up and enjoy!!


Mrs B xx

Wednesday, March 6, 2013

The Not So Mythical Lemon Cheesecake


As long as I have known Mr B he has been obsessed with my Mum's lemon cheesecake.

Not bad seeing as he had never tried it.

I'm not sure how it came up in conversation, but one night Mum mentioned her Famous Lemon Cheesecake and I have to say it was met with lots of puzzled looks around the table. I'm now 27 and I don't remember ever trying it.....Dad has a vague memory of it.....but for Mum it's still there at the forefront of her mind, she included it in a book she made for me of all of her favourite and most popular recipes and even still knows the recipe off by heart!

Needless to say, over the years Mum has copped a lot of flack about the 'mythical' cheesecake. Mr B is not one to let up on anything....especially when it comes to cheesecake.

So last night when we went to Mum and Dad's for tea....our very first dinner cooked in their brand new kitchen...and after a little bit more furniture moving and a delicious frittata made in Mum's brand new oven-proof fry pan...Mum presented Mr B with her homemade (and non-mythical) lemon cheesecake! Mr B is actually lucky he didn't end up wearing it because Mum banned him from looking in the fridge all night, to the point where Dad stood guard in front of it to stop any sneaky looks, not that it stopped him from trying...or from stirring Mum up about what was actually in there.

I love this series of photos, look how excited Mr B is and how proud my Mum is....


All that was left to do now was top it the cheesecake with whipped cream and a light sprinkling of nutmeg and dig in!


Is there anything better than a big slice of cheesecake with a gorgeous buttery biscuit base, light as air filling and fluffy whipped cream?? Oh that's right there is....sharing it with your nearest and dearest. And I think it was the perfect way to christen Mum and Dad's new kitchen.


Here is a sneak peek at the kitchen in Mum and Dad's new house (and my Mum pottering around in it!).....isn't it amazing? It's so bright and there's so much space to move around and don't even get me started on the storage space. I just love it.


Now back to the Famous Lemon Cheesecake

You will need:

375g plain sweet biscuits
115g butter
1 tspn mixed spice
225g cream cheese
1/2 cup caster sugar
1 pkt of lemon jelly crystals
1 cup boiling water
Juice and ring of 2 lemons
1 tin (375ml) of Carnation evaporated milk
Whipped cream and nutmeg to serve

Place the biscuits in the bowl of a food processor and process until fine crumbs.

Add the butter and mix spice. Process to combine.

Lightly grease a round 25cm diameter springform tin with butter. Press the biscuit mixture firmly into the base and up the sides of the tin. Try and get as close to the top as you can around the sides. Place in the fridge to chill.

In the bowl of an electric mixer combine the cream cheese and sugar. Beat well.

Meanwhile, combine the jelly crystals and boiling water with the lemon juice and lemon rind. Set aside to cool.

In a clean bowl, beat the evaporated milk until stiff.

Gently fold the evaporated milk into the cream cheese mixture.

Add the jelly mixture to the cream cheese mixture and beat on low speed until all ingredients are combined and mixture is smooth.

Pour the filling into the prepared biscuit case. Place in the fridge for at least 3-4 hours to set.

Serve topped with freshly whipped cream and a sprinkling of nutmeg.

Enjoy!

Mrs B xx

Monday, March 4, 2013

An Egg-ceptionally Easy Dinner!


Yesterday I had a lovely date planned for Mr B and I, but all sorts of things happened including a bed that was far too comfortable and a wasp attack....honestly the universe is against me having any sort of romantic life what so ever. Regardless of Mr B's finger looking like it might have actually been bitten by some sort of radio-active wasp and me having a panic attack about him having some sort of allergic reaction, we soldiered on and decided to head up to the top of Mt Wellington seeing as it was such a beautiful day. The view from the top on such a clear day was incredible and it was nice to be up there on a warm and sunny day instead of a cold and snowy one for a change!

We spent a couple of hours doing various walks over and around the top of the mountain and made plans to go back and do some of the longer ones another day when we are, both, free of potential allergic reactions and fully stocked with ample food and drink supplies.

By the time we got home we were buggered. Tired and hungry an easy tea was in order and it doesn't get much easier then omelettes!


Mr B and I are absolutely in love with this omelette recipe, it's quick and simple and the end result is not only hanging off the plate but it's soft, creamy, cheesy and delicious. Plus in our house you know a recipe is good when Mr B requests to have it instead of his weekly steak!

For this super easy (and rather large) omelette, you will need:

2 eggs
1 tbspn milk
2 tbspn finely diced chives
1/3 cup grated cheese
Fillings (ham, mushroom, tomato etc)
Butter

Whisk the eggs, milk and herbs until combined. Season with salt and pepper.

In a large fry pan over medium heat, melt 1 tspn of butter and swirl over the base of the pan.

Pour the egg mixture into the pan. Using a large spatula or egg flip, occasionally lift the edges allowing the uncooked egg to flow underneath. Cook for 2-3 mins or until the underside is set, but the top side is still soft and creamy.

Sprinkle one half of the omelette with grated cheese and desired fillings. Fold omelette in half to enclose filling. Gently slide onto a plate and serve with salad.

Enjoy!

Mrs B xx

Friday, March 1, 2013

Happy Birthday Dad!

Yesterday was my Dad's birthday and as with all birthdays in our family this meant work was replaced with a day of celebrating and I mean really, who is going to argue with that?

As you know, Mum and Dad have been living on site in a caravan whilst their dream home is being built and last Thursday, just in the nick of time, they finally got the keys to their new home! It has been a long and tiring and stressful process, especially the last few weeks, but I think the first morning they woke up in their new home after a good night's sleep in their own bed, it made the whole thing worthwhile. Mr B and I have been so proud of the way they have dealt with the trials and tribulations they have endured and so happy that they have finally reached the light at the end of the tunnel - plus it meant that we could celebrate Dad's birthday in their brand new home!


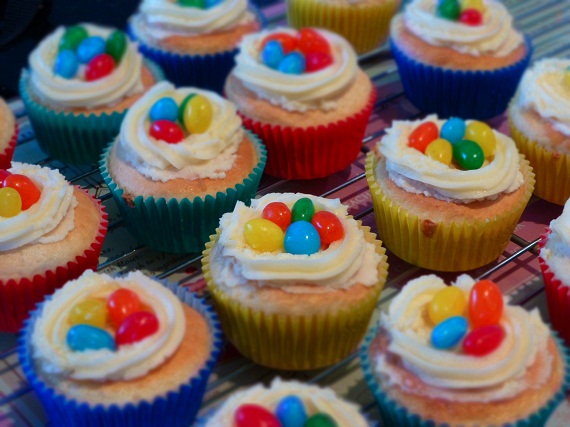
Starting the day in style, we enjoyed a fruit platter, orange juice, coffee, yoghurt and a mandatory birthday cupcake out on the new deck overlooking the Derwent River. It was a beautiful morning for it and just a gorgeous spot to sit outside and have breakfast - if it were my home I would definitely be eating every meal possible out there....and probably sitting out there reading a book or enjoying a drink or hell, just taking in the view in the in between times!


For our next trick, we all climbed on the bikes and hit the road. It was a slightly overcast day, but it made for a fantastic ride up the coast to Bicheno and the Bicheno Motorcycle Museum. Bicheno is roughly a 2.5hr ride from home and it's rare that we all have the time to get out and go for a nice long ride but when we do, we make the most of it! The Bicheno Motorcycle Museum has been on Dad's must-see list for quite some time now and what better time to cross something off than your birthday! The Museum was really interesting and full of lots of old classic motorcycles. Fuel tanks empty, both ours and the bikes, we headed up the road and after filling the bikes up, we stopped at the Bicheno Pub to fill the bellies up! A delicious warm pub loaf, some bad boy fries, a plate of scallops and some fish cakes later, Mum and I were calling best meal of the day on these Sweet Potato and Zucchini Fritters / Fries, crunchy, tasty and just what the doctor ordered.


Bellies and fuel tanks full, it was back on the road and ready for the ride home, fingers and toes all crossed that the ominous black clouds down the highway would pass by the time we got there! Luckily enough they pretty much did, we hit a few really cold patches and a little bit of drizzle, but nothing too bad. Once we got home, and into some warm dry clothes, it was time for presents!! And a group shot....this was the second attempt....Mr B couldn't figure out which button to push for the timer and when he did....well he pushed the wrong one.


Third time lucky!! What a team!


And finally it was time for the cake! Except it wasn't a cake....it was a tart, an Iced Vo-Vo Tart to be precise! Not long ago, Dad made it very clear that his beloved Iced Vo-Vo's were a heck of alot smaller than they used to be and as fate would have it, that very week, Good Taste Magazine featured an article on how to turn these cute little biscuits into a tart! Somehow, in the few days before Dad's birthday and in the midst of moving and un-packing, Mum remembered this little gem of information and voilà  we had our birthday cake!

Iced Vo-Vo Tart

For the base you will need:

150g Arnott's Iced VoVo Biscuits
200g plain sweet biscuits
160g butter, melted

For the marshmallow filling you will need:

150g marshmallows
1 tbspn milk
200ml thickened cream
1 tspn vanilla paste

For the raspberry jelly you will need:

4 tspns gelatine powder
2 cups fozen raspberries
2/3 cup water
2 tbspn caster sugar

For the topping you have two options....

I used 1 cup of vanilla buttercream tinted pink with 2-3 drops of pink food colouring and sprinkled with 1 tbspn dessicated coconut. I use the Australian WW recipe for buttercream and it's the nicest and easiest to work with I have ever tried!

BUT you can also use 1 cup of whipped thickened cream tinted pink with 2-3 drops of pink food colouring and sprinkled with 1 tbspn dessicated coconut.

To put it all together....

Spray a square fluted tart tin, with removable base, with oil.

In a food processor, process the biscuits until they become fine crumbs. Add the butter and process to combine. Use a glass to spread and press mixture firmly over base and sides of prepared tin. Place in the fridge for 1 hour.


To make the marshmallow filling, combine the marshmallows and milk in a microwave safe bowl and heat on high for 60 seconds. Remove from the microwave and stir mixture until smooth. Set aside for about 6 minutes to cool. It's really important that you do this or it will split in the next step. 

Use an electric mixer to beat the cream and vanilla bean paste in a bowl until firm peaks form. Gently fold half the cream mixture into the marshmallow. Fold in the remaining cream until combined. Spoon over the biscuit base and smooth the surface. Place in the fridge for 2 hours or until firm.


To make the raspberry jelly place the raspberries, water and sugar in a saucepan over medium-low heat for 1 minute or until the sugar dissolves. Bring the mixture to a simmer. Cook, stirring occasionally, for 2-3 minutes or until the raspberries soften. Add the gelatin to the raspberry mixture and stir until it dissolves. Strain the mixture through a sieve into a bowl. Discard the seeds. Set aside for 25 minutes to cool. Carefully pour the jelly over marshmallow. It's best to do this whilst the tart is still in the fridge if you can, or you put yourself in the akward situation of having to try and carry a very full tart tin to the fridge without leaving a trail of jelly behind you! Leave in the fridge for 2 hours to set.


To make the buttercream topping, beat 100g softened (but not melted) butter until it's pale and creamy using the electric mixer. Add 1 cup of icing sugar, 1 tbspn of milk and a dash of vanilla essence. Beat until smooth and fluffy. 

Spread half of the mixture along one edge of the tart. Spread the other half of the mixture along the opposite side of the tart, leaving a thick strip of the jelly visible in the centre. Sprinkle with dessicated coconut. 

This tart is best left in the fridge until you're ready to serve it, but you can definitely make it in advance....I made the base and the marshmallow filling on the Sunday, the jelly on the Monday, the frosting for the top on the Tuesday and when we served it on the Wednesday it was absolutely delicious! 


I'm not going to say that this tart didn't give me it's fair share of grief....I had raspberries dripping from every corner of the microwave after they blew up, I split at least 4 cartons of cream for various reasons....I even burst into tears at one point, but the look on my Dad's face and the end result was worth it all and so much more. 

Happy Birthday Dad!!

Mrs B xx 

LinkWithin

Related Posts Plugin for WordPress, Blogger...